How To Make a Monster Cake
This post may contain affiliate links. Please read our Disclosure Policy.
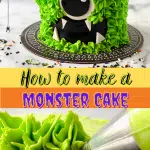
If you are planning a monster party or love to host Halloween parties you have got to see this. I’m showing you how to make a Monster Cake in this step-by-step tutorial. You’ll love how the Halloween Monster Cake blows your guests away!
You’ll find this cake is so much easier than it looks. Follow my step-by-step instructions to make this super cute monster cake any time you need a special monster-themed treat for your kids, family, or friends.

Equipment You’ll Need
These supplies can be purchased from your local craft store in the cake decorating section or ordered from Amazon.
- Two 8 inch round cake pans or Four 6-inch round cake pans
- Decorative cake board.
- 1M or 2D decorating tip.
- 1 oz black fondant.
- 1 oz white fondant.
- 3-inch circle cutter.
- 2-inch circle cutter.
- Craft knife or sharp paring knife. You can find a craft knife at any supermarket or hardware store.
- 16-inch piping bags.
- Parchment Paper. Used between layers while freezing them.
- Clear Vanilla Extract will keep your cake white while adding vanilla flavor.

Ingredients for the Monster Cake
Ingredients for the Green Layers of the Monster Cake Recipe
- White Cake Mix.
- Eggs.
- Vegetable Oil.
- Water.
- Clear Vanilla. Clear prevents the vanilla from affecting the color of the cake.
- Electric Green Americolor Gel Food Coloring. This is what we used in the images you see. You can choose the color of your monster!
Ingredients for the Black Layers of the Halloween Monster Cake
- Chocolate Cake Mix.
- Eggs.
- Vegetable Oil.
- Water.
- Vanilla. It’s not as essential to use clear for this cake color. You might prefer to save the clear vanilla for white cakes and just use regular vanilla for this.
- Black Gel Color.
- Halloween Sprinkle Mix.
In addition to these ingredients, you’ll also need buttercream frosting or you can purchase decorator icing. You’ll find the recipe for my favorite buttercream frosting at the end of this post.

How to Make a Monster Cake Step-By-Step
Baking The Cakes
- Before you begin, preheat the oven to 350º so that it’s ready to go. Your cakes will bake more evenly.
- Spray (4)6-inch pans with non-stick baking spray. This is the baking spray that includes flour.
- Make your white cake mix according to package instructions adding clear vanilla at the end.
- Add in 2-3 drops of electric green gel food coloring as you mix the cake.
- Pour this evenly into two pans.
- Make the chocolate cake mix according to instructions, adding vanilla and at the end.
- Add 4-5 drops of black gel food coloring as you mix the cake. Pour this cake mix into the remaining two pans.
- Bake all four pans for 30-40 mins, until a skewer or dinner knife comes out clean.
- Allow the cakes to cool in the pans for one hour.
- If the cakes are poofy you may need to level the cakes.
- Freeze these for a minimum of 2-3 hours before you decorate the cake. Separate the layers with parchment paper or spread each layer out on a baking sheet lined with parchment paper before placing the cake layers in the freezer.

Frosting the Cakes
- Add a small amount of frosting to your cake board.
- Place down your first cake layer and add a generous amount of icing.
- Repeat this process for all layers (alternating the colors of cake).
- Once all layers have been stacked and filled with buttercream, do a crumb coat around the outside of the cake and chill for 15 mins.

Working with Fondant
- During this time, gather your fondant, cornstarch or powdered sugar, circle cutters and small rolling pin.
- Lightly brush work area with cornstarch or powdered sugar and work a small amount of white fondant between your fingers (this will resemble working with play dough).
- Once the fondant is soft, roll it out to 1/8 inch thickness and cut out the first 3 inch circle.
- Lift the excess fondant (not the circle) and place into a plastic bag (so it won’t dry out).
- Next do the same process for the black fondant with the 2 inch circle.
- Do another black circle with a 1 inch cutter and finally a small piece of white fondant for the tiny reflection dot.
- Using a damp paper towel to make the fondant tacky (not wet) adhere each circle to the other creating the eye.
- For the mouth, roll out black fondant into a log.
- Slightly curve it and then roll it with the rolling pin making the shape of the mouth.
- Roll out white fondant with a rolling pin. Use a craft knife to cut the small triangle teeth out.
- Adhere to the mouth with a damp paper towel, careful not to use too much water, it will stain the white fondant.
- Fit the eye and mouth on the cake.
Want to save this recipe?
I'd like to receive more tips and recipes from Hostess At Heart!

Creating Fur on the Monster
- Fill a piping bag fitted with a 1M (or 2D) piping tip.
- Fill the bag half way with desired colored frosting.
- Holding the bag at a 45 degree angle squeeze out frosting.
- Release pressure and then pull away. Remember this phrase: Squeeze, stop squeezing, pull away.
- Add the “fur” around the face of the monster.
- Pipe stars (fur) all the way around the cake.
- The frosting will “crust” over as it dries causing it to hold its shape.

Tips and Tricks for the Coolest Halloween Monster Cake Ever!
While our instructions call for using two cake mixes, you could make this cake by splitting a single cake mix in half. Use 8-inch round pans if you are making one cake mix. Use 6-inch round pans if you are making two cake mixes.
A white cake mix will make a brighter green. If you use a vanilla cake mix or yellow cake mix it will change the green color accordingly and may even become blue.
Chocolate cake is the easiest to dye black. If you want to use all vanilla: dye it chocolate brown first. Then add black dye. It won’t be as dark but that’s the only way it works. Do not add black dye directly to vanilla. It will turn grey.
It’s important to get your decorator icing to the correct consistency for piping. If it’s too runny and won’t hold its shape, add more powdered sugar. If it’s too thick to squeeze through a piping bag, drizzle in additional cream (or milk) 1 teaspoon at a time.
Your hands may gradually warm up the frosting so that it won’t hold its shape and will start separating. If this happens, you can put the bag or bowl into the refrigerator for a bit. Keep it covered in a bowl with a damp paper towel or a lid to keep it from drying out.
It’s important to note that too much water will dissolve your fondant. You can lightly brush it to remove the cornstarch with a mix of sugar and water or what I do is use vodka and a small painting brush.

Storing Leftover Cake
Monster Cake can be kept at room temperature for a couple of days and then needs refrigerated. If it is being kept at room temperature, do not use an airtight container, or the frosting will get weepy and spoil faster. The sugary crust that develops when the frosting is exposed to air protects it from spoiling. If it is refrigerated, you will need an airtight container to keep the cake from absorbing odors from the fridge.
Similar Recipes
Mummy Pretzels. A fun salty-sweet snack perfect for any monster party.
Monster Cupcakes. Adorable cupcakes perfect for serving to a crowd.
Monster Rice Krispie Treats – Everyone loves a cute monster. These monsters are perfect for your little monsters.
Halloween Cakes, Cupcakes, and Cake Pops – A ton of amazing Halloween-inspired recipes.
Love trying new things? You may enjoy our “How To” articles!


Monster Cupcake Frosting
Equipment
Ingredients
- 1 lb powdered sugar
- 1 cup unsalted butter (2 sticks)
- 1/4 cup heavy cream
- 1 tsp vanilla extract
Instructions
- Cream butter until it is light and smooth.
- Add in all of the powdered sugar and mix on low.
- Slowly drizzle in the heavy cream about 1 tablespoon at a time.
- Mix on high to beat air into the buttercream making it fluffy
- If you're making more than one color, separate enough frosting into separate containers. Add the colors to the frosting and beat until combined. Frosting should be smooth and fluffly.
- Cover any frosting left in the container with a damp paper towel until you're ready to use it. That will keep it from developing a crust.
Notes
Nutritional Disclaimer
This recipe was calculated using the exact brands and measurements I used to make this recipe. If you are following a strict diet please note changing anything will cause the nutritional info to change. My calculations are intended as a guide only.


He’s sooooooo cute! This is my kind of easy decorating. I’m doing a Halloween-themed dessert each weekend and can’t wait to make this little guy!
How fun! Thank you.
How fun is this monster cake! All the tips allowed me to do it! Going to make it again for Halloween for the kiddos coming!
That’s awesome, Nikki!
This cake is so cute!! I was intimidated to make it – but I followed your instructions step by step and I pulled it off!! I am so happy that I found this recipe! I will be making it again in a couple of weeks now that I know it was a success! Thank you!!
I’m so glad you enjoyed it, Michaela! It’s easy once you’ve done it once or twice.
Wow, this is adorable! I have wanted to try my hand at using fondant. You’ve inspired me to give this a try for our neighborhood halloween party.
Thank you! It’s a party monster for sure.
Julie, this cake is adorable, who wouldn’t want to dig in! Your steps are clear and easy to follow, making for party this month!
Thank you! It’s not that hard and tons of fun!
This is super cute! I love frosting that tastes delicious and holds it shape so you can make cute little monsters like this!
Thank you! It’s tons of fun to make this monster.
This is going to be a fun day for my kids and I when we try this. It’s really cute and they’ll love it too.
I love that you’ll get the kiddos involved. It’s a lot of fun.
This is so adorable. I am going to make this for our annual Halloween get together. Everyone is going to love this!!
Thank you, Beth! I’m sure it will be a hit!
What a fun Halloween dessert! My kids and I want to try making this together. I just love that big eye ball, makes me smile!
Thank you, Jen! This isn’t a scary monster lol!
This is fun! Perfect for a birthday party or upcoming holiday. Thank you for sharing!
Thank you, Teodora! I think it’s so much fun too!
This is the most adorable Halloween cake I’ve ever seen! It will be perfect for a small Halloween party with friends, thank you!
Thank you, Jess! It was fun to make.