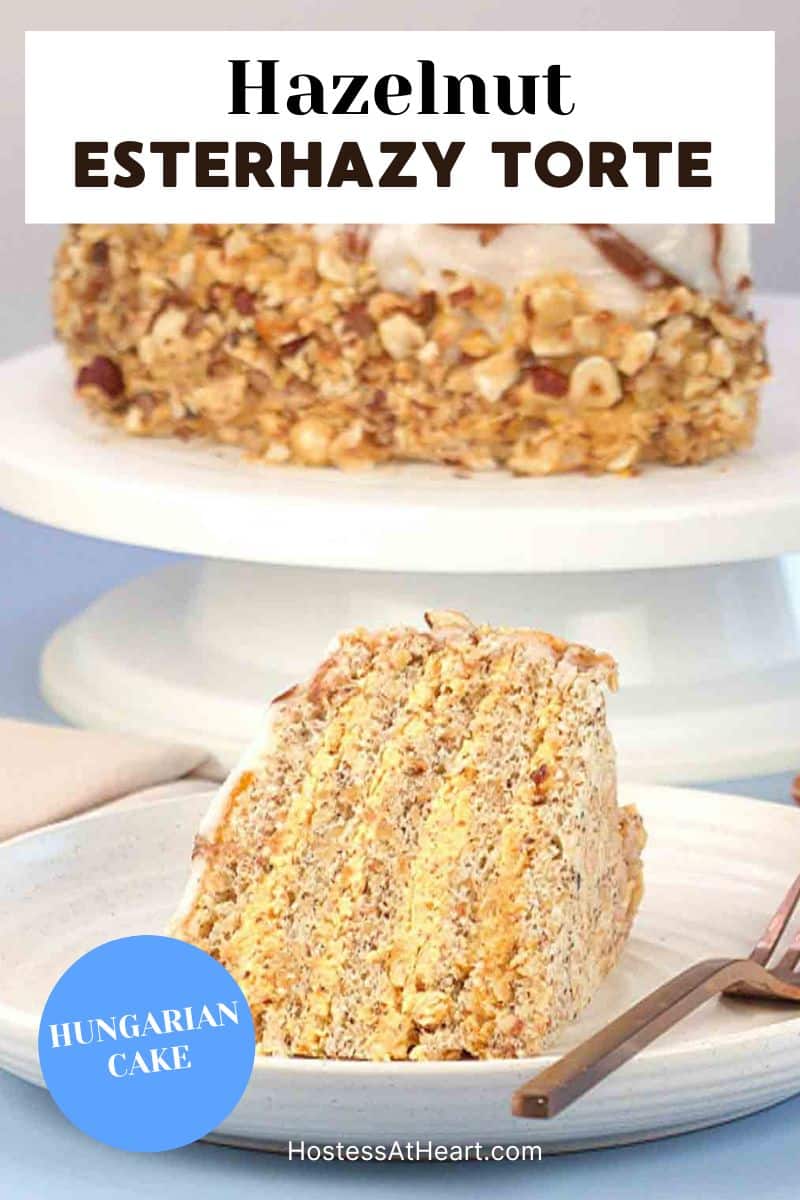
Esterhazy Torte: The Stunning Hungarian Dream Cake
This post may contain affiliate links. Please read our Disclosure Policy.

Prep Time: 45 minutes | Cook Time: 1 hour | Chill Time: 24 hours | Total Time: ~26 hours Servings: 12
An Esterhazy Torte is one of those stunning desserts that makes everyone at your table go completely silent before the compliments start flying. That’s exactly what happened the first time I served this Esterhazy cake.
I was new to European-style baking and decided to dive in headfirst — and I haven’t looked back since. This gorgeous hazelnut layer cake is a showpiece that tastes every bit as good as it looks, and I can’t wait to share every tip I learned along the way.
What Is an Esterhazy Torte?
The Esterhazy Torte (also known as Esterhazy cake) is a classic Central European dessert that originated in 19th-century Hungary. It was named after Prince Paul III Anton Esterházy de Galántha, a member of the wealthy Hungarian Esterházy noble family. The cake became famous in the coffeehouses of Vienna and Budapest and is still considered one of the most iconic cakes in Hungarian and Austrian baking tradition.
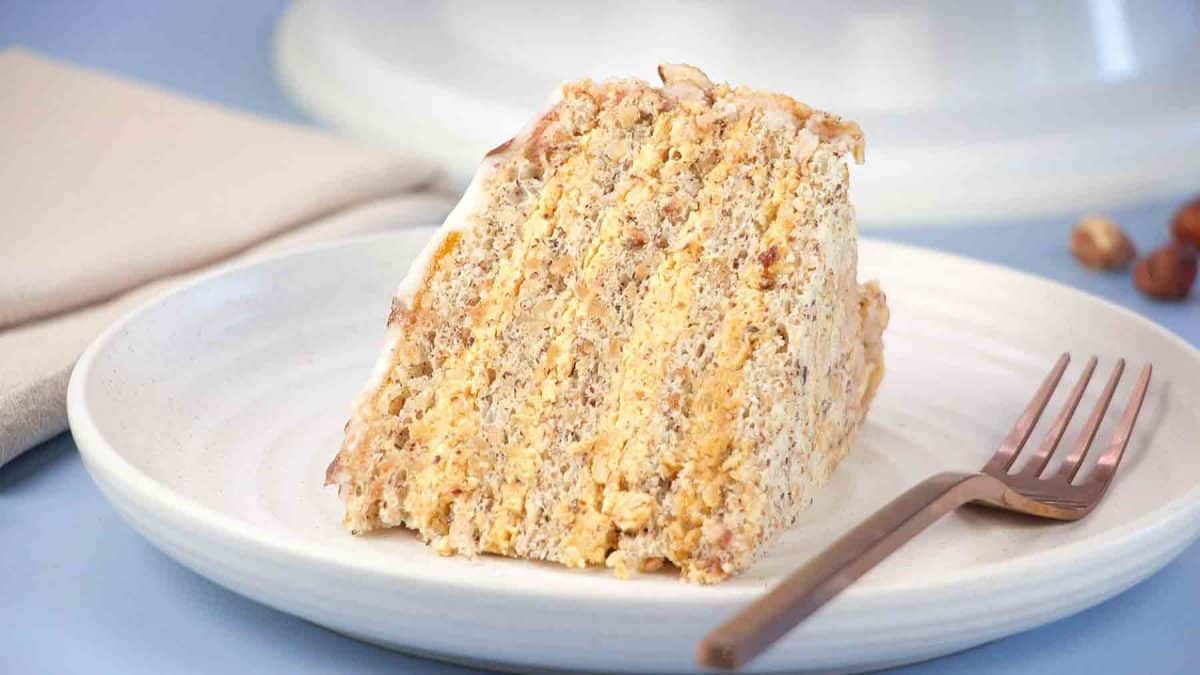
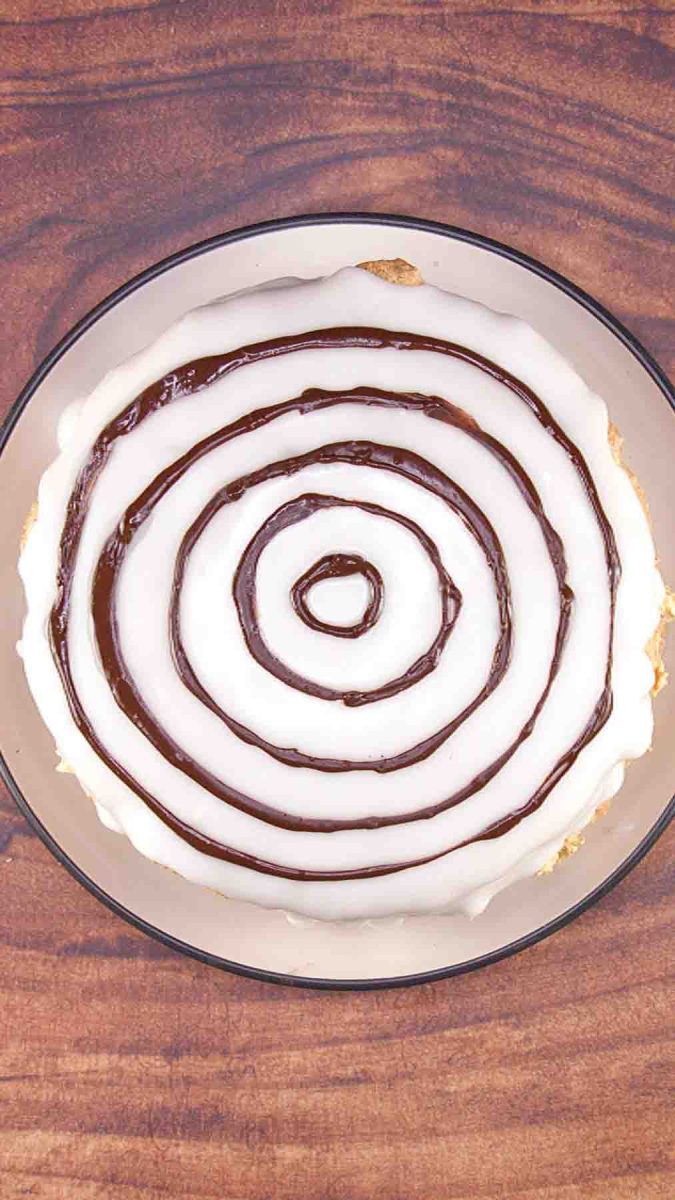
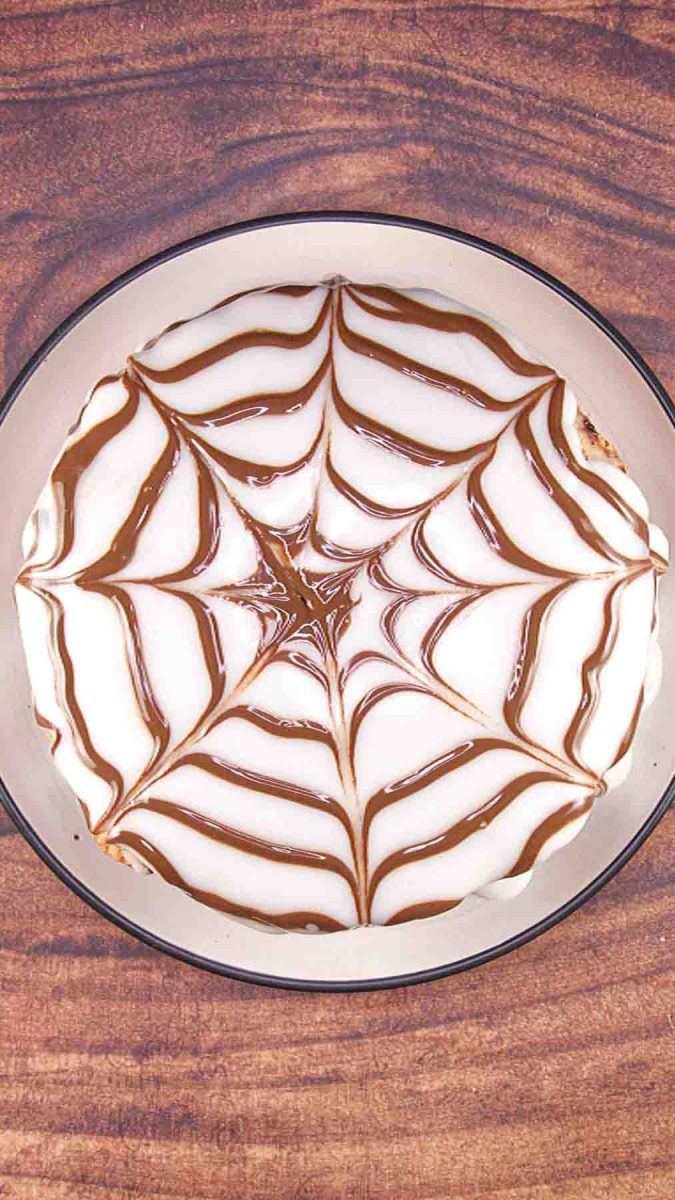
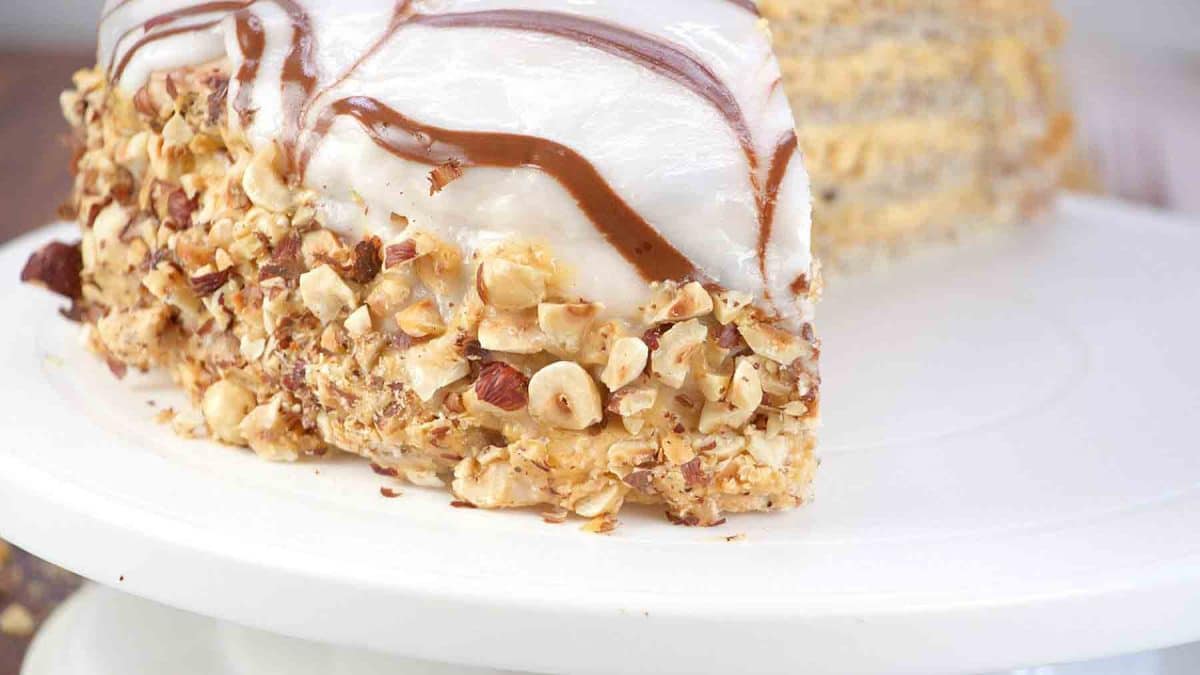
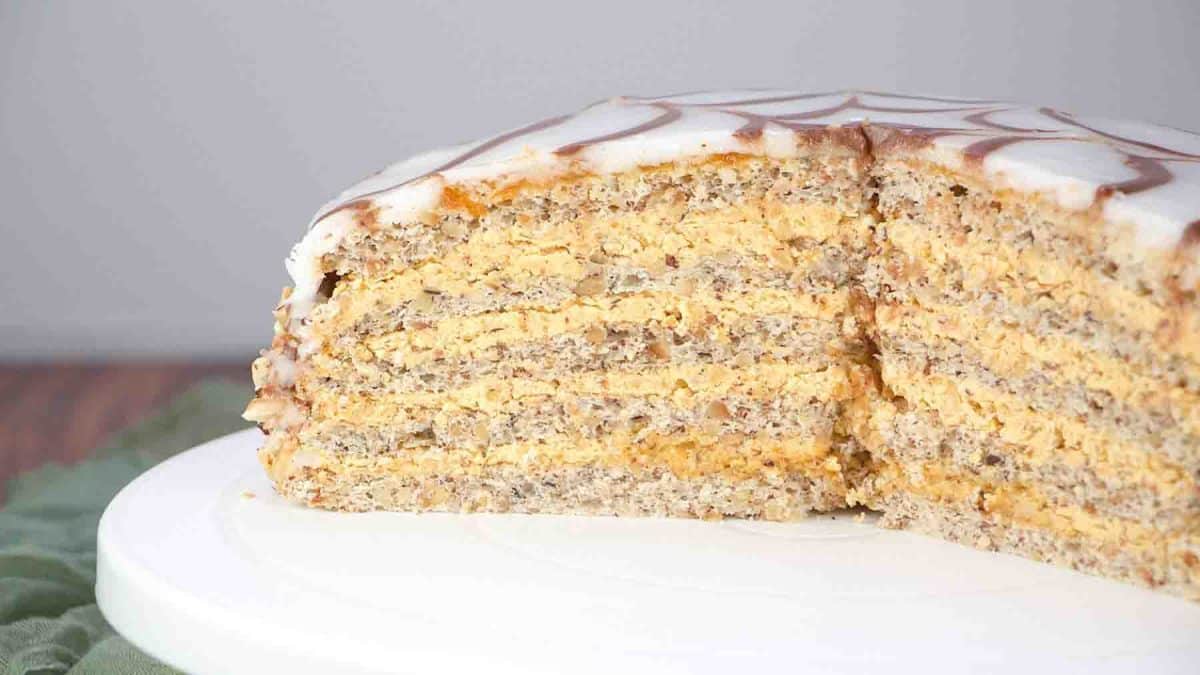
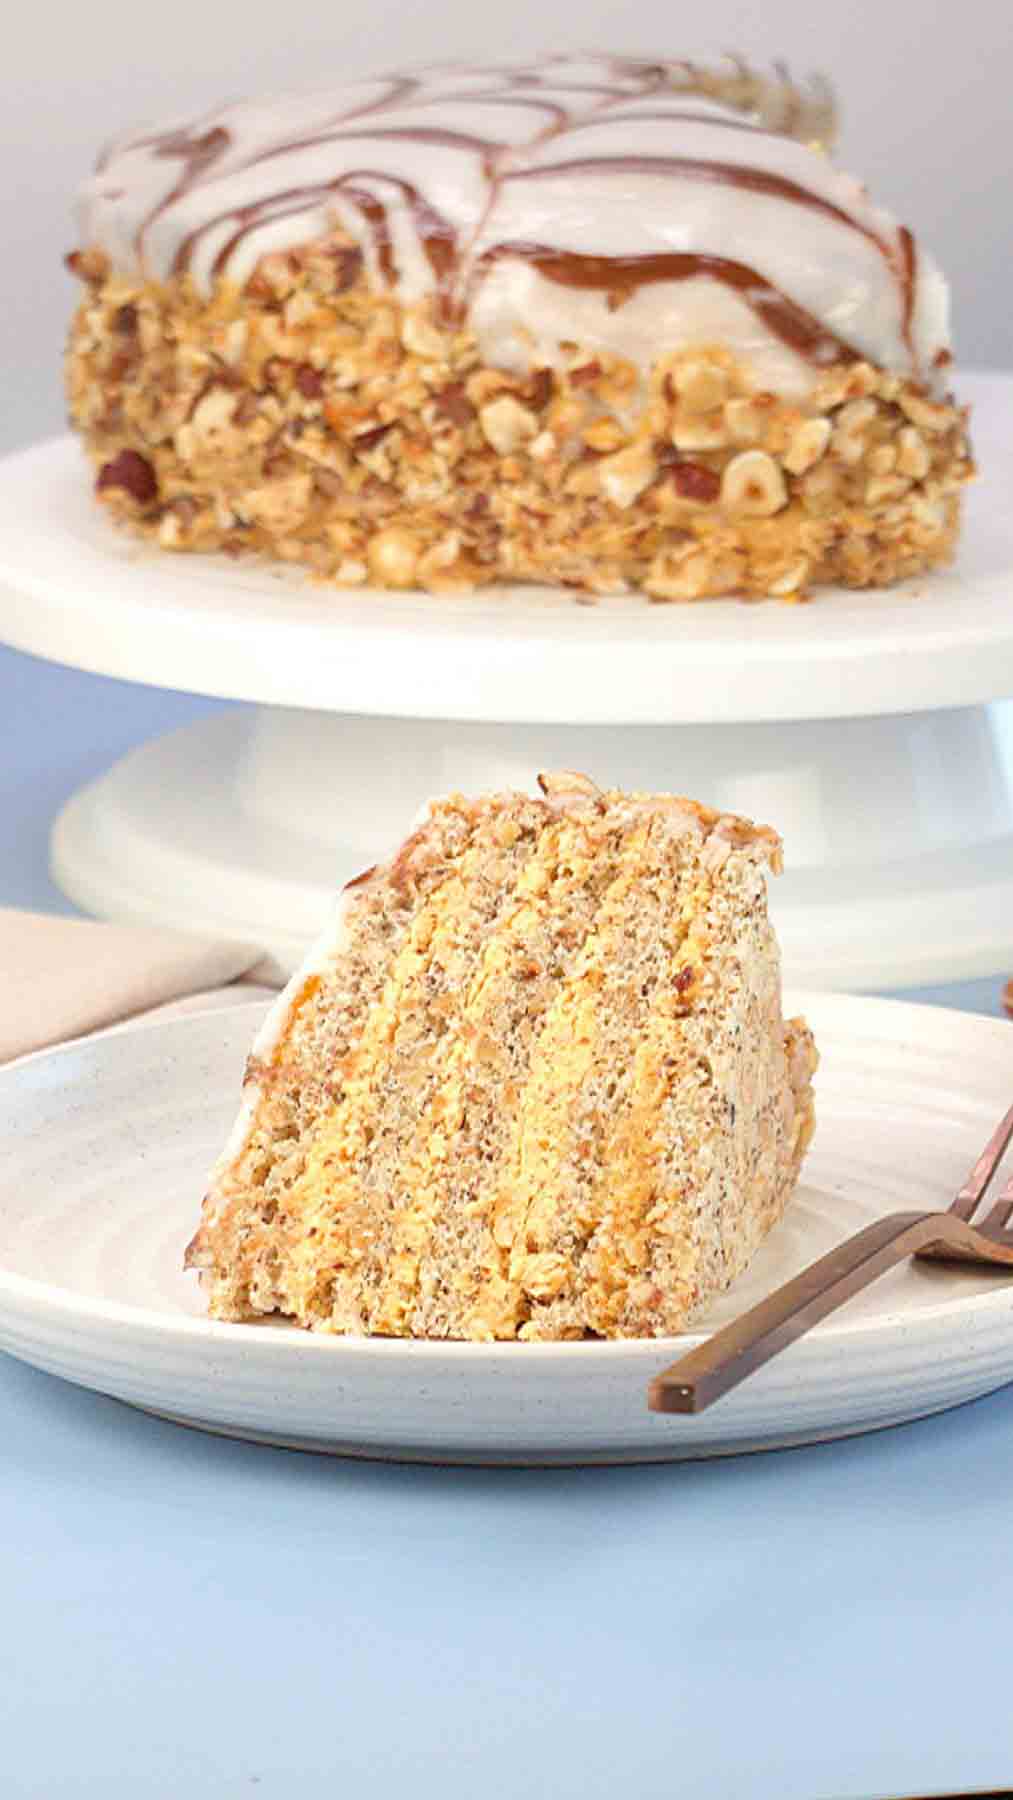
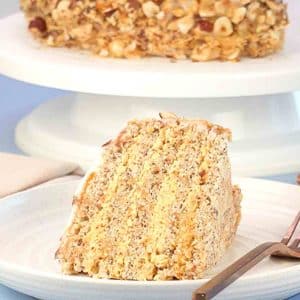
What makes it so distinctive? It’s made of five thin, crispy hazelnut meringue layers (called dacquoise) sandwiched together with a rich hazelnut buttercream filling. The top is coated with a smooth white icing and decorated with the famous chocolate spiderweb design — those beautiful concentric circles with lines drawn through them. The sides of the cake are pressed with crushed toasted hazelnuts for a gorgeous finishing touch.
It’s a cake for celebrations. It’s a cake for impressing guests. And yes — it’s absolutely worth every single step.
Why You’ll Love This Recipe
I made this Esterhazy cake as part of a baking challenge and nervously shared it with two other couples that very weekend. Talk about pressure! But the moment they tasted it, the room lit up. The layers are light and nutty, the filling is creamy and rich without being too sweet, and that signature spiderweb top makes it look like it came straight from a Vienna coffeehouse.
The other thing I love? You can break the steps up over two days. The dacquoise layers can be baked one day, and the filling, glazing, and decorating done the next. After it’s assembled, it rests in the fridge for 24 hours — and it actually gets better the longer it sits. By day five (if it lasts that long!), the flavors have deepened in the most incredible way.
Key Ingredient Notes
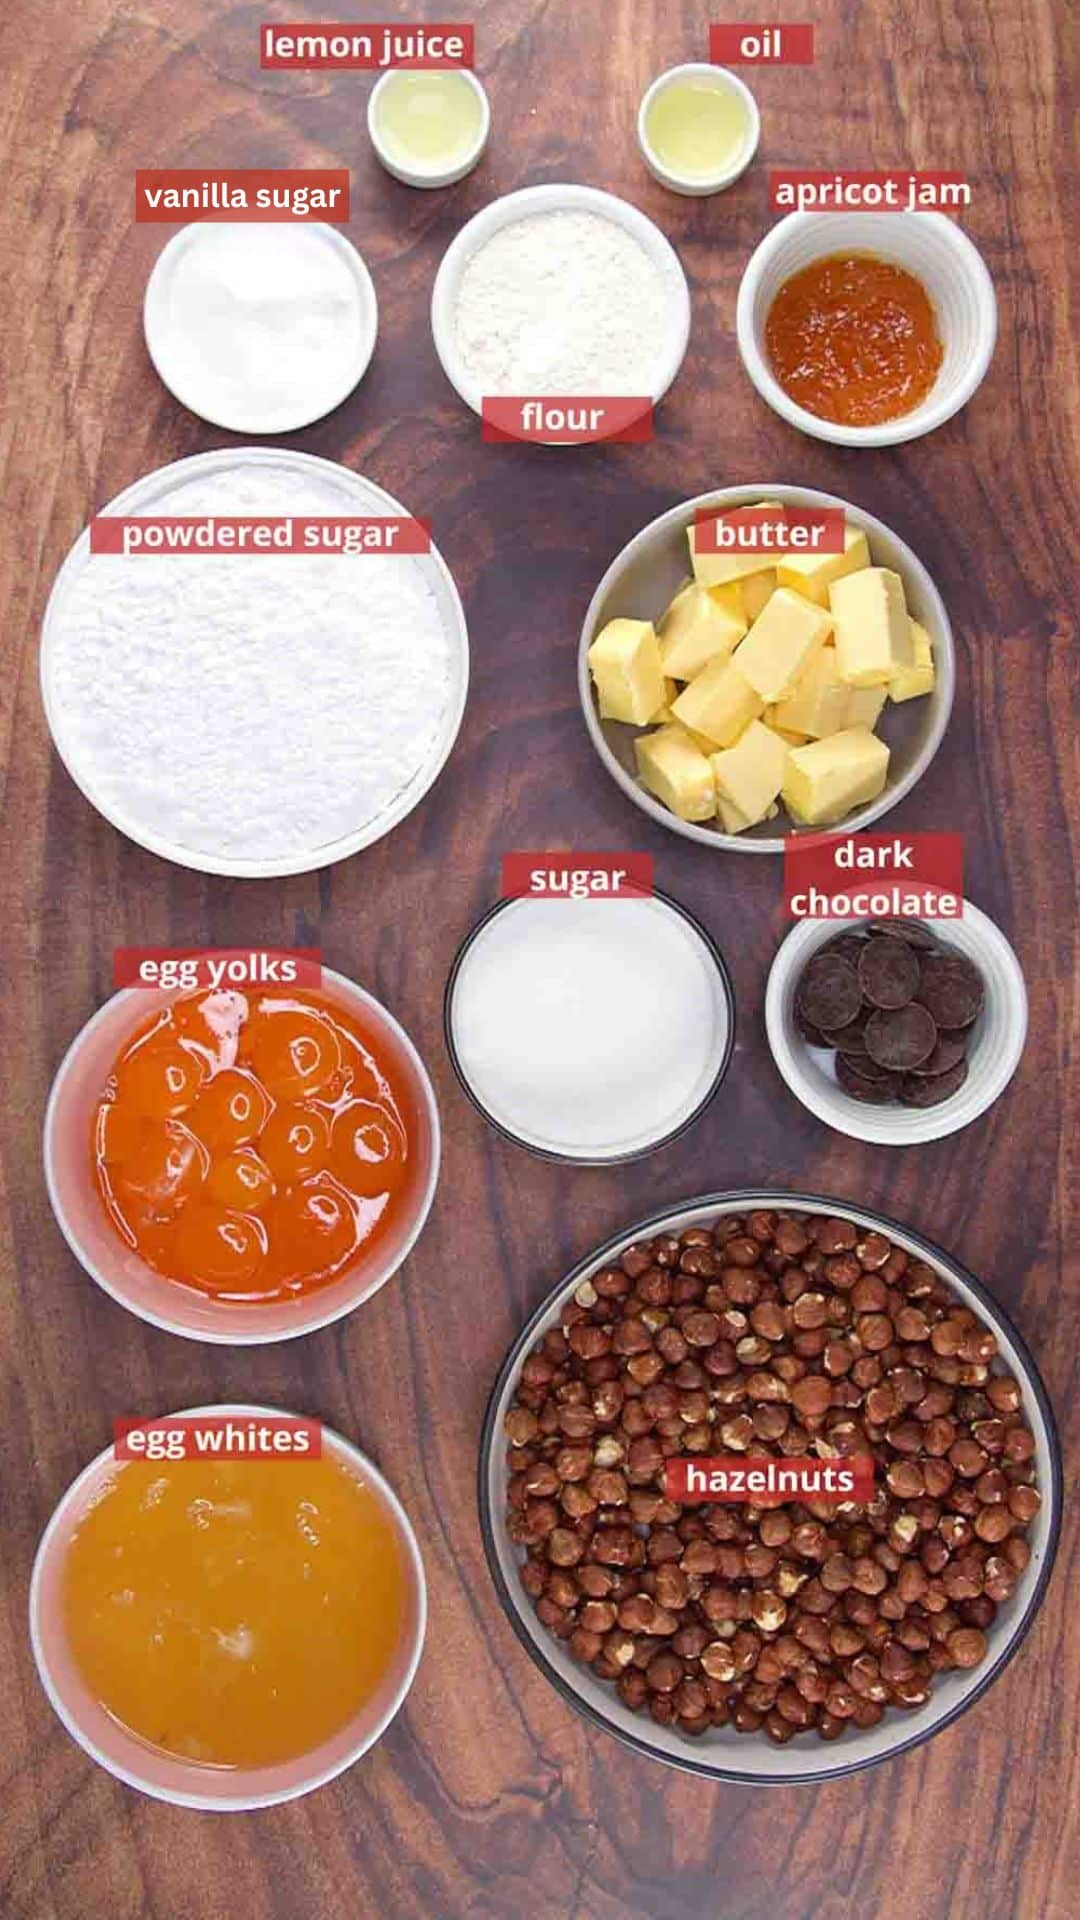
Hazelnuts — You’ll use them two ways: ground finely into the dacquoise layers and the filling, and roughly chopped to press around the outside of the cake. We toast them to brings out a deep, warm, nutty flavor that makes all the difference.
Egg Whites (for the layers) — These need to be beaten to stiff peaks, which means using a clean, grease-free bowl. Even a tiny bit of fat can prevent your egg whites from whipping properly. Make sure your eggs are at room temperature for the best volume.
Egg Yolks (for the filling) — The hazelnut buttercream filling is cooked over a double boiler, which might sound intimidating but is actually very manageable. It creates a silky, stable filling that holds up beautifully between those delicate layers.
Apricot Jam Glaze — This is the “glue” that helps the white icing stick to the top of the cake. It also adds a subtle sweet-tart layer of flavor. Don’t skip it! Just a thin coat is all you need.
Vanilla Sugar — If you can’t find vanilla sugar in the baking aisle, you can make your own by storing a vanilla bean in a jar of sugar for a few days. Or, substitute with 1 teaspoon of pure vanilla extract per tablespoon of vanilla sugar called for.
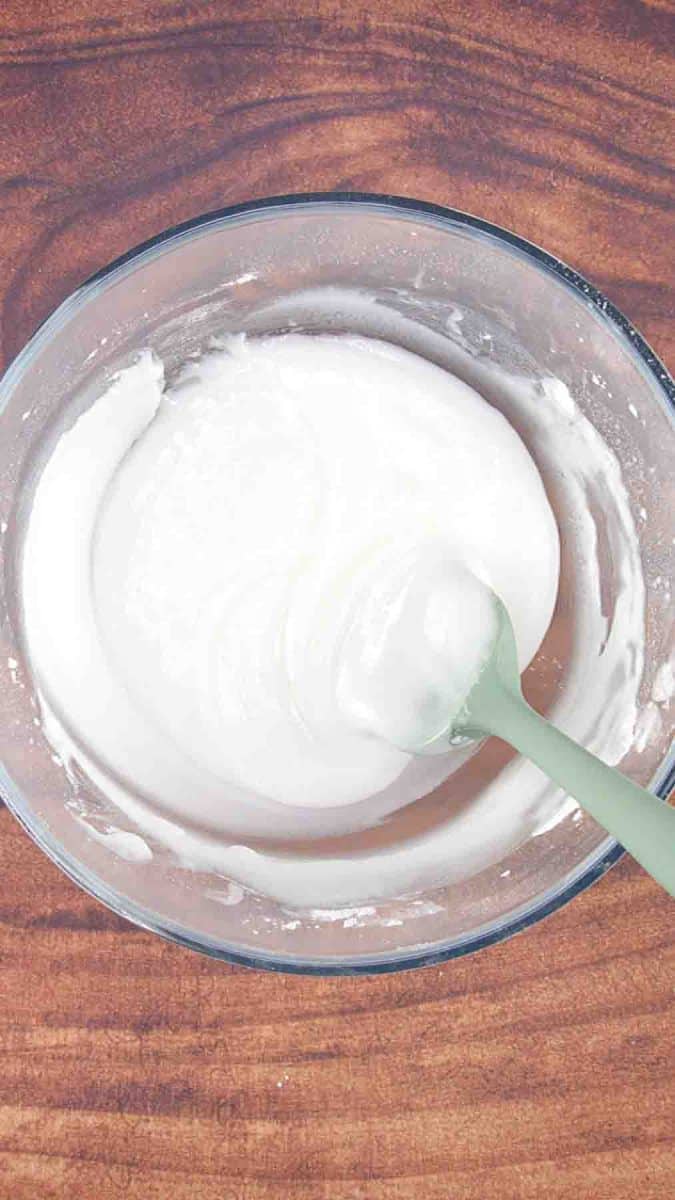
Powdered Sugar (for the icing) — The white icing is made by hand with powdered sugar, oil, lemon juice, and hot water. Mix it until it’s smooth and creamy but not runny.
Pro tip: if the icing spreads unevenly on the cake, a quick pass with a hair dryer will smooth it right out!
How to Make Esterhazy Torte: Step-by-Step
Step 1: Toast and Prep the Hazelnuts
 Toast
Toast- Grind
- Ground
- Chopped
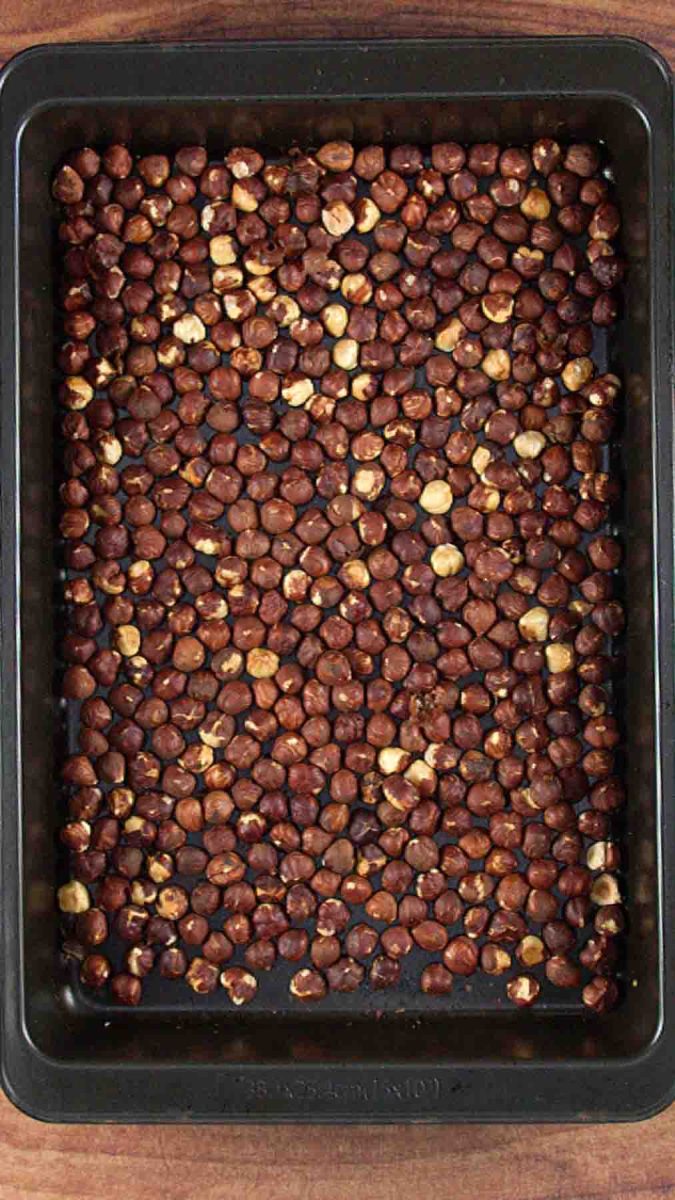
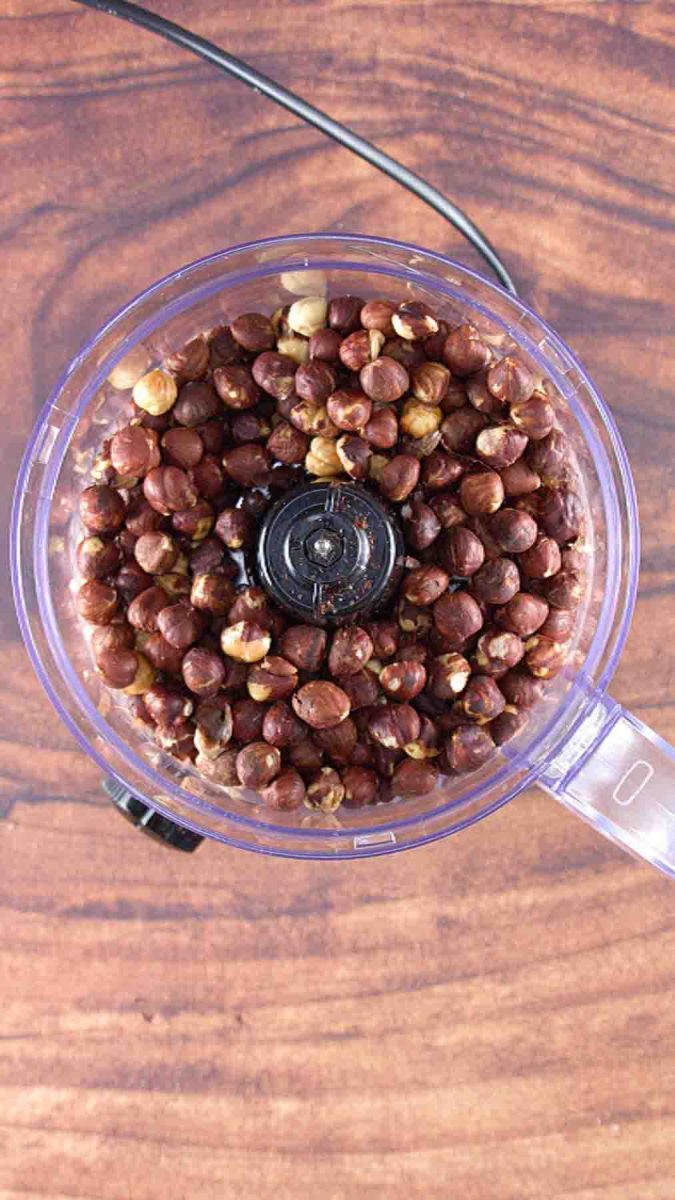
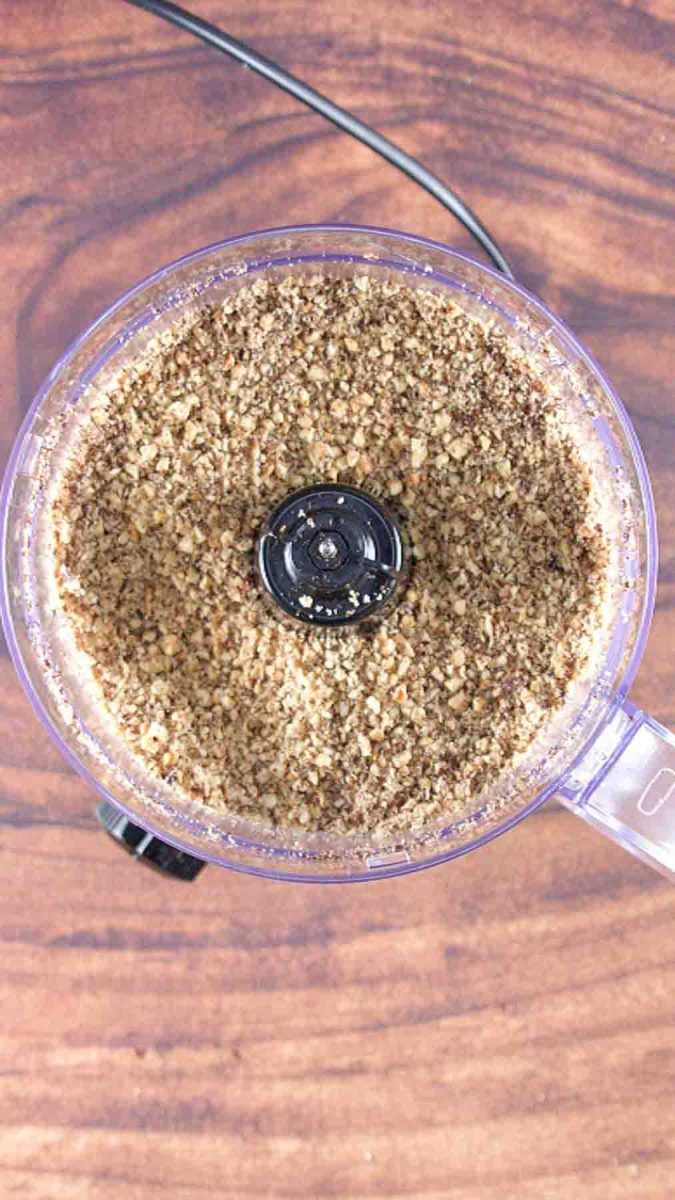
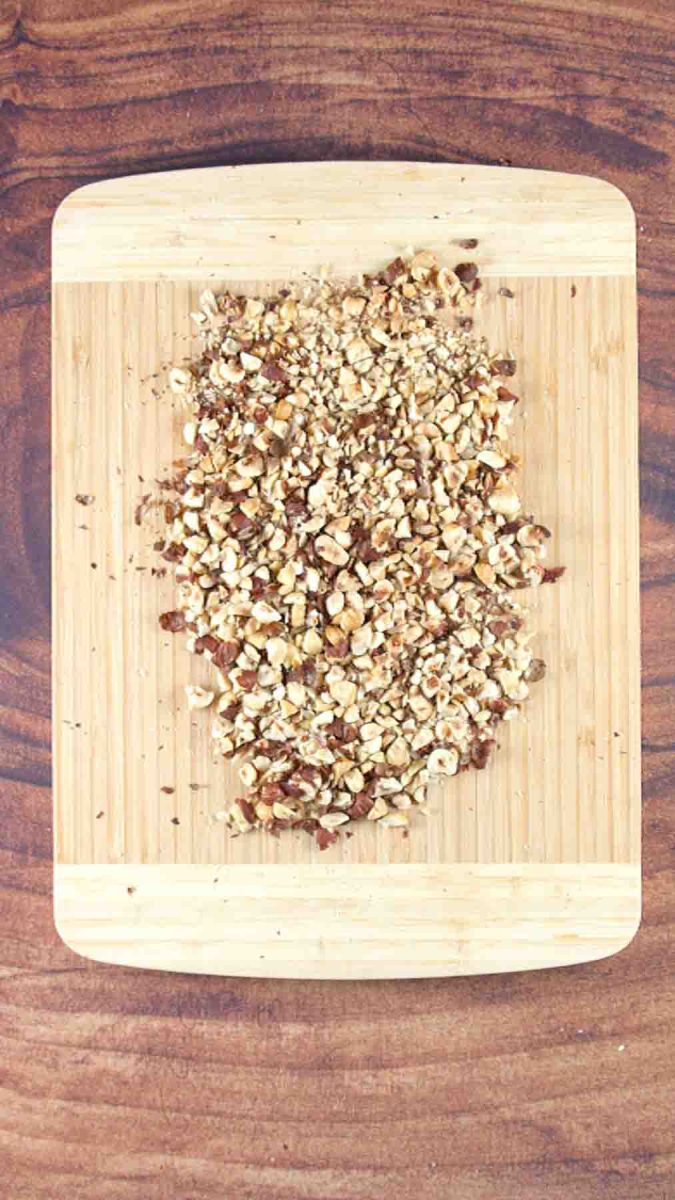
Spread your hazelnuts on a baking sheet and roast them at 350°F for 15–20 minutes, until they smell nutty and the skins start to crack. Watch them closely so they don’t burn! Let them cool completely. Once cooled, roughly chop ¾ cup (100g) and set aside — these go around the outside of the finished cake. Grind the rest into two separate batches: 2½ cups (250g) for the cake layers and 1½ cups (150g) for the filling.
Step 2: Make the Hazelnut Meringue Layers (Dacquoise)
Preheat your oven to 325°F. Do not use the convection/fan setting.
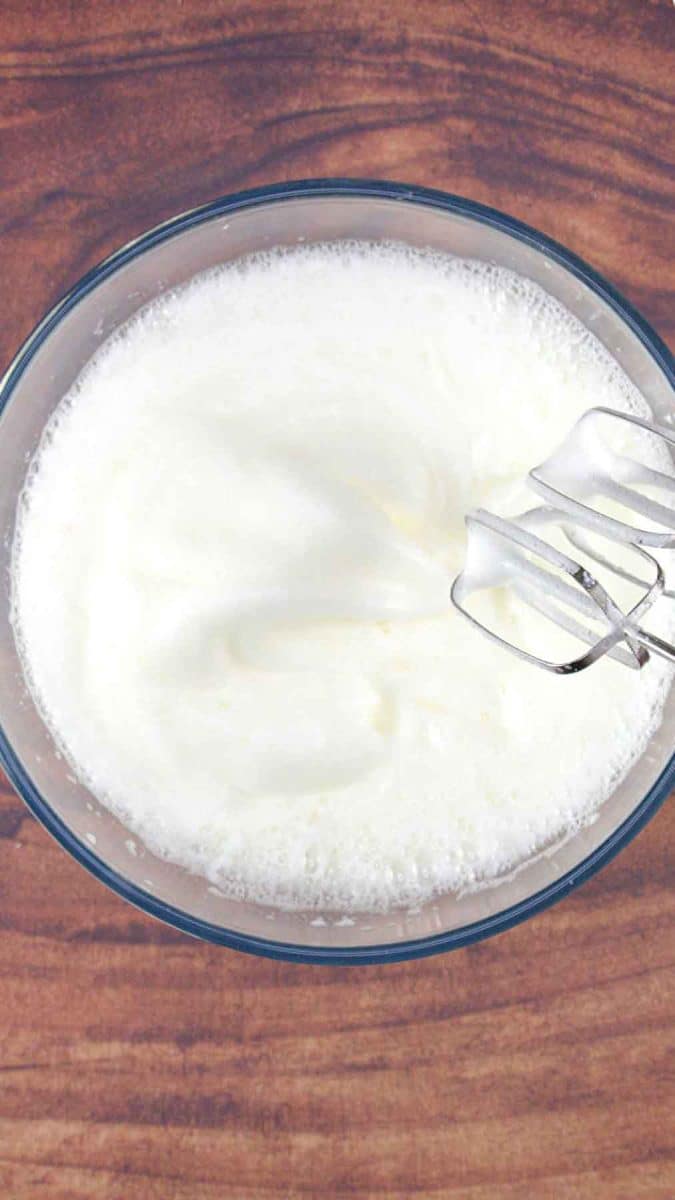
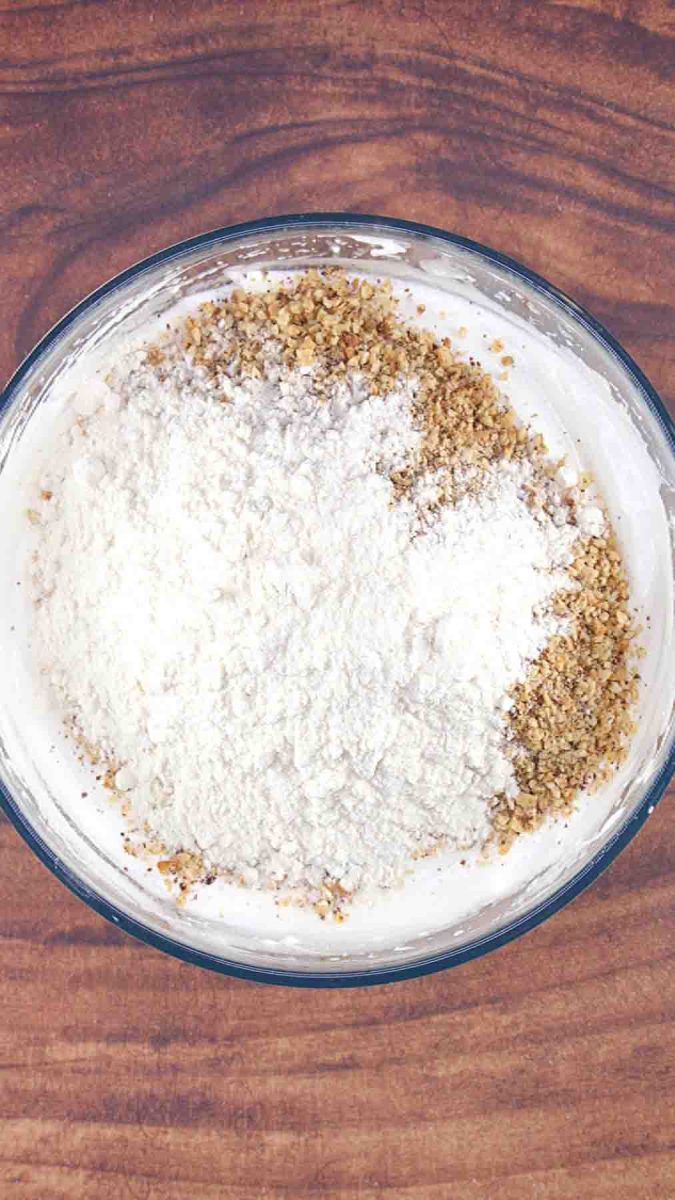
Using an electric mixer, beat the 12 egg whites while slowly adding the sugar and vanilla sugar. Beat for about 5 minutes until you have stiff, glossy peaks. Turn the mixer to its lowest speed and gently mix in the 2½ cups of ground hazelnuts and the flour just until combined — don’t overmix.
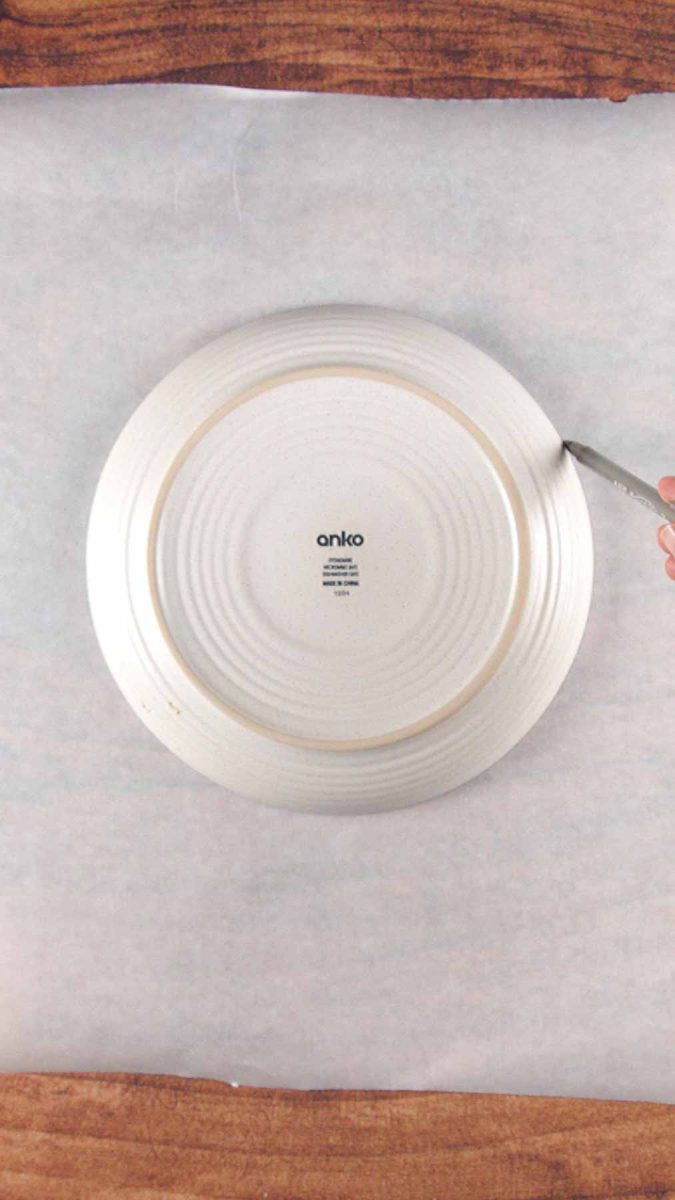
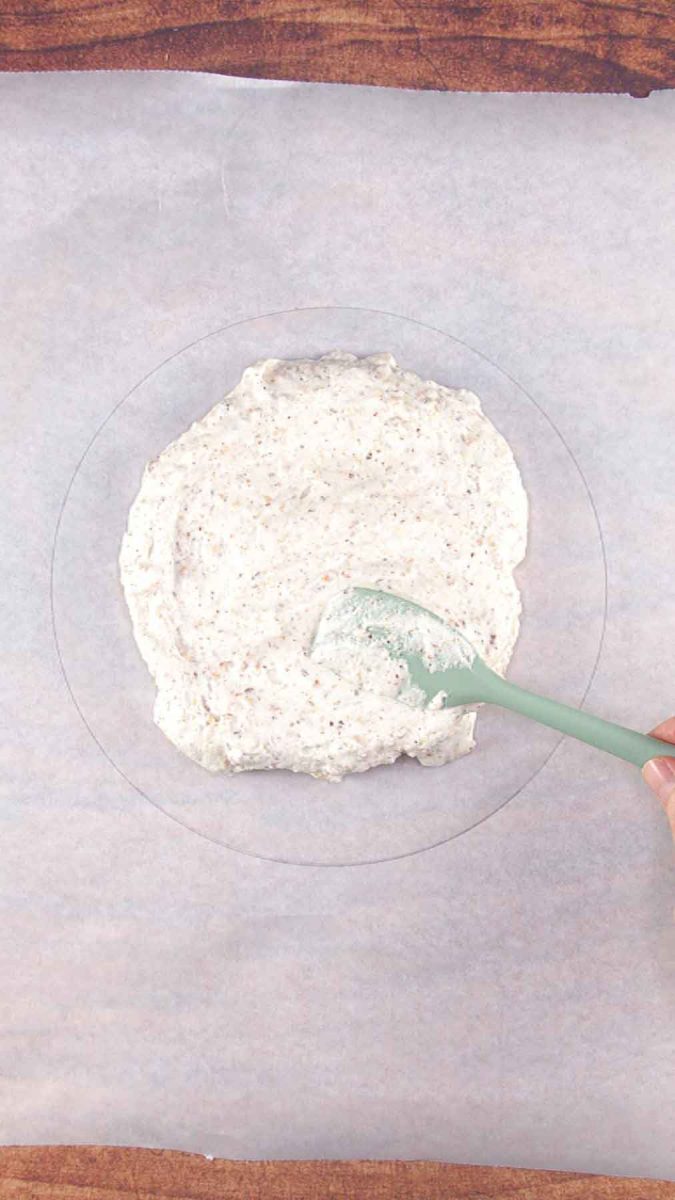
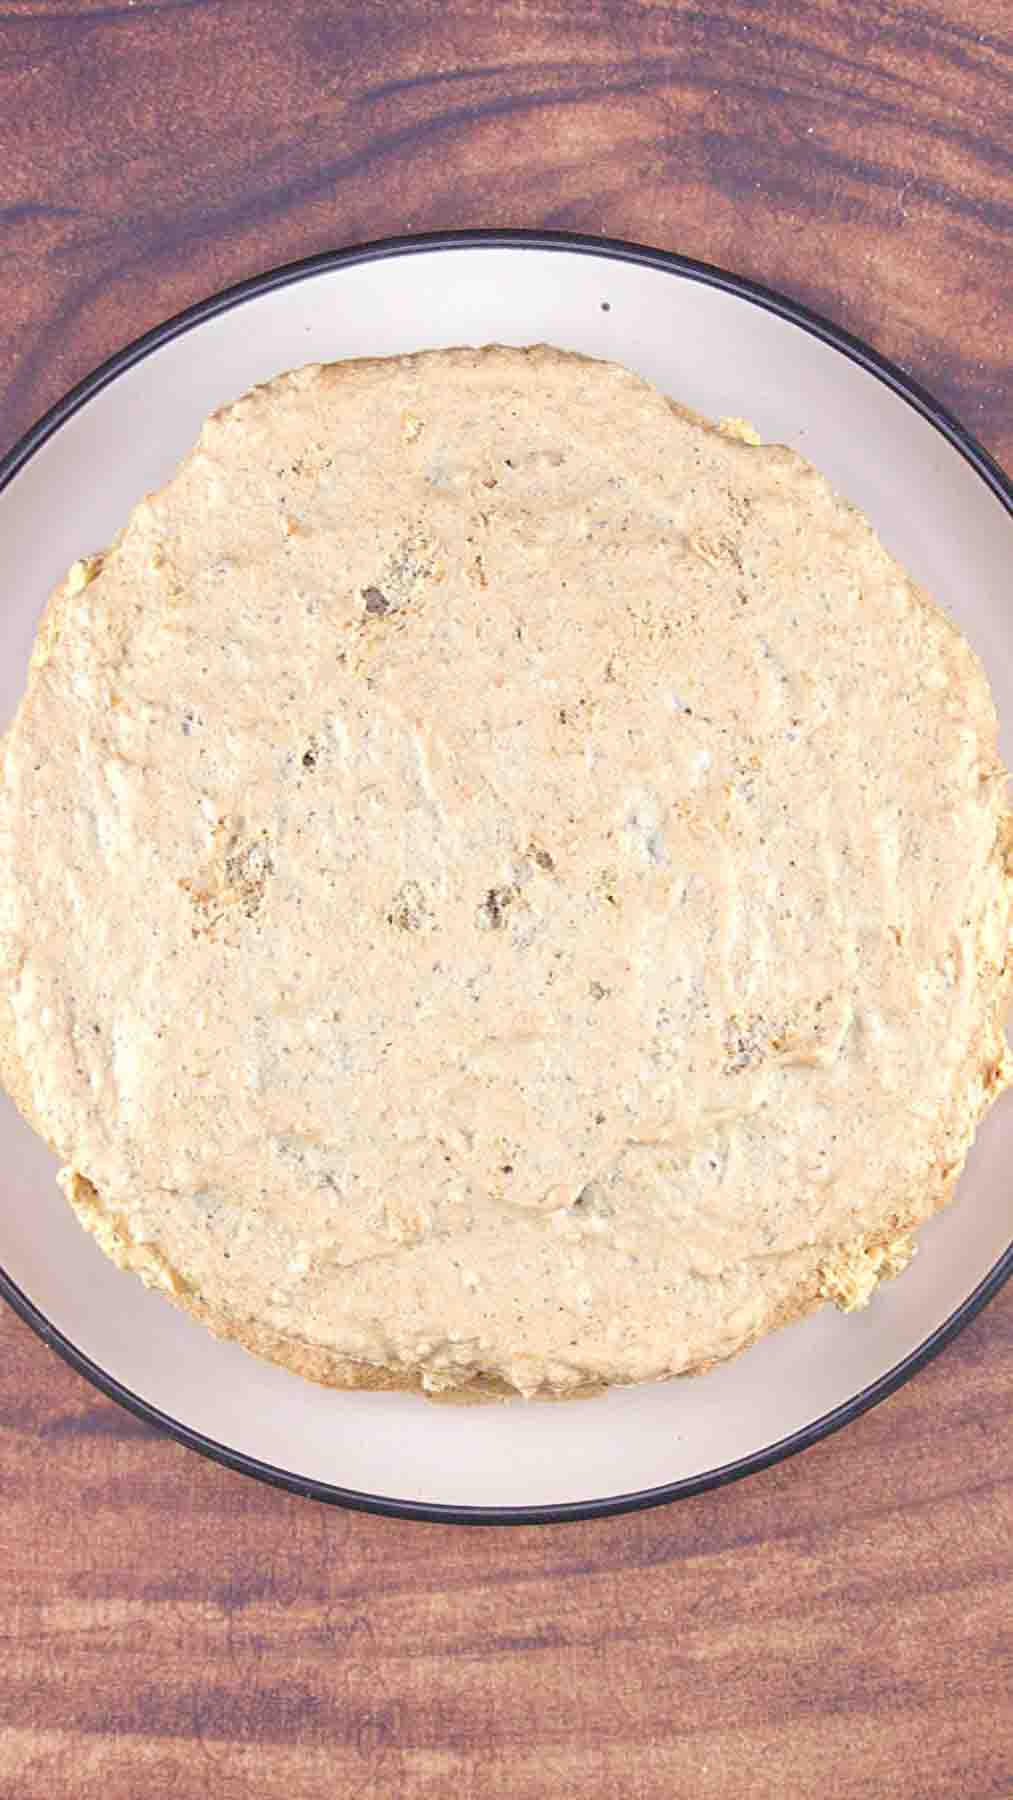
Divide the batter evenly into 5 portions. Trace a 10-inch circle onto 5 pieces of parchment paper, flip them over, and place each on an upside-down baking sheet. Spread one portion of batter into each circle.
Bake one layer at a time for 14 minutes. The layer will look soft, but it’s done when it’s no longer sticky to the touch. Slide it off the pan to cool on a flat surface. Let the pan cool before baking the next layer, or use a second pan to speed things up.
💡 Tip: At this point you can cover the layers with a clean kitchen towel and pick up the rest the next day if needed.
Step 3: Make the Hazelnut Buttercream Filling
Set up a double boiler: add about 1 inch of water to the bottom pot and bring it to a gentle simmer. The water should NOT touch the bottom of the top pan.

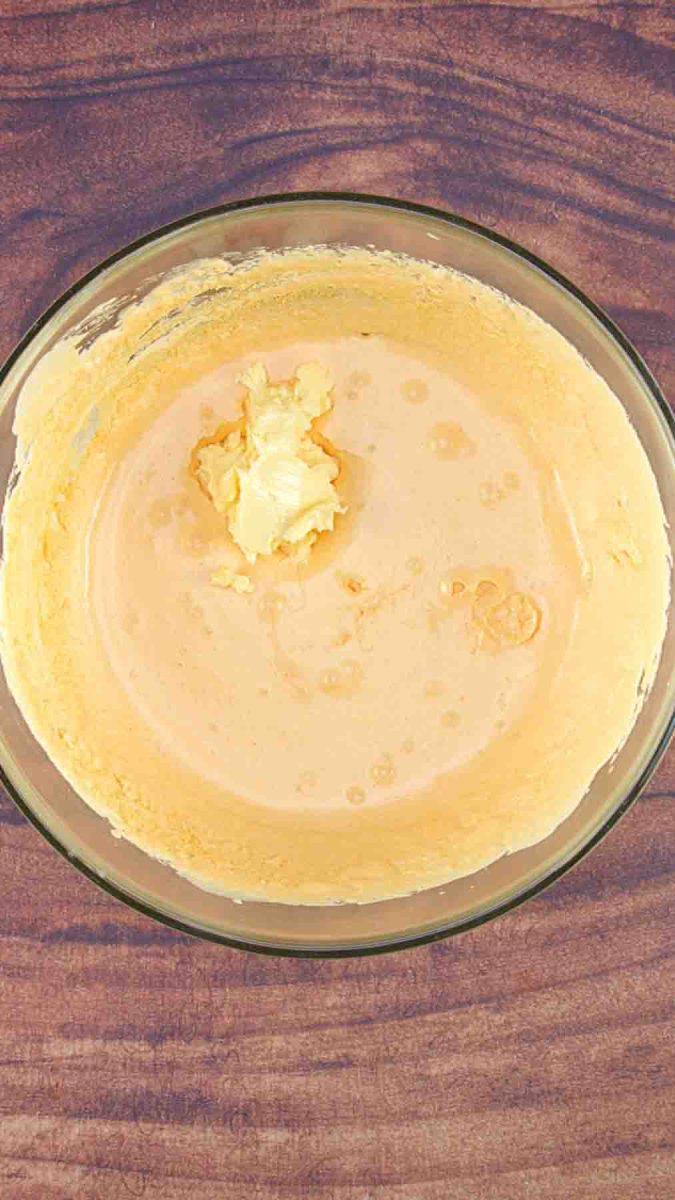
In the top pan, beat the 12 egg yolks with the caster sugar and vanilla sugar using an electric mixer. Place the pan over the simmering water and cook for 14–15 minutes, stirring every couple of minutes with a wooden spoon and scraping the sides. Stir constantly near the end. Remove from the heat and let it cool completely.
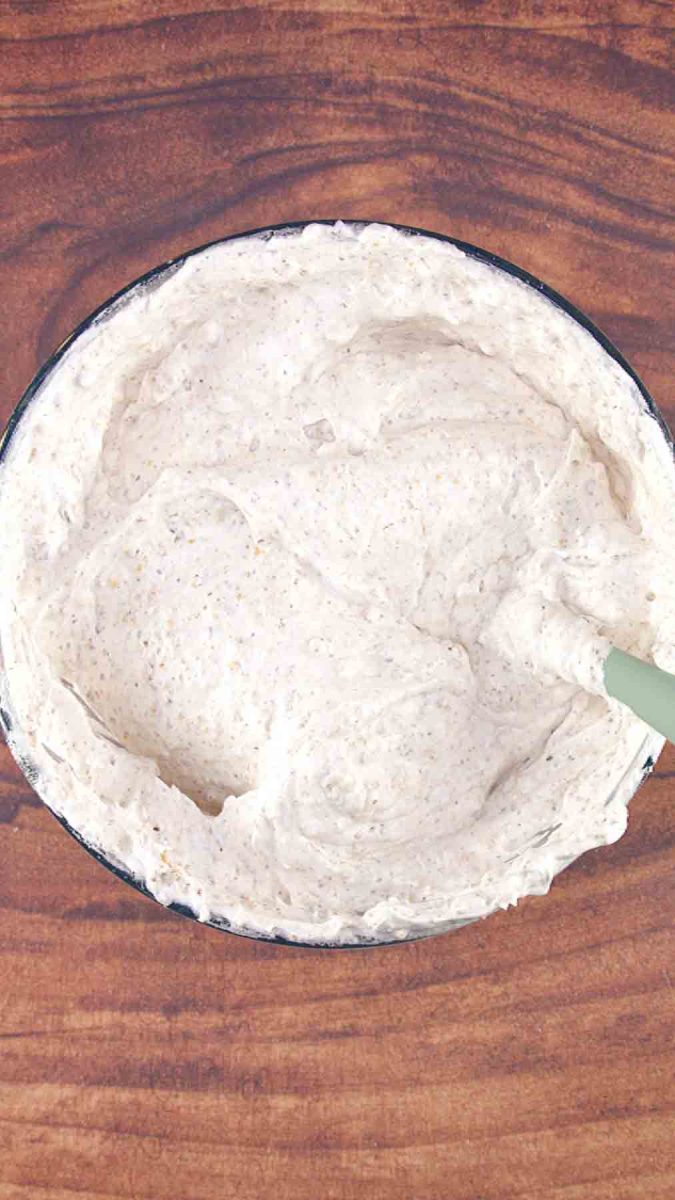
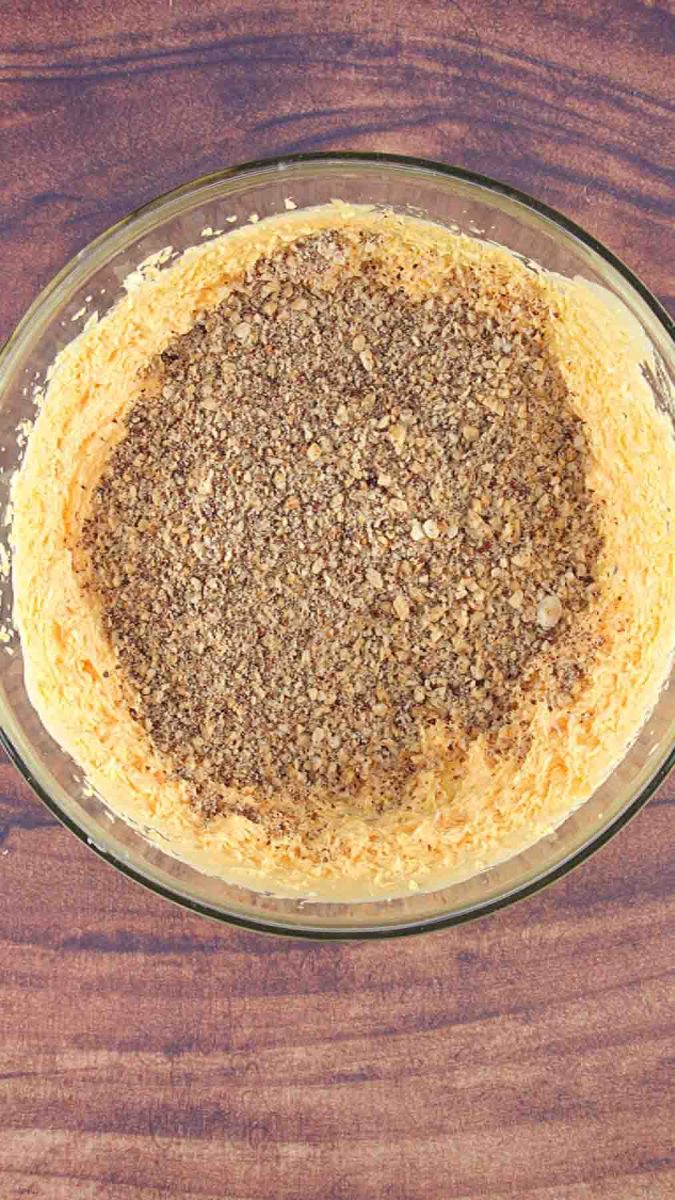
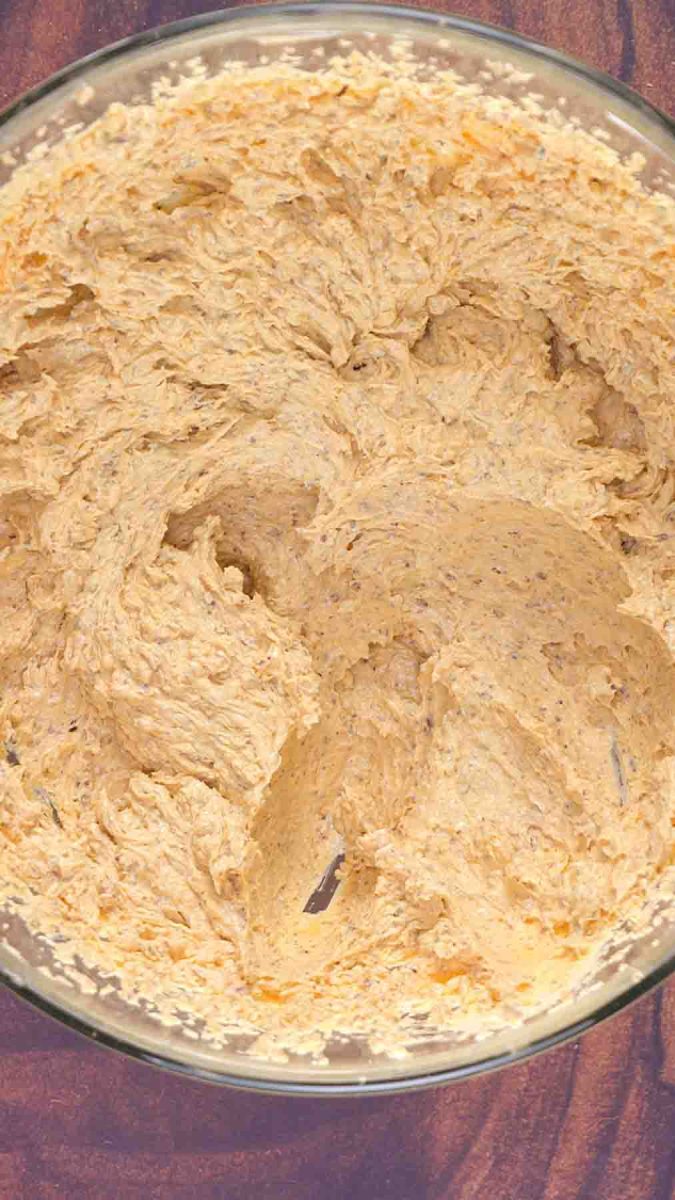
Once cooled, beat the cooked yolk mixture for 30 seconds. In a separate bowl, beat the room-temperature butter for 2 minutes until light and fluffy, then beat it into the yolk mixture. Add the 1½ cups of ground hazelnuts and beat until everything is combined and smooth.
Set aside 3 tablespoons of the filling — you’ll use this to coat the outside of the cake later. Divide the rest into 4 equal portions.
Step 4: Stack the Layers
Line a large tray with parchment paper. Peel the parchment off one dacquoise layer and place it on an upside-down baking sheet. Spread one portion of the hazelnut filling evenly over it. Add the next layer and repeat until all 5 layers are stacked. Do NOT put filling on the very top layer — flip that last layer upside down so the flat side faces up. This gives you a smooth, even surface for the icing.
Place a sheet of parchment on top, then set a flat tray over it. Add something heavy on top (like a pan half-filled with water) to help level everything out. Refrigerate for 1 hour.
Step 5: Apply the Apricot Glaze

Warm the apricot jam and water together in a small saucepan until loose and spreadable. Remove the parchment from the top of the chilled cake and brush a thin, even layer of the warm jam over the top. Return the cake to the fridge for 30 minutes.
After 30 minutes, use the reserved 3 tablespoons of hazelnut filling to spread a thin layer around the sides of the cake.
Step 6: Ice the Top and Create the Spiderweb Design
Before you start, get your chocolate piping bag ready — you’ll need it immediately after the white icing goes on.
Want to save this recipe?
I'd like to receive more tips and recipes from Hostess At Heart!
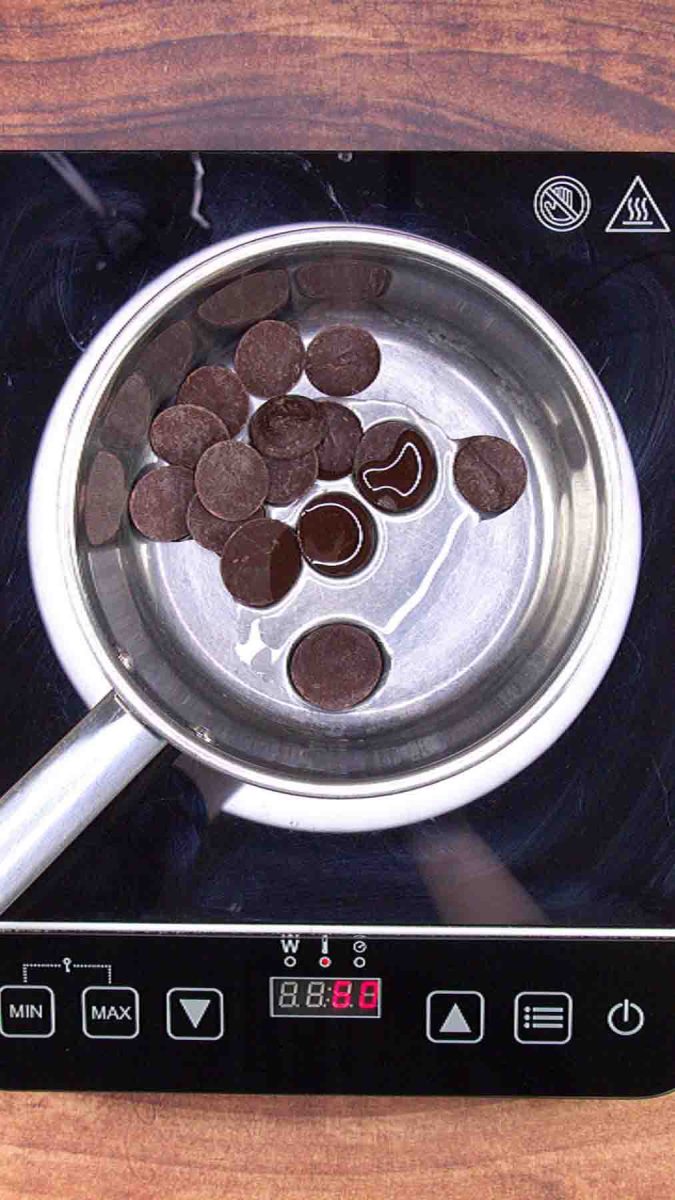
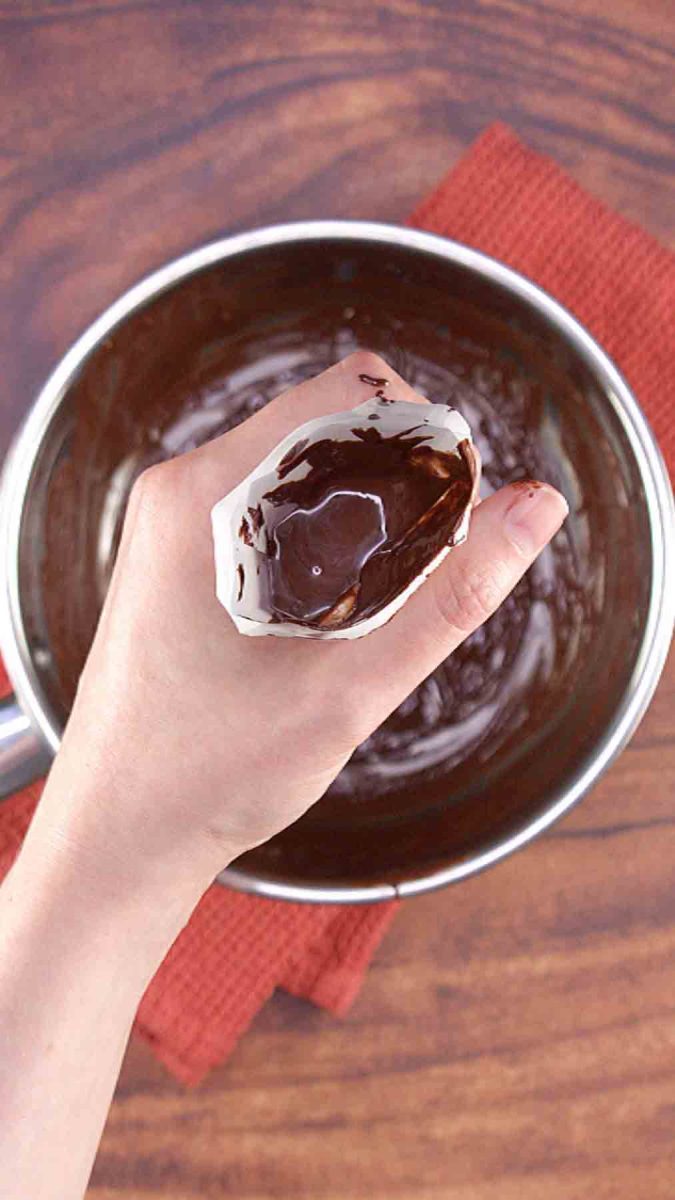
Melt the dark chocolate with 1 teaspoon of oil, stir until smooth, and let it cool slightly. Spoon into a piping bag with a small round tip (or a zip-top bag with a tiny corner snipped off).
By hand, mix the powdered sugar, oil, and lemon juice, adding hot water one teaspoon at a time until the icing is smooth and creamy but not runny. Mix vigorously for a couple of minutes.
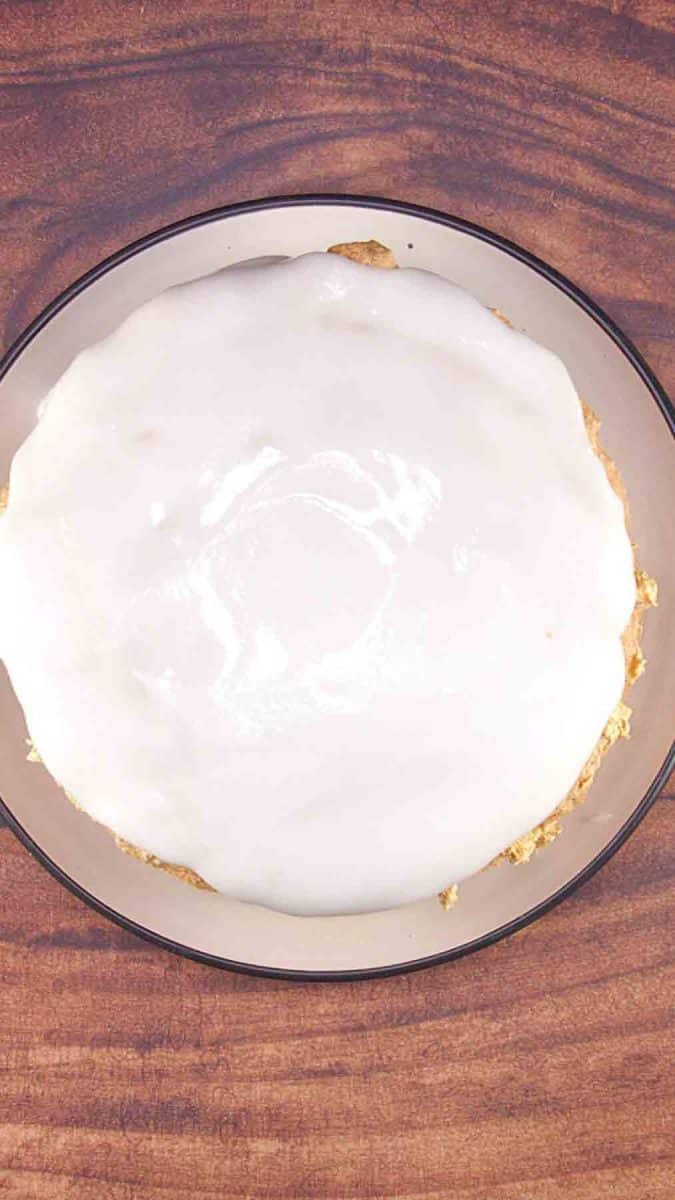
Using a large knife dipped in hot water, quickly spread the white icing over the top of the cake in one smooth pass.
Immediately pipe 4 chocolate circles onto the wet icing, starting from the center and working outward. Then take a wooden skewer or the back of a butter knife and drag it from the center outward — rotate the cake slightly and repeat for a total of 6 lines. This creates the classic spiderweb pattern. Work fast before the icing sets!
💡 Tip: If the icing looks uneven, a quick pass with a hair dryer on low heat will smooth it right out.
Step 7: Finish the Sides and Chill
Press the roughly chopped hazelnuts firmly around the sides of the cake to coat them evenly.
Cover the cake and refrigerate for at least 24 hours before slicing. This rest time is non-negotiable — it lets the layers meld together, the filling set, and the flavors deepen beautifully. The cake is even better on day 2 or 3!
Step 8: Slice and Serve
Use a sharp knife to cut clean slices, wiping the blade between each cut for the neatest presentation. Serve chilled or at room temperature alongside a strong cup of coffee. Enjoy every single layer!
Pro Tips for Success
Weigh your dacquoise batter. Divide the batter into 5 equal portions before spreading — this is the easiest way to make sure all your layers are the same thickness. I literally used 5 bowls and divided the mixture evenly by weight.
Bake one layer at a time if needed. Each dacquoise layer bakes on an upside-down baking sheet. Let the pan cool between batches, or use two baking sheets to speed things up.
Don’t overbake the layers. They’ll look soft when you pull them from the oven at 14 minutes — that’s okay! The test is that they shouldn’t be sticky to the touch. They firm up as they cool.
Press and chill before icing. After stacking the layers with filling, place a sheet of parchment over the top, add a heavy tray, and refrigerate for 1 hour. This levels everything out and gives you a flat, even surface for the icing.
Work fast with the icing. The white icing sets quickly, so have your chocolate piping bag ready to go before you spread it. You want to pipe the chocolate circles while the icing is still wet so you can draw the spiderweb pattern through it.
Plan ahead. This cake must chill for at least 24 hours before cutting. Overnight is the minimum; two to three days is even better. It genuinely improves with time.
Serving Suggestions
This Esterhazy cake is a centerpiece dessert all on its own — no sauces or garnishes needed. Simply slice it with a sharp knife (wipe the blade clean between cuts for the neatest slices) and serve chilled or at room temperature.
It’s absolutely perfect for birthdays, dinner parties, holiday celebrations, and any occasion where you want to impress. Serve with a cup of strong coffee or espresso for a true Viennese coffeehouse experience.
For a little extra touch, dust each slice plate with a tiny bit of powdered sugar before plating.
How to Store It
Store the Esterhazy Torte covered in the refrigerator for up to 7 days. In fact, the flavor actually deepens and improves the longer it sits, so don’t be afraid to make it a couple of days ahead.
Make-ahead tip: You can bake the dacquoise layers up to 24 hours in advance. Cover them loosely with a clean kitchen towel and leave them at room temperature until you’re ready to assemble.
Can you freeze it? I’ve never frozen this cake. Even so, I don’t recommend it because the moisture would change the textures.
Frequently Asked Questions
What does “torte” mean? A torte (from the Italian torta) typically refers to a rich, multi-layered cake made with little to no flour — ground nuts or breadcrumbs are often used instead. This gives tortes their dense, moist texture that’s different from a regular cake.
Is Esterhazy Torte difficult to make? It’s involved, but not impossible! The steps are straightforward — the challenge is patience and timing. Breaking it into two days (layers one day, assembly the next) makes it very manageable.
Can I make it gluten-free? The dacquoise layers use only a small amount of all-purpose flour. You can substitute a 1:1 gluten-free flour blend and it will work well.
Why does it need to rest 24 hours before cutting? Resting allows the layers to absorb the filling and the icing to fully set. Cutting it too early will cause the layers to slide. Trust the process — it’s worth the wait!
Can I use a different nut? Yes! Almonds, walnuts, or pistachios all work well. Hazelnuts are traditional and give the most authentic flavor, but feel free to experiment.
How do I get the spiderweb design right? Pipe 4 concentric circles of melted chocolate on top of the wet white icing. Then use a wooden skewer or the back of a knife and draw lines from the center outward, rotating the cake between each line (6 lines total). Work quickly before the icing sets!
What’s the difference between Esterhazy Torte and a regular layer cake? A regular layer cake uses flour-based sponge layers. Esterhazy uses dacquoise — a crisp, nutty meringue layer. The texture is completely different: lighter, crunchier, and more delicate, with a silky buttercream that softens the layers as it rests.
Make This Cake Your Own
This Esterhazy Torte has become one of my most treasured recipes — the kind I pull out when I really want to make someone feel special. The combination of light hazelnut meringue layers and silky buttercream is unlike anything else, and that stunning spiderweb top makes it a true conversation piece.
If you make this cake, I’d love to hear about it! Leave a ⭐⭐⭐⭐⭐ rating and a comment below — your reviews help other readers find this recipe and give me the best kind of feedback. Happy baking!
Esterhazy Torte
Ingredients
Hazelnut Sponge Layers (Dacquoise)
- 12 egg whites
- 1 cup superfine sugar 1 cup plus 1 tablespoon, 250g (caster)
- 2 tbsp vanilla Sugar
- 2½ cups ground hazelnuts
- ⅔ cup all Purpose Flour
Hazelnut Cream
- 12 large egg yolks
- 1 cup superfine sugar 250g caster
- 2 tbsp
vanilla sugar
20g - 1⅓ cups butter 300g room temperature
- 1½ cups ground hazelnuts 150g, toasted, divided
Apricot Jam Glaze
- 3 tbsp
apricot jam
45g - 1 tsp water 5ml
White Icing
- 3¼ cups
powdered sugar
400g - 2 tsp vegetable oil 10ml neutral oil
- 3 tsp lemon juice 15-20ml (3 to 4 tsp)
- 4 tbsp hot water 60ml
Chocolate Decoration
- ¼ cup dark chocolate 50g
- 1 tsp neutral oil 5ml
For the sides
- ¾ cup roughly chopped hazelnuts 100g
Instructions
Toast and Prep the Hazelnuts
- Roast hazelnuts on a baking sheet at 350 °F (175°C) for 15–20 minutes, until fragrant and skins begin to crack. Watch carefully to prevent burning.
- Let cool completely. Roughly chop ¾ cup (100g) and set aside for the sides of the cake.
- Grind remaining hazelnuts into two batches: 2½ cups (250g) for the sponge layers and 1½ cups (150g) for the filling. Grind finely but don't go so far that they turn into nut butter.
Hazelnut Layers (Dacquoise layers)
- Preheat oven to 325°F (165°C). Do not use the convection/fan setting.
- Using an electric mixer, beat the egg whites while gradually adding the superfine caster sugar and vanilla sugar. Beat for about 5 minutes until stiff, glossy peaks form.
- Switch the mixer to its lowest speed. Add the 2½ cups of ground hazelnuts and the flour and mix just until combined. Do not overmix.
- Divide the batter evenly into 5 equal portions (weighing them out makes this easy)
- Trace a 10-inch (25cm) circle onto 5 pieces of parchment paper. Flip each piece over and place on an upside-down baking sheet.
- Spread one portion of batter inside each traced circle.
- Bake one layer at a time for 14 minutes. The layer will look soft but is done when it is no longer sticky to the touch.
- Slide the parchment and layer onto a flat surface to cool. Allow the baking sheet to cool before baking the next layer (or use a second sheet).
- Repeat for all 5 layers. At this point you can cover the cooled layers with a clean kitchen towel and continue the next day if needed.
Hazelnut Filing
- Fill the bottom of a double boiler with 1 inch (2cm) of water. Bring to a gentle simmer. The water should not touch the bottom of the top pan.
- In the top pan of the double boiler, beat the egg yolks, caster sugar, and vanilla sugar with an electric mixer.
- Place the pan over the simmering water and cook for 14–15 minutes, stirring every 2–3 minutes and scraping the sides and bottom. Stir constantly near the end.
- Remove from heat and let the mixture cool completely.
- Once cool, beat the cooked yolk mixture for 30 seconds with an electric mixer.
- In a separate bowl, beat the room-temperature butter for 2 minutes until light and fluffy.
- Beat the butter into the yolk mixture until fully combined.
- Add the 1½ cups of ground hazelnuts and beat again until smooth.
- Remove 3 tablespoons of filling and set aside for the sides of the cake. Divide the remaining filling into 4 equal portions.
Assemble the Layers
- Line a large tray with parchment paper. Peel the parchment off one dacquoise layer and place it on an upside-down baking sheet.
- Spread one portion of hazelnut filling evenly over the layer.
- Place the next dacquoise layer on top and repeat, stacking all 5 layers with filling between each. Do NOT place filling on the top layer. Place the final layer upside down so the flat side faces up.
- Cover the top with parchment paper, set a flat tray on top, and weigh it down with something heavy (such as a pot half-filled with water).
- Refrigerate for 1 hour to level and set.
Apricot Jam Glaze
- Heat the apricot jam and water in a small saucepan until loose and spreadable.
- Remove the parchment from the top of the chilled cake. Brush a thin, even layer of warm jam over the top.
- Refrigerate for 30 minutes.30. After 30 minutes, spread the reserved 3 tablespoons of hazelnut filling around the sides of the cake.
Make the White Icing and Spiderweb Decoration
- Melt the dark chocolate with 1 teaspoon of oil. Stir until smooth and let cool slightly. Transfer to a piping bag with a small round tip (or a zip-top bag with a corner snipped off). Set aside — you'll need it immediately after the icing goes on.
- By hand, whisk together the powdered sugar, oil, and lemon juice. Add hot water one teaspoon at a time until the mixture is smooth, creamy, and spreadable but not runny. Mix vigorously for 2 minutes.
- Dip a large knife in hot water. Working quickly, spread the white icing over the top of the cake in one smooth pass.
- Immediately pipe 4 chocolate circles onto the wet icing, starting from the center and working outward.
- Using a wooden skewer or the back of a butter knife, draw lines from the center outward through the circles. Rotate the cake slightly between each line for a total of 6 lines to create the spiderweb pattern. Work quickly before the icing sets. If the icing is uneven, a hair dryer on low will smooth it out.
Finish and Chill
- Cover and refrigerate for at least 24 hours before cutting. The cake improves significantly the longer it rests — day 2 or 3 is even better!
Slice and Serve
- Slice with a sharp knife, wiping the blade clean between each cut. Serve chilled or at room temperature with coffee or espresso.
Video
Notes
- Make it in two days: Bake the dacquoise layers on Day 1 and complete the filling, assembly, and decoration on Day 2. This makes the process much more manageable.
- Vanilla sugar substitute: Use 1 teaspoon of pure vanilla extract per tablespoon of vanilla sugar called for.
- Nut substitutions: Almonds, walnuts, or pistachios all work in place of hazelnuts.
- Gluten-free option: Substitute the all-purpose flour with a 1:1 gluten-free baking blend.
- Storage: Keep covered in the refrigerator for up to 7 days. Flavor improves with time!
- Freezing: Freeze individual slices wrapped tightly in plastic wrap for up to 1 month. Thaw overnight in the refrigerator.
- Recipe adapted from Jelena, A Kingdom for a Cake.
Nutrition
Nutritional Disclaimer
This recipe was calculated using the exact brands and measurements I used to make this recipe. If you are following a strict diet please note changing anything will cause the nutritional info to change. My calculations are intended as a guide only.
Related Recipes You’ll Love
If you loved making this Esterhazy Torte, you’re going to want to explore more impressive desserts from the Hostess at Heart kitchen!
- My Homemade Sweet Cherry Torte is another stunning layered dessert with a pecan shell and rich cherry filling — beautiful and surprisingly approachable.
- For a no-bake option that’s just as elegant, my Easy 3-Ingredient Chocolate Truffles are the perfect make-ahead treat for entertaining.
- Love the look of an impressive decorated cake? My Chocolate Stout Bundt Cake with Irish Cream Glaze is another showstopper that’s a little easier on the timeline.
- If you need a great frosting to practice your decorating skills, my Chocolate Buttercream Frosting is smooth, silky, and pipes beautifully.
Did you enjoy this recipe? Don’t forget to pin it for later and follow me on Pinterest for more delicious recipes like this one!
Originally published: January 30, 2015. Updated: March 12, 2026– Enhanced with more detailed instructions, tips, and serving suggestions. No changes were made to the recipe.


What a beauty! It’s a show stopper.
Absolutely gorgeous 🙂 A piece of art. I just can’t imagine spooning in. 🙂
Thank you so much skd! It was a great learning experience.
A gorgeous, gorgeous torte. Almost too pretty to eat (almost….cause if you’d give me a fork I would be right in there)
My husband and I had dueling forks on the last piece 🙂 Thank you so much for stopping by.
This is just lovely! It looks like it came from one of the old world bakeries!
This is a superb recipe and you did a superb job. I don’t often bake cakes, but next time there is an occasion, I will try this one for sure.
Thank you so much for your lovely comment and the follow Hilda! I was very pleased with the way it came out but was nervous while making it.
I love hazelnuts, and I can only imagine how good could be eating this cake! Congrats Julie, and happy FF to you!
Oh my, do those layers ever look delicious! Thanks for making this to share with us!
Thank you so much for visiting!
Gorgeous. 🙂
Julie, this looks incredible, I’m sure its equally delicious, love hazelnuts!
Thank you!
Oh wow, does that ever look delicious, I love hazelnuts, what a wonderful cake, thanks for sharing:)
Thanks Lily! I’ve never really cooked with hazelnuts, but it wont be the last time. They were yummy indeed.
Julie one piece please!!!! This looks so delicious!!!! 🙂
Awe thanks so much Amy!
Beautiful cake and it sounds delicious 😉 It’s wonderful that you’re trying new cooking techniques as well!
Thanks Justine! I must admit that I held my breath a lot during this recipe, but very happy that it looked decent and tasted great.
What a great idea to join daring kitchen Julie! I’ve have been thinking about joining, but am not sure I’ll be able to keep up. This torte looks just wonderful!
It’s only one recipe a month, and you can miss twice before they boot you out of the secret baking club. 🙂
Impressive undertaking Julia! Good for you to stretch yourself! The cake looks divine and so beautiful too!
Thank you Johanne! It was a bit of a push but I did have a great time making it.
Oh my this torte looks mesmerising. .. I wanted to try something nutty dessert and this looks perfect…. Thank for sharing this recipe… 🙂
Thank you so much Chitra! It will feed a crowd that’s for sure!