Sourdough Multigrain Wheat Bread Recipe
This post may contain affiliate links. Please read our Disclosure Policy.
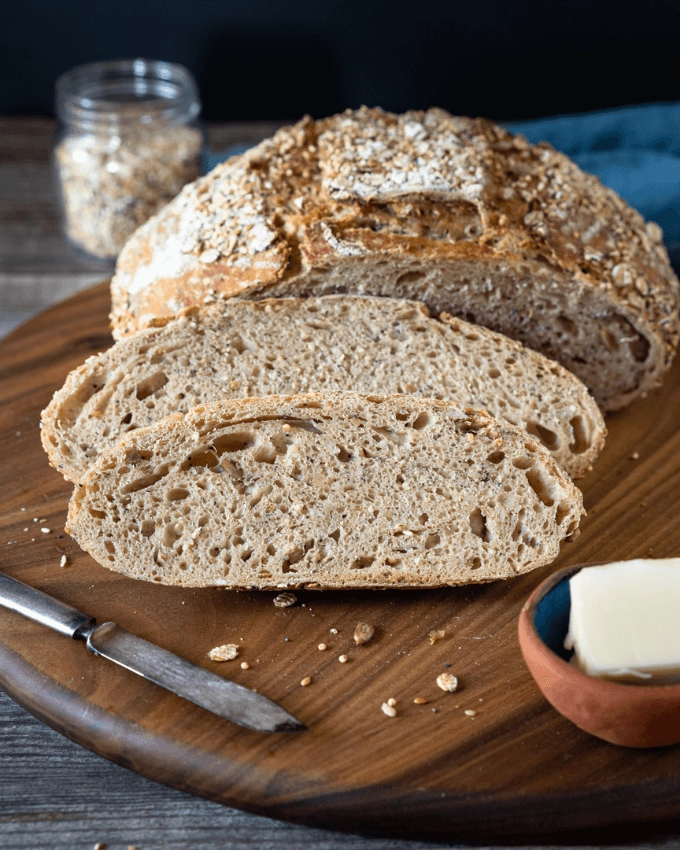
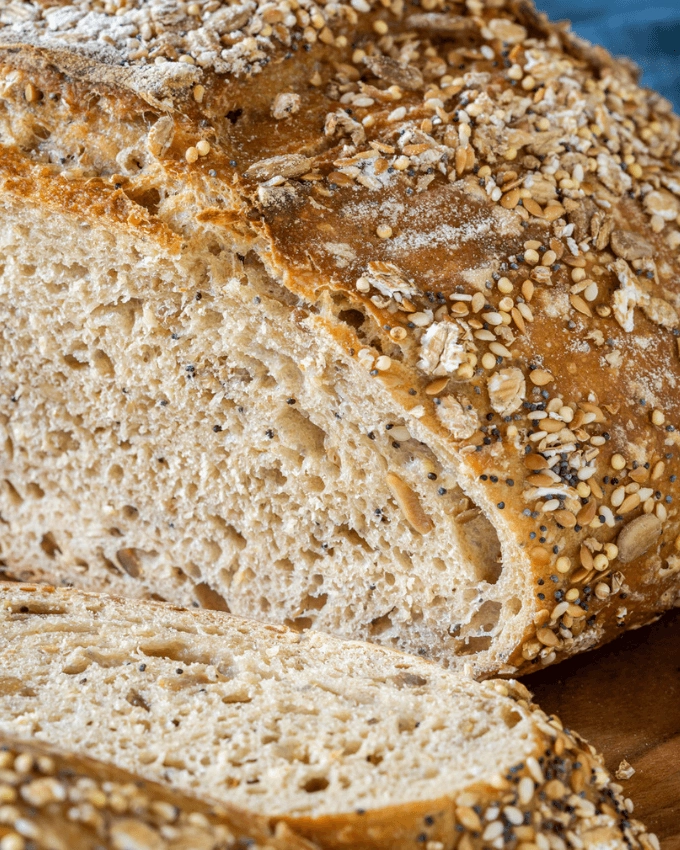
Whole Grain Sourdough Bread is an artisan loaf you can make at home. Simple ingredients and minimal handling transform this homemade Multigrain Wheat Sourdough Bread into a nutty soft and tender loaf with a perfectly crunchy crust.
This post has been updated from 2019 to improve readers’ experience. No changes were made to the recipe.

If you want bread with a soft and tender interior, and that crispy crust, you’re going to love this Multigrain Sourdough Bread. This Whole Grain Bread has just enough holes to hold all that butter and a nutty flavor your family will love!
This multigrain wheat loaf of bread is what keeps you searching for the perfect bakery. You’ll be surprised how a few turns of a simple dough come together into a nutty homemade bread that’s bakery beautiful.
Table of contents
- Can a beginner make Multi-Grain Sourdough Bread?
- What you may need
- The Ingredients used in this Multigrain Organic Wheat Bread:
- How To Make Sourdough Multigrain Wheat Bread
- Stretch and Fold
- Bulk Fermentation (rise time)
- Dutch Oven Baking
- How to store Sourdough Wheat Bread
- Whole Grain Sourdough Bread F.A.Q’s
I love grains, seeds, nuts, and lots of them. I start my morning with yogurt topped with granola and nuts, and there’s nothing better than a piece of homemade bread slathered with butter or mashed avocado with my morning coffee.

I’ve always loved baking and always wanted to bake bread with a wild yeast starter but it took me a while to try it.
You see, most of the recipes and books that I looked at talked about percentages and interactions, and I just wanted to make the darned bread.
But I had to change my ways. One thing that I did have to do is to weigh my ingredients. I know using grams in the United States drives people nuts However, 1/4 cup of my starter isn’t going to measure 1/4 cup of your starter. The reason is because of the gasses this ingredient has. But you still need 150 grams.
It took me a while to get the confidence to try it, but I was lucky enough to start with a pretty easy Overnight Sourdough recipe. That recipe includes a video that I’ve added to this recipe card for you.
If you have questions on making or using a Bread Starter or need to start one for yourself, read “Sourdough Bread Starter.”
After making that recipe several times, I got enough experience with what my dough should feel like.
Can a beginner make Multi-Grain Sourdough Bread?
Yes! In order to make bread like this, I recommend just rolling up your sleeves and jumping in. Read the recipe through and just take it one instruction at a time. It’s just flour you know? And, hey, give me a shout with your questions. I answer all my own comments and mail.
I’ve had a few loaves that didn’t turn out quite like this one but I learned something each and every time. I still do.
Take a recipe such as this one and remake it until you have enough confidence to diagnose any issues you might have.
Why isn’t this a Whole Wheat Bread Recipe?
The short answer is that it could be. You see, the Whole Grain Council requires that only 51% or more needs to be made of whole grain in order for it to be called whole grain. What?
60% of this homemade Wheat Bread recipe is a whole grain so legally I could have called it Whole Wheat.
For this loaf, I used a mix of bread flour and wheat flour in order for this loaf to be fluffy and not too dense or heavy. If you use all whole wheat flour, gluten is often added to get the right texture.
This recipe may not be whole wheat but it is organic, multigrain, dairy-free, nut-free, and vegan. Oh, and most important, delicious!
What you may need
Hostess At Heart participates in affiliate programs. As an Amazon Associate, I earn a commission from qualifying purchases. Please refer to my disclosure page for more information.
- Instant-Read Thermometer – I use an instant-read thermometer for this recipe. I couldn’t function without it.
- Lodge 6 Quart Enameled Cast Iron Dutch Oven. Classic Red Enamel Dutch Oven (Island Spice Red) – I love this dutch oven. I have three that are triple the price of this one and it’s my favorite. It bakes my bread perfectly and makes a mean ragu recipe.
- Oven Mitts – When I work with heavy pots and pans I want an oven mitt versus a hot pad. These mitts are heat rated to 550° so are good for the oven or bbq and come in several colors. They also come in a longer length for longer arms!
The Ingredients used in this Multigrain Organic Wheat Bread:

- Bubbly starter (Levain) – I recommend feeding your starter and letting it get active for a couple of days. Once it’s it’s consistently active, it’s ready to use.
- Salt – I use fine sea salt. It is easier to incorporate and dissolve than coarser salt.
- Wheat Flour – I used organic whole wheat flour. It has an amazing nutty flavor.
- Organic Bread Flour – Bread flour has a higher protein content than AP flour. That higher protein provides more structure to your loaf. It worked very well with the wheat flour
- Water – There’s a lot of controversy regarding water in bread making. Some experts say if you can drink it you can bake with it. Other experts say the chlorine and mineral content can inhibit yeast activity.
- Multigrain Blend – my own Organic Whole Grain Blend recipe.
Variations – You don’t have to use the Multigrain blend that I recommend. You can use all sesame seeds, flax seeds, sunflower seeds, oats, poppy seeds, or whatever you like, or leave it all off. Make this homemade wheat bread your own.
NOTE: You do not have to use organic ingredients and this bread will turn out just fine. It’s a personal choice.
How To Make Sourdough Multigrain Wheat Bread
Prepare the Sourdough Starter
The night before
Step 1: feed your starter and wait until it’s increased in volume from 30% to 50%. I put a rubber band or a piece of tape on the container to measure the increase in volume.
For my baking, I feed our starter before bed by taking 1 tablespoon of starter and mixing it with 200gr filtered water and 200gr of our 50/50 flour mix. It has always passed the float test the next morning which can be 6 to 8 hours. This makes more starter than what you will need but I bake several loaves at a time and freeze them.
If your starter is runny it can be because it’s starving and it will need to be fed again before you can use it.
Mix and Proof
The next day
Step 2: Using a large glass bowl, combine all of the ingredients together, including the seeds and grains. Mix by hand just until the ingredients are combined (less than 5 minutes). Cover the dough and let it rest for 30 minutes. While the dough rests, prepare to shape the dough
Note: I’ve found when using whole grain flour that you need a higher moisture content (hydration). Or, even baking in a dry climate or during the winter for me, the dough needs a higher moisture content.
It’s all about the feel of the bread. You want it to feel wet but not so wet that it isn’t manageable. I will often hold back about 50 grams or roughly 1/4 cup of the water that the recipe calls for.
After I get the ingredients mixed, if the dough feels dry, I’ll mix in the additional water. Sometimes you’ll need even more than that. Just keep adding a little bit at a time. It will not take you long to get the feel of what you want. This isn’t a real wet dough.
Shaping bread dough
Want to save this recipe?
I'd like to receive more tips and recipes from Hostess At Heart!
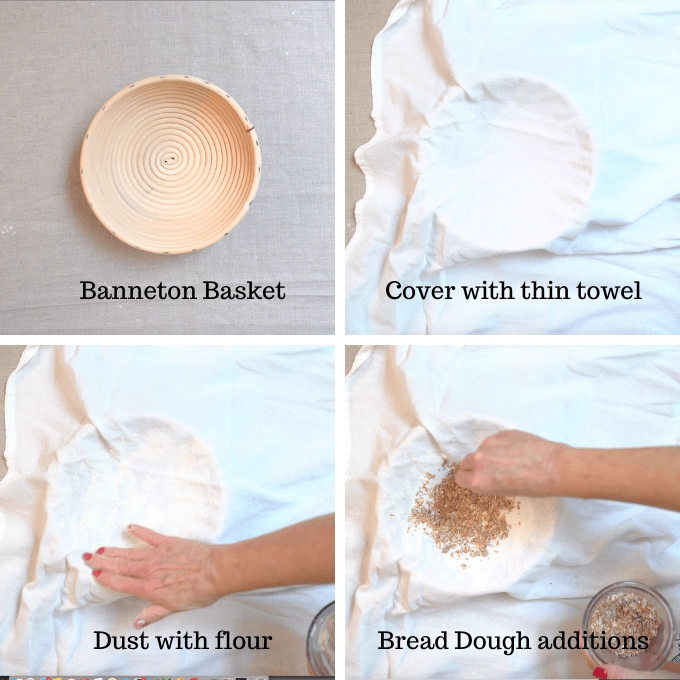
Step 3: When shaping bread dough into a loaf, there are a few simple things that you’ll want to do.
- Prepare the container that you want your dough to rise in. If you have a round loaf, you want a round container.
- This can be what’s called a banneton or a simple basket or a bowl.
- I line the container with a thin flour sack or linen towel and then dust it with flour, or my favorite, a 50/50 mix of rice flour and whole wheat flour.
- The bread dough will pick up the texture of the container you use. You can see the rings from the banneton basket.
- You can also add seeds, oats or other ingredients you want on top of your bread.
Stretch and Fold
Step 4: Stretch and fold the dough by pulling the outside of the dough to the center as you turn the bowl. I usually do about six pulls or as many as it takes me to get all around the loaf. Pull the loaf towards you, from the outside of the loaf toward you turning the dough in a circular motion. The skin of the dough should become taught.
Step 5: Roll the round loaf in additional seeds and grains and set it smooth-side-down in your container (smooth side down).
Bulk Fermentation (rise time)
Cover the dough with the ends of the towel and let it rise for 6 hours at room temperature or you can let it rise for 4 hours at room temperature and then set it in the refrigerator to bake the next day. This is known as the bulk fermentation phase.
The rise time may vary when left at room temperature depending on the weather and temperature. The loaf may not double in size but will be noticeably larger in size.
- If you push a dent into the loaf and it springs back quickly it needs a little more time.
- Slowly springs back means it’s ready to bake.
- If it doesn’t spring back at all, it may be over-proofed. You can still bake it but it will not have as much oven spring and be much denser.
Unlike our Overnight Sourdough recipe, I didn’t don’t do a second proof before baking this Sourdough Multigrain Bread recipe.
Bake and Cool
Step 6: Preheat the oven. I’ll put the empty covered dutch oven in my oven and let it preheat for up to an hour. You want it hot. Remove the shaped loaf from the bowl or basket and place it in a pre-heated dutch oven. Score the bread with a razor blade or sharp knife. See my video for putting the bread loaf into the hot dutch oven below.
Replace the lid and put it in the oven. Reduce the temperature and let the bread bake for 20 minutes. Remove the lid and let it bake for another 15 to 20 minutes or until an instant-read thermometer reaches 209°F to 212°F.
Remove the bread from the dutch oven and let it cool on a cooling rack for at least 90 minutes.
Bread Flip Technique
I used to worry about getting my bread into a hot pot quickly without deflating the bread dough and/or burning myself. This simple flip technique solves that issue. Please note that in the video I used a cold pot for demonstration purposes only.
- You will need a strip of parchment paper and a pie plate. A round pie plate works even if your loaf is a shape other than round.
- Place the strip of parchment paper over the top of your bread dough container.
- Holding onto the parchment paper and the container, flip upside down. Your parchment paper is now on the bottom side of your loaf of dough.
- Score the dough as desired.
- Pick up the loaf of dough and carefully insert it into the pot.
Dutch Oven Baking
I’ve been asked if you must bake this sourdough wheat bread recipe in an enameled cast-iron dutch oven. My experience has shown me that it’s the closest that I can get to a professional steam oven.
I’ve used an aluminum roaster and while I got good spring, the bottom was hard and much darker, almost burnt.
I’ve also baked this multigrain sourdough bread in my dutch oven without preheating the pan. I get better color on the bread when I preheat the pan in the oven versus putting it in a cold pan.
I’ve had readers report that they placed the bread on a baking stone and misted the edges of the oven but I haven’t tried it with this loaf for two reasons.
- Every time you open your oven, you lose valuable heat which can affect the spring, baking time, and moisture content of your loaf.
- If you drop water on the glass insert of your oven it can shatter.
How to store Sourdough Wheat Bread
- Sourdough bread can sit out on the counter without covering it until it’s cut or up to 2 days.
- Sliced sourdough can be placed cut-side-down on a cutting board at room temperature.
- I’ve had wonderful results storing artisan bread in linen bags.
- Multigrain Sourdough freezes really well. I’ll often bake 6 loaves at a time and freeze 5 of them. I’ll place a loaf in a freezer-safe bag and then wrap it in foil. It’s good for 3 months.
Whole Grain Sourdough Bread F.A.Q’s
Using whole-grain ingredients does provide about twice the fiber as found in other bread recipes.
It’s been said that sourdough is easier to digest and that the fermentation process has been shown to lower blood sugar.
Yes, this recipe is vegan.
I use an instant-read thermometer and bake to 212°F. I’ve read that if you tap the loaf and if it sounds hollow, it’s done. That’s not always true.
As the bread bakes, it expands (also called oven spring). Scoring the bread prevents the crust from cracking or “blowing out”. Some people like this look. Whether you score it or not, the bread will still taste the same.
The bread still has a lot of moisture retained in the crumb once it comes out of the oven. When the bread cools, the water evaporates.
If the bread is cut before it’s cool the moisture is absorbed by the crumb making it gummy and the crust making it hard once it’s cool.
Why is my multigrain sourdough bread dense?
There can be several reasons and I’ll cover the most obvious.
This loaf of sourdough bread has low moisture content and minimal handling. Some of the sourdough recipes you see have a high moisture content that makes handling them more difficult. They also go through multiple stretches and fold series. I wanted a loaf that a beginner could make and be proud of.
You also have to have a bubbly starter. If your starter isn’t vigorous, it will not have the energy to bubble, which creates more of an open crumb.
Don’t forget to come back and let me know how your Multigrain Sourdough Bread turned out!

Sourdough Multigrain Wheat Bread Recipe
Ingredients
- 150 grams bubbly starter
- 285 grams *purified water or filtered water at room temperature
- 200 grams bread flour organic
- 300 grams whole wheat flour organic
- 9 grams sea salt fine
- 75 grams Whole Grain Blend Mix Plus extra for the exterior crust
Instructions
- Combine and mix all of the ingredients except, for about 50 grams of the water, together briefly (just for a few minutes is enough) with your hand. If the dough is dry add the additional water. If it's wet you will not need it. Cover the bowl with plastic wrap and let the dough rest for 30 minutes. Do NOT skip this step.
- Stretch and fold the dough into the bowl several times for about a minute. I just pull the outside to the center as I turn the bowl.
- Roll the outside of the dough with the multigrain blend and place the dough into a prepared bowl or banneton seam-side up.
- Cover and let the bread rest for 6 hours and then either prepare it for baking or place it in the refrigerator for baking the next day.
- If you've refrigerated the bread dough, remove it from the refrigerator while the oven preheats.
- Preheat the oven to 475 °F and place a lidded pot inside to heat up. You can use an enamel dutch oven or aluminum roaster. You can also put the dough into a cold pot but I find I don't get the same golden color when I do that.
- Carefully remove the pot from the oven and remove the lid. Turn the dough over so the smooth dome side is up. Carefully place the dough into the pot.
- Slash the bread with a razor blade or sharp knife. Replace the lid and put the pot in the oven.
- Immediately reduce the heat to 425 °F. Bake for 20 minutes. Remove the lid and bake for an additional 18 to 25 minutes. I test my bread with an instant-read thermometer and remove it when my temperature reaches 206 °F to 212 °F
- Immediately remove the loaf from the pot and cool it on a cooling rack for at least 90 minutes before slicing. 2 to 4 hours is highly recommended.
Notes
- If you want to mix bread earlier in the day. After rising for 6 hours at room temperature, set the covered dough in the refrigerator and bake the next day. Remove the dough from the refrigerator to sit out while the oven preheats.
- Feed earlier in the day. When it’s bubbly do the test float. If it’s runny it’s used up all it’s energy and needs to be fed again before you can use it. Repeat the float test.
- Your bread can be cooked in a cold dutch oven but I like the color and rise I get from preheating my lidded pot.
- This bread freezes beautifully. I wrap it in plastic wrap or a ziplock bag and then heavy-duty foil.
Nutrition
Nutritional Disclaimer
This recipe was calculated using the exact brands and measurements I used to make this recipe. If you are following a strict diet please note changing anything will cause the nutritional info to change. My calculations are intended as a guide only.
If you enjoyed this Multigrain Bread recipe, here are a few more you may enjoy.
Don’t forget to pin this amazing Sourdough Multigrain bread recipe before you go!

I have two books (out of several) that I’ve learned so much from. I recommend them exclusively to help in your bread experience. They are easy to read and will help you get that beautiful loaf on the table!
Don’t throw out your discard starter! Here are a few sourdough starters discard recipes that you can make!


My kitchen tends to be on the cooler side. Regular breads take about 10 hours to rise. Would I do the same for this one & Wait for it to double or stick to the 6 hours?
Thanks:) can’t wait to try it
Actually, a slow rise works amazing with this bread so instead of refrigerating shape it and leave it on the counter for about 10 hours or until you push it with a finger or knuckle and it slowly bounces back. If it doesn’t come back, it’s over proofed or if it bounces back quickly it needs more time. Please let me know how it goes for you.
I was wondering if you have a book you have written or recommended me to purchase for making sourdough breads and starter?
Hi, Paula! I have a starter posthttps://hostessatheart.com/bread-starter/ that will help you make your own starter. It’s just flour and water and you’ll see how easy it is. My first sourdough recipe is an easy sourdough recipe to get you started: https://hostessatheart.com/sourdough-bread-recipe/. I use the equipment in this post: https://hostessatheart.com/10-gifts-for-the-bread-baker/, and highly recommend Tartine Bread (affiliate link https://amzn.to/3wxLUwn). It’s a book that has really helped me. I hope you’ll reach out and let me know if you have more questions. I love the process of sourdough and hope it’s for you too.
I am SO HAPPY I found this recipe! What a flavorful loaf this produces with a perfect crumb and that lovely exterior. I’ll definitely bake this again because the whole family loved it.
We love this bread too. Thank you, Erin!
Nice change-up from my typical sourdough! Came out perfectly!
I’m glad you enjoyed them! Thank you.
Followed the recipe exactly and it came out perfect! I so appreciate the measurements in grams…so helpful for baking bread.
This bread is seriously the best wheat bread I have ever made! ABSOLUTELY FANTASTIC!!
I already adore your regular sourdough, made this for a change the other day, so tasty!!
This recipe is making me want to get out the sourdough starter again! I’m so excited to give this bread a try.
I am new to bread baking and looking for a very easy recipe. What do you mean when you say “squelch” the ingredients? Do you mean mix all together? Also, the 75 gr of Whole grain blend mix – you do nit say to to soak this separately. And actually your recipe is not clear about when to add it to the rest of the ingredients? Also, in the comments, some asked you about making a Kevin. But I don’t see you mention a levain in this recipe. Sorry, but need some explanations soon.hoping to bake tomorrow!
Hi Halyna! Thank you for your questions. When I say squelch (unclear term) I mean to mix the ingredients together. I don’t soak the whole grain blend and add it right at the beginning when all of the other ingredients are added. The levain is actually the same as the bubbly starter that you build before you mix your bread. I hope this helps but please let me know if you have more questions.
Thank you for your prompt response. Sorry about my autocorrect typos! I decided last night to soak my multigrain (did a bit more – 90 gr plus 90 gr of water, which has all been soaked up). I just mixed the starter, flour and water, it is autolyzing. Will then add the soaker. You don’t mention adding honey, but will add a tablespoon. Hoping this all works out ok!
Again, thanks so much for your super quick response!
Just thought of something else. Do you ever bake in a cold Dutch oven? I recall reading someplace else to do the second rise in the pot you will bake in – don’t have to worry about transferring from the fermenting bowl. Then place in a cold oven, but count the baking time from when oven reaches your desired temperature. Have you ever done this? And if yes, can I store it in refrigerator overnight and bake the next day?
Hi Halyna! I hope your bread baking is going well. You can definitely bake in a cold Dutch oven but I don’t feel it browns as deeply. I’ve never put my bread in a cold oven. To me, I love the initial spring the bread takes on from the hot oven. If you give it a try, I’d love to know how it turned out.
My loaf came out pretty dense, not airy. It tastes great but what might I have done wrong??
This is a dense bread, Yvonne. You didn’t do anything wrong. I have some recipes coming that will require a little more hands-on instructions but will result in a lighter loaf. Using this recipe, after the dough has rested 30 minutes, fold the dough in on itself about 6 times. You can keep it right in the bowl. Do this every 30 minutes for a total of 4 turns and folds (2 hours). At this time shape it and put it in a bowl or basket and let it either rise covered for two hours and then bake or, cover it with a dishtowel and put it in a plastic bag and refrigerate it overnight. The next morning, bake it. If you bake it the day of it will have a mild flavor. If you refrigerate it you will get a little more of that sour flavor. I haven’t released these instructions but I’ve done them with these overnight recipes and you will get an airy loaf. If you have more questions, email me at hostessatheart@gmail.com.
This loaf turned out beautifully; I must admit having doubts during the process, though. The dough seemed much drier and denser than other similar breads I’ve made, even though I weighed the ingredients precisely. I worked in a little more water at various stages and did more stretch and folds during the start of the 6 hour proofing. I let the dough rest overnight in the fridge and shaped it in the morning once it had warmed up (I used my oven’s proofing cycle). It finally got some spring. The loaf looked gorgeous and got the seal of approval from my husband, a/k/a/ as Mr. Fussy. It was a dense texture with a lovely crust. I will make it again for sure. Next time I‘d like to shape it in an oblong loaf so may bake on a stone.
I’m so glad that it worked for you and Mr. Fussy LOL! Thank you for the tips, they may help our bread baking community!
I can’t wait to try this one. I love whole grain breads. I just finished my 2nd Overnight Sourdough loaf, came out perfect. After failing at 5 attempts of SD, I found your Overnight Sour Dough recipe. So easy compared to the others I tried. My starter is perfect every time now. I used rye flour to get it going, and boy did that flour work well. I’ve added All Purpose flour to it now. thanks Karan
Hi Karen! Congrats on your sourdough! That’s so exciting. Rye flour is a superpower for bread starter for sure! The whole grain is delicious! I hope you’ll let me know what you think.
I am really new to this kind of bread making. To make the Levain can I use my sour dough starter?
Thanks
No problem Maria! I had to correct my recipe and thank you for your question. Some bread recipes require that you made a “Leavain” after your starter. This one doesn’t and just uses your starter. Please let me know if you have any more questions as you go.
THIS bread is perfect. I’ve been making sourdough bread for a few months, but had not tired using whole wheat flour or whole grain yet. This was my first attempt at whole wheat bread and it was perfect! Soft on the inside with a little crust. I use a pampered chef stone bread pan because my family didn’t like like the crunchy crust you get from a cast iron pot. I still get a good rise and shape, just a lighter crust.
Thank you, Lee! I’ll save your tip for the pan for our bread friends who want a softer crust.
Your directions are so clear and easy to follow. I no longer feel like a. Mad scientist with my bubbling concoction on the counter. Thanks for helping me make a beautiful bread,
Awe Joan, we are kindred bread bakers. I’m so glad you enjoyed this bread and I have a few more up my sleeve that I’m working on. Thank you for such a nice comment.
This loaf looks absolutely delicious. I’m with you, coffee and fresh homemade bread slathered with butter does sound like a little bit of heaven. I can’t wait to make some homemade bread!!D
Thank you Deb!
There is nothing like the smell of fresh baked bread! Except for how delicious it is!
Thank you Nikki! We sure agree!
I would love to make this multigrain bread but I do not know how to make Levain. Can you help me with that? Thank you, Leah
Hi Leah! I have a post coming out very soon on creating a starter from scratch. If you already have a starter, you make a bubbly Levain from that. The night before I bake I combine 2 tablespoons of my active starter with 150 grams of filtered water and 75 grams of all-purpose flour and 75 grams of wheat flour. Let it sit out all night and that’s your Levain. It should be nice and bubbly the next morning. As you can see I’m using the weights of the starter that I need in my recipe. Since it will increase in volume overnight, you will have enough to feed for your new starter. Let me know if you have any questions! Juie
Homemade bread is the BEST! I haven’t worked with multi grain before, can’t wait to give it a try!!
Thank you, Kylee!
This is the most beautiful loaf of bread I have ever laid eyes on!
Thank you Michaela!
In my opinion, you cannot beat homemade bread! I’m obsessed with this one and the addition of the multi-grain goodness!
I agree, Erin!
I am a complete bread baking nut too! This one looks amazing, thank you for sharing!
Thanks, Kathleen!
You’ve definitely perfected sourdough bread! This loaf looks absolutely perfect. Would you share a bit of that loaf with me? 😉
You know I would and it goes great with a glass of wine! Thanks, Ann!