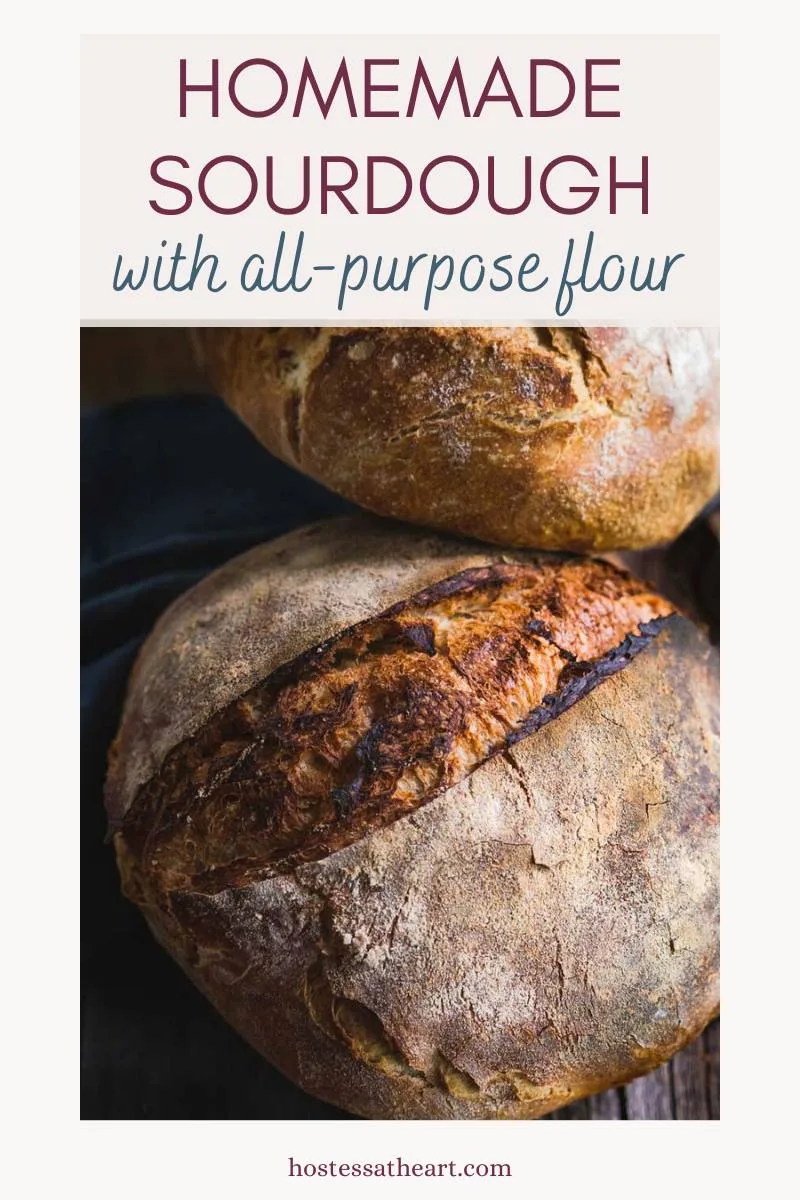
Homemade Sourdough Bread (with All-Purpose Flour)
This post may contain affiliate links. Please read our Disclosure Policy.

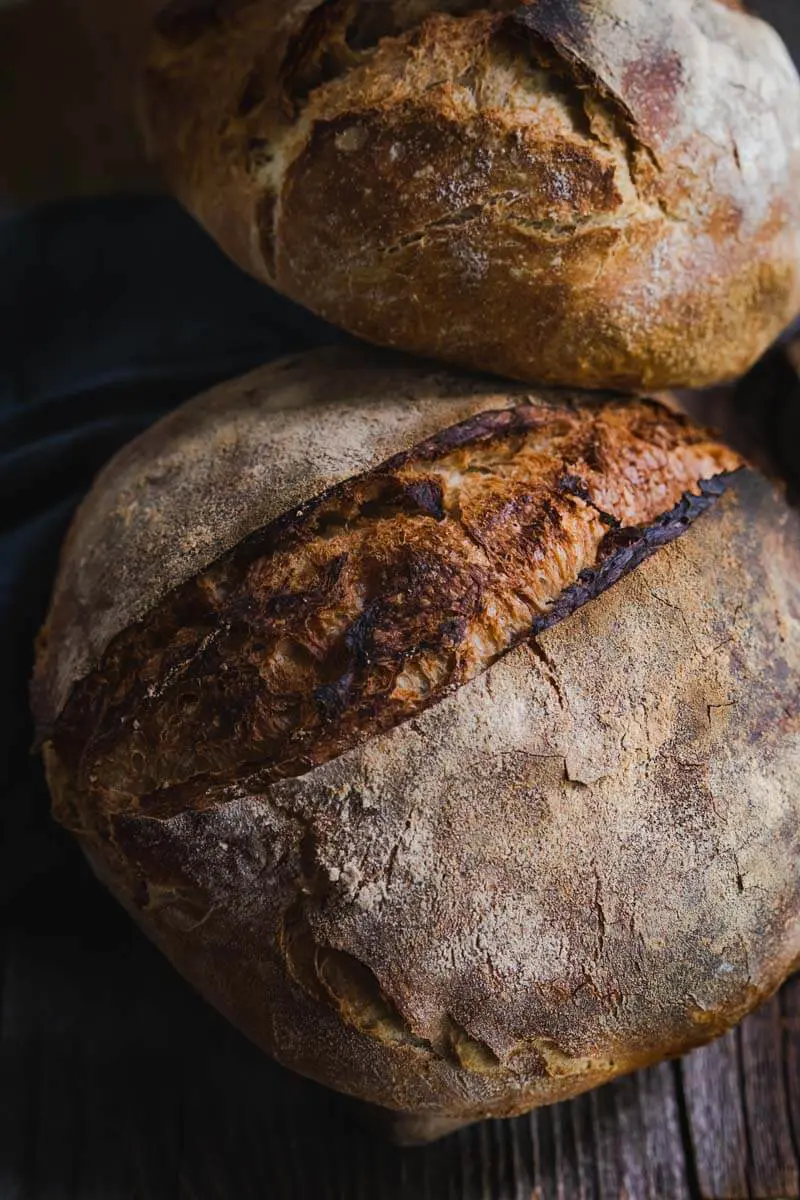
Making Homemade Sourdough Bread at home with a beautifully browned Artisan crust can be simple and without kneading, complicated techniques, or any fancy ingredients.

I baked up over 15 loaves of sourdough bread to perfect this Homemade Sourdough Bread recipe with All-Purpose Flour, and have made it several times since. This delicious Sourdough is now perfect for your kitchen.
Does making Homemade Sourdough Bread at home scare you? I get it! That was me a few years ago.
How about a simple Sourdough Bread Recipe that uses plain all-purpose flour, no kneading, or complicated techniques? Are we taming the jitters just a bit?
We want you to be a successful sourdough bread baker so have included several videos and photos with this recipe for Sourdough Bread. Plus, I’m here to answer any of your questions!
Our Overnight Sourdough Bread recipe has been so popular. However, several of you have been asking for a larger loaf recipe, as well as an all-purpose flour bread recipe.
Table of contents
Several No-Knead Bread Recipes use instant-rise yeast. This recipe uses natural yeast also known as a starter.
If you don’t have one, you can make your own in 5 to 7 days using our recipe for Sourdough Bread Starter.
Feed your Sourdough Starter
Fed starter is also referred to as a “Levain”. Don’t get hung up on the terms. It’s just a fed starter.
We feed our starter before bed by taking 1 tablespoon of starter and mixing it with 200gr filtered water and 200gr of our 50/50 flour mix. It has always passed the float test the next morning which can be 6 to 8 hours.
This makes more starter than what you will need but I bake several loaves at a time and freeze them.
Making Sourdough Bread
Dough Mixing Tips
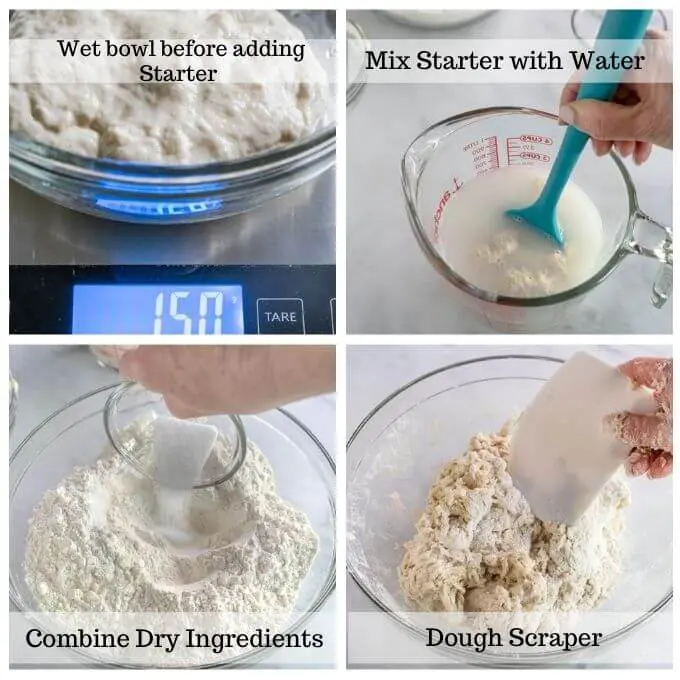
- When I measure out my sourdough starter, I wet the bowl so the starter slides right out.
- Combine the sourdough starter with the water before adding it to the dry ingredients. I find it disperses much easier.
- Whisk the dry ingredients together before adding the wet ingredients.
- Use a dough scraper to remove the dough from the sides of the bowl. They work great for removing the dough from your hands and for folding wetter dough too.
Overnight Proof – Room temperature
We use an overnight proof with this recipe. However, I’m going to simplify it even further so you can match it to your schedule.
- Feed your starter approximately 6 to 8 hours before mixing your bread ingredients.
- We feed our starter before bed by taking 1 tablespoon of starter and mixing it with 200gr filtered water and 200gr of our 50/50 flour mix. It has always passed the float test the next morning which can be 6 to 8 hours. This makes more starter than what you will need but I bake several loaves at a time and freeze them.
- If you feed your starter at 1:00 p.m. it will be ready to mix by 9:00 p.m.
- Do the float test and measure out your ingredients.
- Combine all of the ingredients together with your hand until all of the flour is combined and let it rest, covered, for 30 minutes.
- Tip: Let your bread rest on the counter and in the meantime wash out the bowl and spritz it and a piece of plastic wrap with oil.
- Make sure you use a large bowl that’s at least twice the size of the dough.
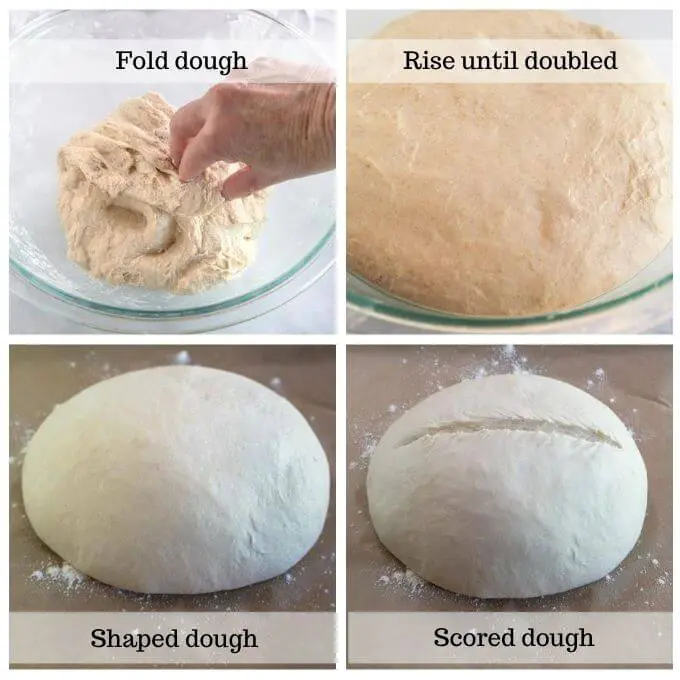
- 9:45 p.m. Stretch the sides of the dough to the center, working it all the way around for about 10 folds.
- Put it in the oiled bowl and cover it with plastic wrap for 8 to 12 hours.
- Preheat the oven and remove the dough the next morning at 7:45 a.m. Lightly sprinkle flour over your working surface and shape the dough into a tight ball by pulling the outsides to the center and pulling it tightly toward you using the friction of a counter or a cutting board and let it rest for 30 minutes.
- This video shows you how I did it.
- You can either shape the dough into a boule (ball) or we often shape it into more of an oval which is great for using it to make sandwiches or toast.
- Score the sourdough.
- Bake
Refrigerated Proof
Proofing this sourdough bread dough in the refrigerator can make your life so much easier by following these steps:
Want to save this recipe?
I'd like to receive more tips and recipes from Hostess At Heart!
- Feed your starter, and within 6 to 8 hours, do the float test and measure out your ingredients.
- Combine all of the ingredients together with your hand until all of the flour is combined and let it rest, covered, for 30 minutes.
- While your dough is resting, prepare a banneton or bowl lined with a flour sack towel that’s been sprinkled with flour. I have photos of how I do this in our Multi-grain Wheat Bread post.
- Stretch the sides of the dough to the center, working it all the way around for about 10 folds.
- Shape the dough into a tight ball by pulling the outsides to the center and pulling it tightly toward you using the friction of a counter or a cutting board and let it rest covered for 30 minutes.
- This video shows you how I did it.
- Put the dough in the basket or bowl and cover it with the ends of the towel. I then put the whole thing in a plastic grocery bag.
- Refrigerate the dough until you’re ready to bake it. My last one sat in the refrigerator for 36 hours!
- Preheat the oven and remove the dough from the refrigerator. Let it sit in the bowl or basket until it comes closer to room temperature, approximately 1 hour.
- I’ve cut this time before and actually extended it to 90 minutes and my bread still came out beautifully.
- Bake.
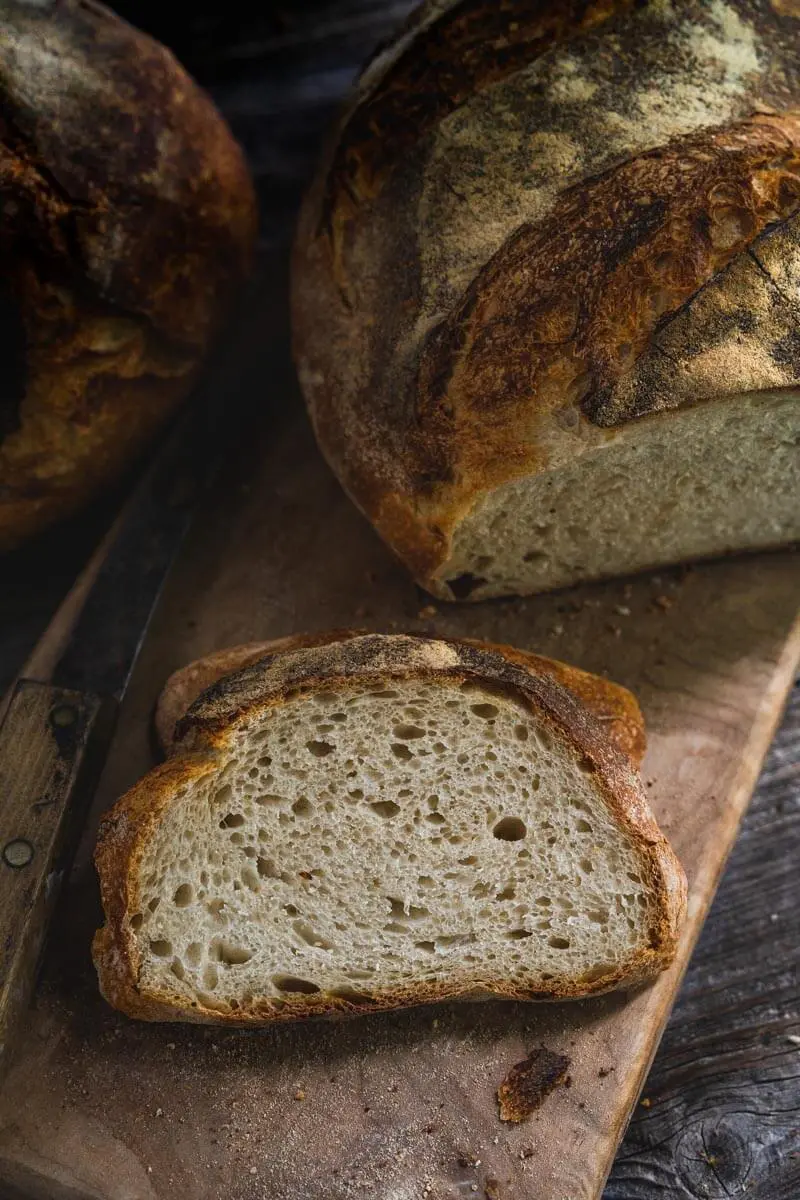
The sourdough bread dough that we proofed in the refrigerator baked up as tall as the Sourdough Bread proofed at room temperature overnight.
The edges may have been a little flatter but nothing that a picky sourdough bread baker would have a problem with.
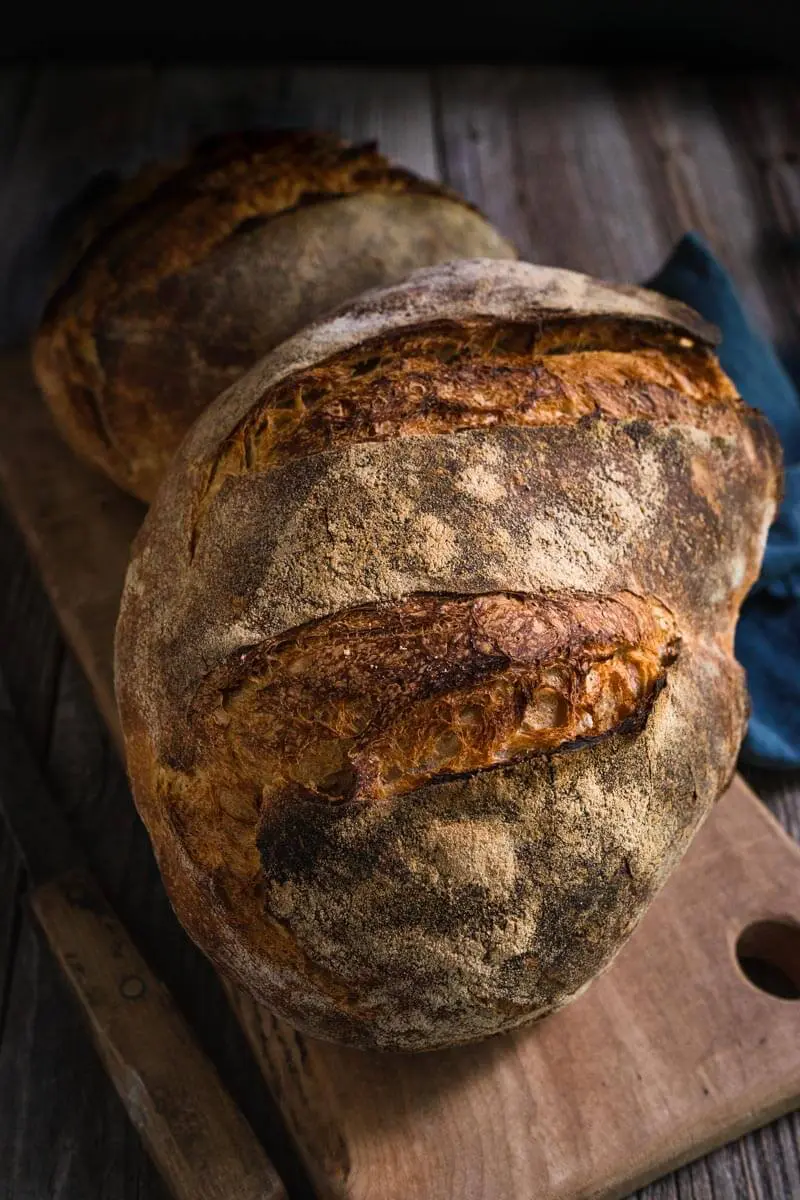
Even though this No-Knead Sourdough Bread recipe is larger than our Overnight Sourdough Bread recipe, we didn’t increase the amount of the Sourdough Starter that I used.
This Basic Sourdough Bread recipe is very easy to work with.
One of the reasons is because it is a 60% hydration recipe which is simply the percent of flour to liquid.
Recipes with higher hydration are much more difficult to work with because they’re much more wet and sticky.
If you want to experiment with other recipes, starting with lower hydration recipes will be easier for you while you’re learning.
No-Knead Sourdough Bread Tips
Hostess At Heart participates in affiliate programs. As an Amazon Associate, I earn a commission from qualifying purchases. Please refer to my disclosure page for more information.
- Preheat the oven! I make sure mine is screaming hot at 475°F and start an hour before I want to bake.
- Make sure your oven rack is centered or slightly lower to accommodate your pot.
- Remove any racks above it so you have less a chance of burning yourself.
- If using an enamel dutch oven as I do, make sure that the knob is rated for that high of a temp. This Dutch Oven is.
- Some pots come with a resin or composite material knob and will start to smell when they get too hot.
- If you are using parchment paper, it must be rated for at least 425°F or it will catch fire! This parchment paper is the one we use.
- I have a video showing you how I get my bread in the pot so you don’t burn yourself!
- Be very careful removing the pot from the oven or the lid from the pot! My daily hot pads don’t handle this heat and leave my arms exposed.
- I use these longer mitts and leave them right by the oven to remind me not to touch the pot!
- Use an instant-read thermometer to know when the bread is baked! Tapping it and listening for a hollow sound doesn’t always work. Your bread is done and NOT overbaked when it reaches 212°F.
How To Reheat and Store Sourdough Bread
Best Way To Store Sourdough Bread
Store sourdough at room temperature. Once the bread is cut you can store it cut-side down on a cutting board but never in plastic. I’ve also had good luck with linen bread bags. Wrapping it in a tea towel or Bee’s wrap works too.
Do not refrigerate sourdough bread. The condensation will create a gummy crust.
How Long Will Sourdough Bread Last?
The chemistry that occurs in sourdough makes it last longer and keeps it fresher than other fresh bread. Your bread should be good for up to 5 days. If it gets dry make homemade croutons!
Can I Freeze Sourdough Bread?
Yes! I often make up to 6 loaves at a time. Once the bread is completely cool, wrap it tightly in plastic wrap and then foil. It will be good for up to 3 months
How To Reheat Sourdough Bread
- We make sandwiches and heat them briefly in the microwave.
- You can freshen up or revive a loaf of sourdough by sprinkling it with a little water and putting it in a 250° F for 5 to 10 minutes.
- Toast it in a toaster or the oven. It’s amazing
We LOVE baking bread! You can find all of our bread recipes here!

Be sure to stop back and let me know how your all-purpose flour recipe for sourdough bread turned out.

Homemade Sourdough Bread with All-Purpose Flour
Ingredients
- 150 g bubbly starter
- 427 g *purified water or filtered water at room temperature
- 750 g all-purpose flour
- 13 g sea salt fine
Instructions
- In a bowl that is twice as big as the dough ball, mix all of the ingredients together with your hand. Cover the bowl with plastic wrap and let the dough rest covered in the bowl for 30 minutes.
- Stretch and fold the dough into the bowl several times for about a minute. If the dough is sticky, dip your fingers in water to prevent the dough from sticking to them. Cover and leave the dough out on the counter overnight (8-12 hours). In the morning it will have doubled in volume at least.
- Pre-heat the oven. I preheat to 475 °F and place your lidded pot inside to heat up. You can use an enamel dutch oven or aluminum roaster. You can also put the dough into a cold pot.
- Dust your counter lightly with flour. I use a rimmed baking sheet lined with parchment paper and then dusted with rice flour if my dough isn't overly sticky. It makes it easy to pick up the dough. Scrape the dough out onto the counter. Don't punch it down. You want to keep as many of those bubbles as you can.
- Pull the outside thirds into the middle and shape as you wish. Try to pull the outside of the dough as tightly as possible so it will hold its shape well. I shaped mine into a ball also known as a boule.
- Cover with some oiled plastic wrap loosely. Allow the dough to rest for 30 minutes. Set the timer as this is the only proofing that should NOT be overdone.
- Remove the plastic wrap and slash the top with a sharp knife or lame.
- Carefully remove the pot from the oven and remove the lid. Carefully place the dough into the pot. I lift mine by the edges of the parchment paper and put the whole thing into the pot. Replace the lid and place in the oven.
- Reduce the heat to 425 °F. Bake for 30 minutes. Remove the lid and bake for an additional 20 to 25 minutes or until an instant-read thermometer reads 212°F.
- Immediately remove the bread from the pot and cool on a cooling rack completely before slicing.
Video

Notes
- Feed earlier in the day. When it’s bubbly do the test float. If it’s runny it’s used up all it’s energy and needs to be fed again before you can use it. To see if your starter is ready, put a small amount in a bowl or cup of water. If it floats it’s ready!
- Your bread can be cooked in a cold dutch oven but I like the color and rise I get from preheating my lidded pot.
- This bread freezes beautifully. I wrap it in plastic wrap or a ziplock bag and then heavy-duty foil.
Nutrition
Nutritional Disclaimer
This recipe was calculated using the exact brands and measurements I used to make this recipe. If you are following a strict diet please note changing anything will cause the nutritional info to change. My calculations are intended as a guide only.
If you enjoyed this sourdough bread recipes here are a few more you may enjoy
If you have leftover starter, don’t throw it out. We have some sourdough discard recipes for you.
Did you enjoy this recipe? Don’t forget to pin it for later and follow me on Pinterest for more delicious recipes like this one!


Hi Julie,
Thank you for the recipe. My dough was quite sticky and I was unable to form the round shape. However it is smooth Going to put it in the oven soon. Any tips?
Thank you!
Hi Camila. There are so many reasons why you got these results. Flour protein, temperature, humidity and so on. Don’t be afraid to add more flour to make it workable. Did you use metric measurements or US?
Thanks for the reply Julie. I used metric. However, I tried the recipe again and the bread turned out much better! Thanks again for your help.
Thank you so much, Camilla. I’m so glad that you tried it again. Sometimes it just takes making it again to get the feel of what you’re looking for.
Hi! My sourdough starter floated and I was overjoyed. I put the dough in the fridge overnight. Woke up around 5 took the dough out and put it on the counter. A couple of hours later I preheated my oven and put the dough in. Was I supposed to do one more stretch and fold and let rest for only 30 minutes? Thank you!
Hi Bobbie! You could either shape it and put it in the fridge or you can do it the next morning and let it rest for 30 minutes while your oven preheats.
I love your recipe. I’m new to Sourdough baking so I’ve tried a lot of different recipes and yours turns out great every time. It’s easy to follow it doesn’t take nearly the amount of work other recipes call for and I get the same result.
Thank you so much, Connie for letting me know! I love it when people find success with this recipe. I was so afraid of sourdough before I started and have tweaked this one enough that it isn’t much different than yeast bread baking with the exception of the ferment time.
I am new to sourdough and LOVE this recipe, great way to use my Costco bag of All purpose flour.
Question though, two make a double bath as you mentioned, at what point do you separate the dough? Or do you just start out with two separate batches in two separate bowls!
Thanks so much! Hoping to be able to bless my neighbors and family with regular sourdough❤️
Hi, Dylan! Great question and I bet your neighbors and family love getting fresh bread as much as mine do. You can do one batch and make two smaller loaves or you can double the batch and work with a larger dough. Either way, you will want to separate them right before shaping them and putting them into your banneton, basket, or bowl (whatever you’re using). Please let me know if you have any more questions. I’m clarifying this in the post for all of our sourdough bakers. ~Jules
I made your bread last night and baked it this morning. Okay, I have to confess that we cut a small slice before it cooled. It is delicious with a crunchy crust and the inside is so flavorful. Perhaps the bread is a little to dense. I’m thinking it’s supposed to have more air holes?? Also my loaf isn’t too big…not sure how big it should be? This was my first loaf and I’m certainly going to make more and I will keep notes on what I do. I’m using an old WW scale and not sure how accurate it is. My question is: What do you use to store your bread? Paper bag, plastic bag, parchment paper? Same for freezing the bread…how to wrap with what.
This should be a pretty good-sized loaf at 750gr of flour. It doesn’t have huge holes in it because the hydration is low (60%). Also, since using APF, this bread will be a little more dense. Have you taken a look at https://hostessatheart.com/sourdough-bread-recipe/? You may want to try this one and compare. It’s a little smaller loaf than the one you made. You can store your bread at room temperature cut-side down on a cutting board or a linen bag made for bread storage. I’ll even put it in a plastic bag once it’s completely cool. If you want to freeze the bread put it in a plastic bag and then wrap it in foil. Thank you so much Lesley. I’m glad you tried it and will happily answer any questions you may have.
What am i doing wrong, every time i try to make sour dough following the directions for water and flour amounts the dough is too runny, almost like paste….can’t be handled at all without adding more flour. And this then messes up my rest time because after i’ve waited the half hour i will then find out that i have to have more flour in order to be able at all to streatch the outside to the middle.
what do i do from here…give it another rest after i’ve added more flour before proceeding to fold to the middle?
Tony, is your starter ready to go or does it need to be fed before using it? Are you measuring the ingredients? Your dough shouldn’t be runny. You can email me at hostessatheart@gmail.com with your reply too.
You say to reduce temp to 425 convection. Does that mean 450 in a non-convection oven?
Hi Julia, some ovens automatically make the adjustment for you but if yours does not, 450 degrees is the proper reduction.
@Julie Menghini, I’m confused! I am not using a convection oven (though I do have that option with my smart oven air). I heated the preheated the oven at 475 and when I put my dough in I reduced it to 425. Is that correct? Thanks!!!
You don’t have to use convection, Bobbie. You did exactly what you should have. How did it come out?
For those that live in northern climates, try proofing the sourdough in a parchment lined instant pot for about 4 hours (on yogurt setting at 85°F). Try removing the dough once per hour and folding it without breaking the bubbles! It was innnncredible.
Thank you for the tip Marc-Andre! I’m sure it will be valuable for many of our sourdough community. I’ll definitely be giving that a try this winter too.
I started late in the day and so I didn’t get it into the bowl to rise until 4:30. I’m thinking about putting it in the refrigerator to retard the rise until morning. I hope it’s ok.
That would be my recommendation to Cindy. Let me know how it goes ~ Julie
This is the most perfect looking loaf of sourdough I have made yet! It turned out so great!
Thank you, Amy!
This looks GREAT and I’ve been wanting to try this! Really helpful tutorial here too!
Thanks, Paige!
I love your bread baking recipes and tutorials Julie, love this one especially since we plow through the smaller sour dough loaves so quickly, baked up beautifully!
Thank you, Kathleen!
We have been playing around with all kinds of breads during this weird time in life. And, this has been one of our favorite recipes to go back to several times. Thanks!
Thank you, Debi! Our bread baking community is definitely growing.
This is such a gorgeous loaf! I hope that mine turns out as good as yours. We will see tomorrow when I bake it!
Thank you, Jennifer!
Thank you for writing details for baking sourdough bread. I’m a newbie bread baker and I need all your tips. On step two…can’t wait to put this in the oven.
Thank you, Sandra! Just ask away and I’ll help however I can.