Sourdough Sandwich Bread using Bread Starter
This post may contain affiliate links. Please read our Disclosure Policy.

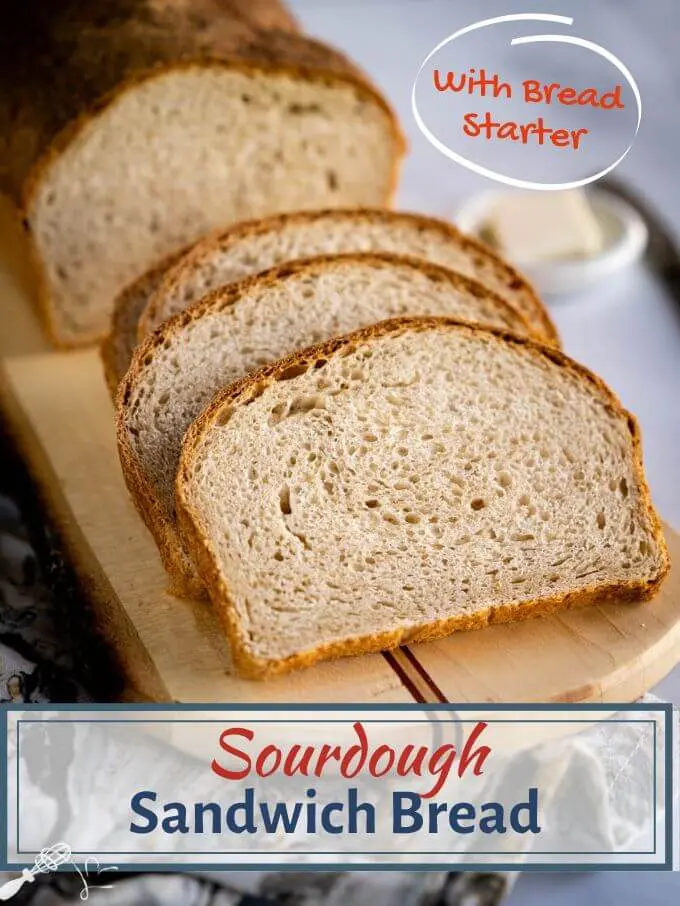
This Sourdough Sandwich Bread is soft and tender and perfect for every day. This bread uses a sourdough starter and doesn’t need any additional yeast.

A soft white Sourdough Sandwich Bread that makes an amazing sandwich or a perfect slice of toast. No added yeast makes this a basic bread that you can bake every day.
I started my sourdough journey a few years ago to expand my bread-baking skills and to get that artisan loaf of bread that we bought at the bakery.
Our Overnight Sourdough Bread was the recipe that I developed and has continued to expand on ever since and continues to be the top recipe on our site.
I never thought I would be using my sourdough starter for a sandwich bread or an amazing Pizza Crust!
Lately, a lot of my friends have been finding it difficult to get dry yeast from their grocery store. I knew that our starter could be used in place of dry yeast.

Bread starter is yeast. It’s not dry yeast, rapid rise yeast, or yeast that you buy in a little packet. I wanted to mention this because some bread recipes indicate they are “Yeastless Bread”. They’re not if they use a natural or wild yeast such as our bread starter.
I sent them our post on How to start your own Bread Starter and told them this sandwich bread recipe was on its way. It’s just bread and water with a little magic bacteria and microbes. You can read a little more about its science if you’re interested.
I’m also using all-purpose flour in this recipe. I know that not everyone keeps a cache of flour varieties like I do.

I popped out a loaf in a jiffy. However, It didn’t have a nice domed top, and even though it looked like bread, the crumb was dense. Not that fluffy interior that I sought. The flavor was fair the day I made it but resembled cardboard the next day.
I did a ton of reading and discovered some ideas that made sense to me.
How to replace dry yeast with starter
If a bread recipe is made up of mainly flour and water, it is a good candidate to convert from dry yeast to starter. It must also contain a sufficient amount of flour and water.
One cup of starter (227g) equals 1 packet or 2 1/4 teaspoons of dry yeast.
Let’s talk about the starter for a minute. My starter is referred to as a 100% starter meaning that it contains an equal amount of water to flour. That makes it very easy to work with and calculate my recipes.
If my starter is 100% hydration (equal parts water to flour) I can replace 1/2 cup of flour and 1/2 cup of water (liquid) in the recipe.
For example, if you have a recipe calling for 3 cups of flour and 1 cup of water and we are using 1 cup of 100% starter, you would reduce the flour to 2 1/2 cups and the water to 1/2 cup. Clear as mud?
Don’t substitute sourdough starter for liquid sweeteners or liquid fats.
Soft Sandwich Bread Ingredients
I wanted this bread to be made up with ingredients that you probably have in your house. The variations you can make may change the flavor but not the outcome.
- Flour – All-purpose flour.
- Water – We used filtered water and warmed it to about 85°F in the microwave.
- Salt – Any will do but I use fine-grain sea salt.
- Butter – Adds flavor and softens the texture. We used non-salted but you can use salted if that’s what you have. You can also exchange the butter for vegetable or canola oil.
- Honey – Adds flavor and is said to give the starter a boost. Sugar also aids in the loaf browning. You can substitute with sugar.
- Starter – 100% hydrated.
I’m giving you this recipe in grams and U.S. conversions to keep it simple. However, I can’t stress enough how important it is that you weigh your ingredients. (I know blah blah blah).
Why should ingredients be weighed?
- When I was calculating this recipe I measured out 1 cup of my starter and it weighed 250 grams. This recipe is calculated at 227 grams of starter. That throws off our liquid and flour ratios.
- I scooped and leveled a cup of flour 3 times and got different weights every single time.
Since I’m pushing you so hard to do this, I’m giving a scale away at the end of this post! Now’s the time to throw your hat in the ring and get a chance to win your own!
Why this Sourdough Sandwich Bread recipe works
This recipe is my second attempt. My first attempt went wrong for these reasons.
With my first attempt, I treated the dough like it was dry yeast. I didn’t work it like sourdough, and while it did rise, I thought I’d get more oven-spring from it. In the end result, flavor and crumb were all wrong.
Sourdough develops more slowly. The kneading and folding that is shown and explained in this post is necessary for the bread to develop gluten and gains strength which helps it to maintain its shape.
Want to save this recipe?
I'd like to receive more tips and recipes from Hostess At Heart!
Steps for making this Sourdough Sandwich Bread Recipe
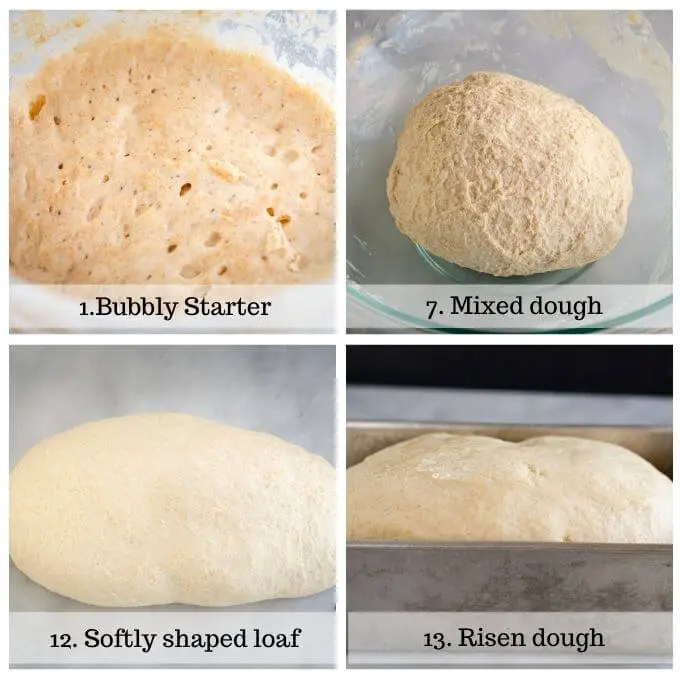
- Build your bread starter – This recipe uses 227 grams of bubbly starter. That’s about the amount I keep on my maintenance schedule so I build it up before using it. Instead of using 100 grams of water and 100 grams of flour to 1 tablespoon of starter, use 2 tablespoons of starter and 200 grams of each flour and water.
- I will actually split this starter up in two separate containers and put 1 tablespoon of starter and then feed each with 100 grams water and 100 grams of flour. This isn’t necessary but it works for me.
- This also assures that I have enough to feed and maintain by not using it all in the bread.
- On the day of baking, test the starter using the float test.
- Measure out all of the ingredients.
- Add the flour and water together and stir.
- Next, add the honey and melted butter.
- Blend together and then add salt.
- Squelch all ingredients together until combined. I use my hand for this.
- Knead the bread for 10 minutes or until smooth. You can also use an electric mixer on medium. However, I like being able to feel the texture so use my hand.
- Shape the dough into a ball and put it in an oiled bowl, turning it once to make sure it has oil on all sides. Cover with plastic wrap and let it rest for 1 hour.
- Stretch and fold the dough over itself for about 6 to 10 turns. Cover the bowl and let the dough rest for another hour.
- Repeat the stretch and fold and rest for another hour.
- At the end of the second rest, the dough should have gained strength. It will also be softer and smoother. Remove it from the bowl and stretch the outsides to get a tighter exterior. Rolling it on a smooth surface while keeping it tight will help too. Shape it into a loaf that will fit an 8 1/2″ x 4 1/2″ loaf pan.
- Oil the loaf pan and place the shaped dough, seam side down. Cover with a piece of oiled plastic wrap and let rest until the dough rises over the rim 1 1/2″. This will take about 3 hours.
- In the last half hour, set up your oven using a baking stone in the middle rack with a metal broil pan on the bottom rack.
- If you don’t own a stone, you can use a baking sheet pan.
- Place the pan of bread on the stone and add 1 cup of boiling water to the broiler pan. Bake for 15 minutes and then remove the broiler pan.
- Remove the bread from the pan after 25 minutes and place the loaf directly on the stone. Bake an additional 20 minutes or until the bread reaches 200°F internal temperature using an instant-read thermometer.
- Cool completely before slicing.

IMPORTANT: Do not replace the broiler pan with a glass dish. The boiling water may cause it to shatter. Also, take care not to spill water on the glass in the door of the oven for the same reason.
You can place a dish towel over the door as an extra precaution.
This may look like a lot of steps, but I wanted to be as detailed as possible. Also, this bread has a lot of resting time. There really isn’t a lot of hands on work, however.
The toughest part is that you must allow your bread to cool completely on a cooling rack before slicing it.
When can I cut my Sourdough Sandwich Bread?

You thought you just had to bake the darned thing right? To get nice even slices you’ve got to let it cool.
Sourdough continues to cook throughout the cooling period. A conventional 1.5-pound loaf should be cooled for about 2 hours but sourdough can take up to 4 hours. The denser and larger the loaf the longer the cooling period.
You know you’ve rushed it if…
- When you go to slice it, your bread “smushes” together or will be doughy when you try and cut it.
- The proper moisture content will not be established and your bread will be overly moist and tear.
- The crust will not have enough structure to allow you to slice it without tearing.

Products we use
Hostess At Heart participates in affiliate programs. As an Amazon Associate, I earn a commission from qualifying purchases. Please refer to my disclosure page for more information.
- Kitchen Scale – You absolutely must have a scale. This one holds up to 22 lbs and will weigh grams and ounces. Make sure you tare the scale with the container sitting on top of it then add the ingredients.
- Baking stone – I use this stone a lot and love its size. I just leave it in the oven even when I’m not using it.
- Instant Read Thermometer – I use an instant-read thermometer for this recipe, for grilling, and even baking bread! I couldn’t function without one.
We LOVE baking bread! You can find all of our bread recipes here!
Bread recipes for overnight sourdough starter
- Overnight Sourdough Bread
- Multi-Grain Whole Wheat Bread
- Spelt Sourdough Bread
- Homemade Sourdough Bread with All-Purpose Flour
I hope you enjoyed this delicious recipe as much as we do. Drop me a comment below, and don’t forget to give it a star rating. ⭐⭐⭐⭐⭐. Your comments and ratings help others decide if this recipe is for them too.

Sourdough Sandwich Bread
Equipment
Ingredients
- 325 gr flour All-purpose
- 113 gr water
- 227 gr starter ripe or bubbly
- 21 gr honey
- 57 gr butter melted and cooled
- 9 gr salt
Instructions
- The night before baking or approximately 6 hours before mixing, feed the bread starter. You need 227 grams total so combine about 2 tablespoons of starter with 200 grams of flour and 200 grams of water. Cover and let sit at room temperature.
- The next morning, do a float test on your starter and if ready, measure out 227 grams.
- Combine flour, salt, water, and starter, and stir together. Add honey and melted butter. Combine until blended. Using my hands works best for me.
- Knead the dough for 10 minutes. Put the dough in a large oiled bowl and cover it for one hour.
- Stretch and fold the bread dough 6 to 10 times. Cover it again for 1 hour. Repeat the stretch and fold and let it rest for another hour.
- At the end of 3 hours, shape the dough into a loaf by pulling the outside tight and rolling. Put the bread in an oiled 8 1/2" x 4 1/2" pan and cover it with oiled plastic wrap. Let it rise until the dough crests the rim of the bread pan by 1 1/2".
- Prepare the oven 1/2 hour prior to baking by putting a baking stone on the middle rack of the oven and a broiling (metal) pan on the bottom rack. Preheat the oven to 425 °F.
- Remove the plastic wrap from the bread dough and place the bread pan on the baking stone. Put a cup of boiling water in the broiling pan. Immediately close the oven door and reduce the oven temperature to 400 °F.
- After 15 minutes, remove the broiling pan and bake 10 more minutes. (A total 25 minutes)
- Remove the bread from the loaf pan and place it directly on the baking stone. This will brown the bread and create a nice bottom crust. Bake and additional 15 to 20 minutes or until it reaches an internal temperature of 200°F.
- Cool completely on a cooling rack before slicing.
Notes
Nutrition
Nutritional Disclaimer
This recipe was calculated using the exact brands and measurements I used to make this recipe. If you are following a strict diet please note changing anything will cause the nutritional info to change. My calculations are intended as a guide only.
Did you enjoy this recipe? Don’t forget to pin it for later and follow me on Pinterest for more delicious recipes like this one!
Conversions for this recipe
You know that I’m always preaching the value of a scale and I’ll keep doing that. For this recipe, I did calculate my ingredients as I went.
- 2 1/2 cups all purpose flour
- 1 cup starter
- 1/2 cup water
- 1 tablespoon honey
- 1 1/4 teaspoons salt
- 1/4 cup butter
That said, I’m adding a disclaimer that I can’t guarantee how your recipe comes out or troubleshoot any problems you have if you don’t weigh. I see you rolling your eyes!
If you hate throwing away sourdough starter discard, you’re going to love these Sourdough Starter Discard recipes!
I’m so grateful to you. This soft and tender Sourdough Sandwich Bread recipe is a conglomeration of requests that I’ve received and something I’ve wanted to do for a long time.


What weight is the dough in this recipe please? I’m trying to fit it into my Pullman loaf pan that should hold 450 grams of dough.
Hi Ayla, I don’t know if the total dough weight is what you want to calculate whether or not the Pullman loaf would work. The total is 748gr or .75 kg total weight. If your Pullman loaf pan is a standard size or 10×5 it should hold a recipe that contains 4 cups of flour or about 440 grams. The total flour weight of this loaf is right there so it should work (438.5) just perfectly.
Thank you so much! I will give it a try then and let you know how it turns out
How much is the total dough weight please? I’m having trouble figuring out that part of recipes to fit my pans. I have a Pullman bread pan that I would like to use for this and it can hold 450 grams to get that nice square loaf. I did see you mentioned the weight of the overnight SD bread recipe is 500 grams so that was very helpful.
It had 500 grams of flour but that’s not the total flour weight Ayla. Since our starter is 50/50 flour and water you need to add 75 gr for a total of 575gr total flour weight.
Great bread! Made it today and we almost finished it at supper. Was slicing it pretty thick so there won’t be 18 servings, but all good. The addition of the salt was not included in the printed instruction but I saw it in the video, I actually added it at step 5 after the first hour rest. I also scored the loaf twice diagonally before putting in the oven, rose nicely. Will have to check out some of your other recipes.
Thank you, Brian! I appreciate you letting me know that I missed the salt. Can’t have good bread without it. I appreciate you’re stopping by and let me know if there’s something you’d like to see.
@Julie Menghini, the addition of the salt is still not written in the recipe and I don’t see the video. At what point should it be added?
Thank you so much for your comment Kayla! There’s been a glitch with the videos so I moved this one out of the recipe card. The salt is added when you mix the other ingredients. I’ve corrected the recipe card and you can see it in the video. I appreciate your question, Kayla. It helps me create better content. ~ Jules
I just tried this recipe and love the simplicity of it!! Only thing is it seems to be done after the first 25 minutes of baking. Maybe due to my small oven? I have a double so each is smaller than normal. Here’s to hoping it turned out fine even with the shorter baking time!
The important thing, Sandra is that you like it! I use an instant-read thermometer to test it and pull it at about 212F. It can be difficult tell if the bread is baked in the center.
Excellent recipe. I have made this several times and really enjoy the bread. Delicious !
Thank you, Natalie!
We baked this yesterday with our sourdough starter, and OH MY WORD, it smells and tastes so good! So happy we have homemade sandwich bread in the house now.
Thank you, Erin!
Hi Julie! I Love how simple your recipes are, however I keep running into problems with my bread not rising. My starter is active and bubbly and passes the float test with flying colors but my dough just doesn’t rise. I had minor success with a cinnamon bun recipe I tried, but it took over 16 hours for my dough to come anywhere close to doubling in size. My first thought was the temperature of my home, but I have been turning the heat on so it is at least 68-70 (that’s as high as I could get my boyfriend to agree to lol). With this sandwich bread recipe I have had the dough sitting for 4.5 hours now in the bread pan and it’s not even close to the top of the pan let alone above it by any measure. I just can’t figure out what I am doing wrong.
Your room temp is cool and that’s why it’s taking so long. What I do, Sarah, is microwave a cup of water for a couple of minutes and leave the cup in the microwave and then put my bowl of dough in there. Some people turn the light on in their oven but my light makes the environment too warm. Try that and see if that helps and then check back with me.
Is it ok to use a glass pan instead of metal?
I’m not sure that I would Jen. Using the steam method and such high heat could be dangerous.
I want to see all of your starter discard recipes.
Awesome! Thank you Danny. They’re coming soon.
I was shared your site by a friend who knew I was a newbie at all of this- it worked perfectly! I have wanted to attempt a starter and sourdough for a long time and the stay-at-home time provided the opportunity and your recipe made it achievable- THANK YOU! Your tips also helped me save my starter, which was on the brink of disaster (new to that too).
Mary, I’m excited for 3 reasons. You’ve begun your sourdough journey for one. It took me a while to get the nerve to do it in the beginning too. #2. I’m so glad that your friend referred you here! Please thank them for me! #3 Thank you for leaving me a terrific comment! Your comment helps others on this journey as well.
Thank you!! My first few attempts were awful then i tried your recipe and it is the best!! Wish I could post pix!! We have made 3 loaves and all were eaten so quickly!! Dropped one to my parents and they couldn’t believe how good it was- sharing your site with them too!! Lol!! Thank you!!
Thank you for helping me through the process of making my own sourdough!! I have learned SO much from you!! What recipe would like like to see? More ways to use my Sourdough starter of course!! And maybe some for the discard, too?
That’s a great tip! Thank you!
I’ve tried a few sourdough recipes with my brand new starter already, but this is the one I’m going to be turning to for sandwich bread from now on! It was amazing1
Thank you!
you have answered absolutely every single question I had about making bread… Im going in now to give it a whirl! It sounds so good! (looks great in your pics too!)
We all love sourdough here…great recipe!! I’m so glad you got me to try baking bread!
Thank you!
Another winner Julie! So simple and just like a soft loaf of good sandwich bread! Love the sourdough hint to it too!
Thank you so much Kathleen!
This bread looks perfect and delicious. Maybe for a recipe a panini with ciabatta bread? I love paninis.
Me too Kesha! Thank you!
Thank you so much for an easy sourdough recipe using ingredients I have on hand while some ingredients can be difficult to get! Are there any simple sourdough discard recipes using common ingredients?
Most of the time we fry it with herbs mixed in but I have some recipes in the works. Thank you, Hannah!
Oooh! Another bread recipe for me to try – I can’t wait!!
Thank you, Deb! Let me know how it goes!
What recipe would I like to see? Mmmm, maybe a Parmesan garlic sourdough bread stuffed with all kinds of goodies like sundried tomatoes and basil.
Oh that sounds amazing! Just think of a blt on that bread!
Just getting into sourdough and can’t wait to try this! I’d love to see more starter discard recipes 🙂
You got it Megan! Thank you!
comfort food casseroles..Love them!
Me too! Thank you Susan!
Cannot wait to try this recipe! I love Baking! Have you ever published a good challah bread or perogies recipe? Live your blog and recipes. Stay safe and we’ll.
Hope, you are sure a breath of fresh air, thank you! I have challah on my want to make list, so please check back soon. I do have 4 recipes using bread starter on the blog and hope one of them will appeal to you in the meantime. Stay safe and well my friend!