Overnight Sourdough Bread Recipe – Easy Enough For Beginners!
This post may contain affiliate links. Please read our Disclosure Policy.

Learn how to make delicious overnight sourdough bread at home with a step-by-step video that’s perfect for the beginner and that your family will love.
Overnight Sourdough Bread recipe is the perfect recipe to learn baking with a sourdough bread starter. Our step-by-step instructions and video will have you creating an amazing loaf of bread at home in no time.
This Sourdough Bread recipe couldn’t be easier to make and it’s a lot quicker compared to other sourdough bread recipes from starters.
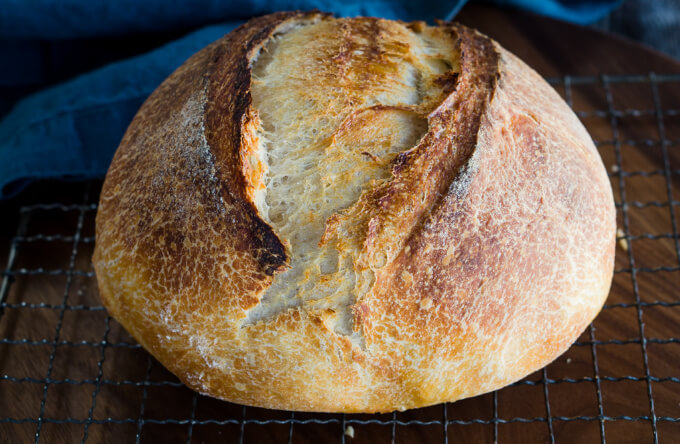
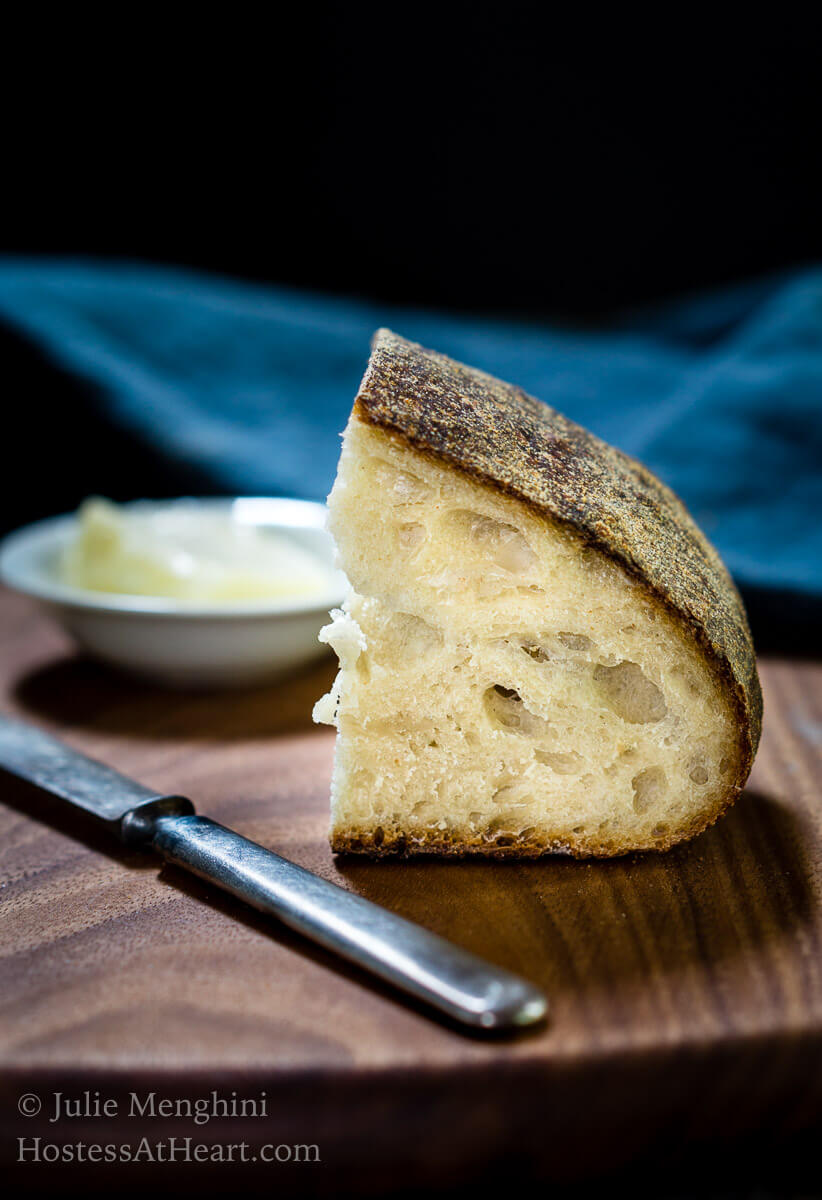
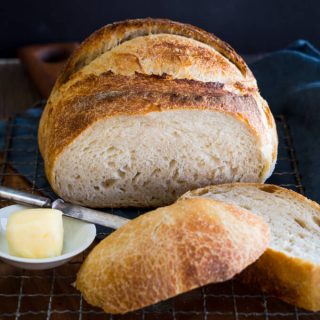
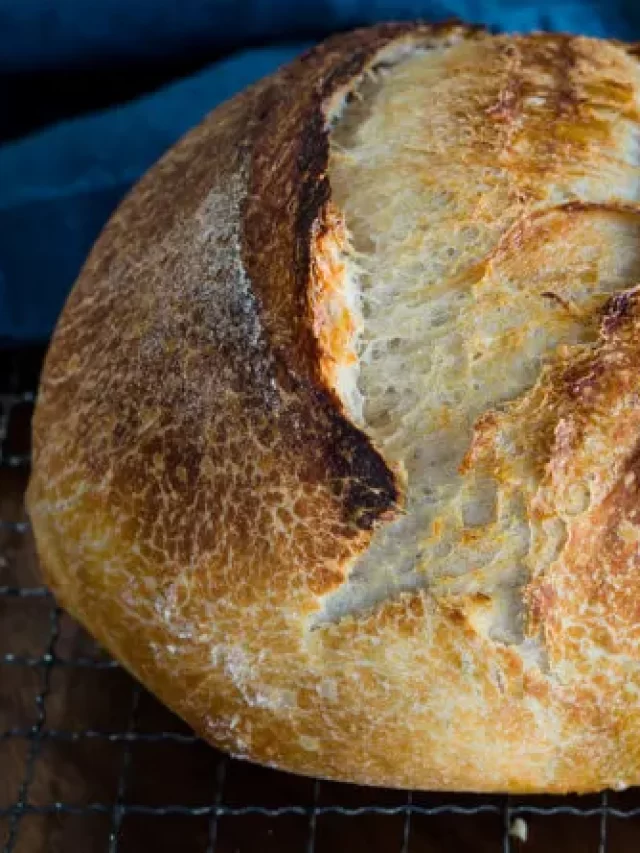
This 500g homemade sourdough recipe has a tender crumb with a slightly sour flavor surrounded by a beautiful crisp crust that has that pull you want in artisan bread.
Hello, Julie. Just wanted to say thank you for sharing your overnight sourdough recipe as it really works well for me, a lot of people have shared their methods and this one is simply the best one I have come across so far. So thank you again!”
Kris T
What is Sourdough Bread
Sourdough bread is made by fermentation of dough using naturally occurring lactobacilli and yeast. Sourdough bread has a mildly sour taste not present in most bread made with baker’s yeast and keeps better than other bread due to the lactic acid produced by the lactobacilli. Wikipedia
What is different about sourdough bread?
The difference is in how they are made. Regular bread is made using store-bought yeast that reacts with gluten, making the dough rise. Sourdough bread is made with a “starter“. This starter is made from a combination of yeast and bacteria growing inside a paste made of flour and water.
Make your own starter!
Need help with your sourdough starter? Our Complete Sourdough Baking Guide covers everything from creating a starter from scratch to maintaining it long-term, plus advanced techniques and troubleshooting.
Health Benefits of Sourdough Bread
The fermentation that occurs from using a starter has been shown to lower blood sugar, be easier to digest and can even be tolerated by gluten-resistant individuals.
However, that’s not to say it is gluten-free. Sourdough bread contains higher levels of folate and antioxidants than other bread. Healthline is a very thorough reference regarding the health benefits of sourdough.
Ingredient Tips:
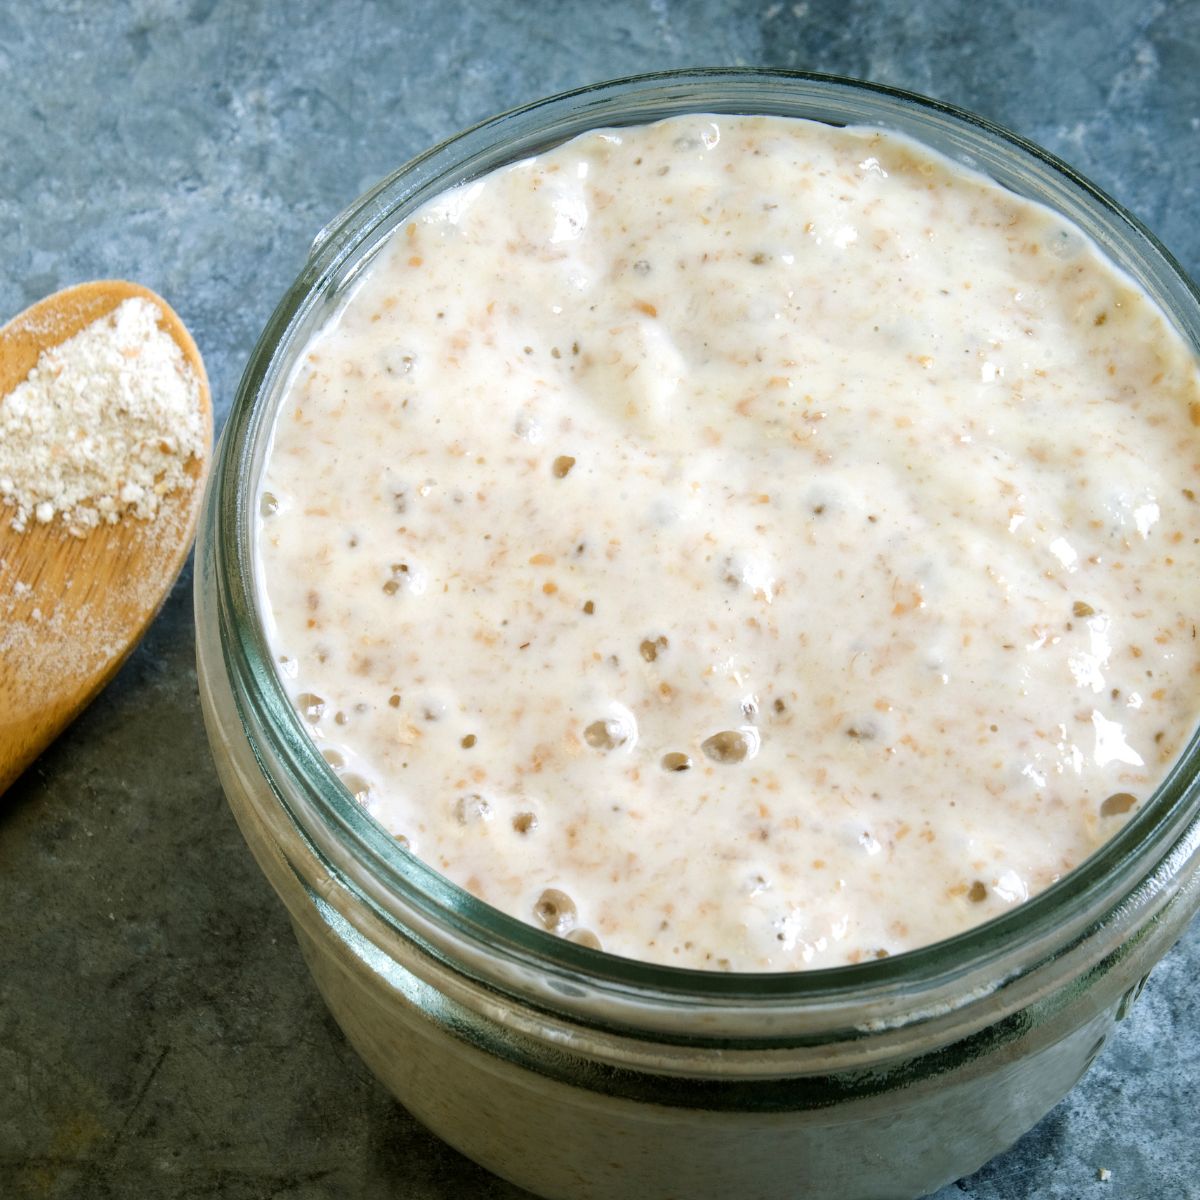
- Bubbly starter – I recommend feeding your starter and letting it sit out at room temperature 4 to 6 hours or until it increases in volume by about 30% and passes the float test.
- If your dough is runny it can be because your starter was actually starving when you used it.
- Bread Flour – Bread flour has a higher protein content than AP flour. That higher protein provides more structure to your loaf.
- If you substitute, they will both be delicious, and the texture will be the same but you may find the loaf made with AP flour balloons out more or doesn’t rise as high.
- Water – There’s a lot of controversy regarding water in bread making. Some experts say if you can drink it you can use it to bake with. Other experts say the chlorine can inhibit yeast activity.
- Mineral content (hardness) can reduce extensibility (elasticity and ability to stretch) of the dough.
- Salt – I use fine sea salt. It is easier to incorporate and dissolve than a coarser salt.
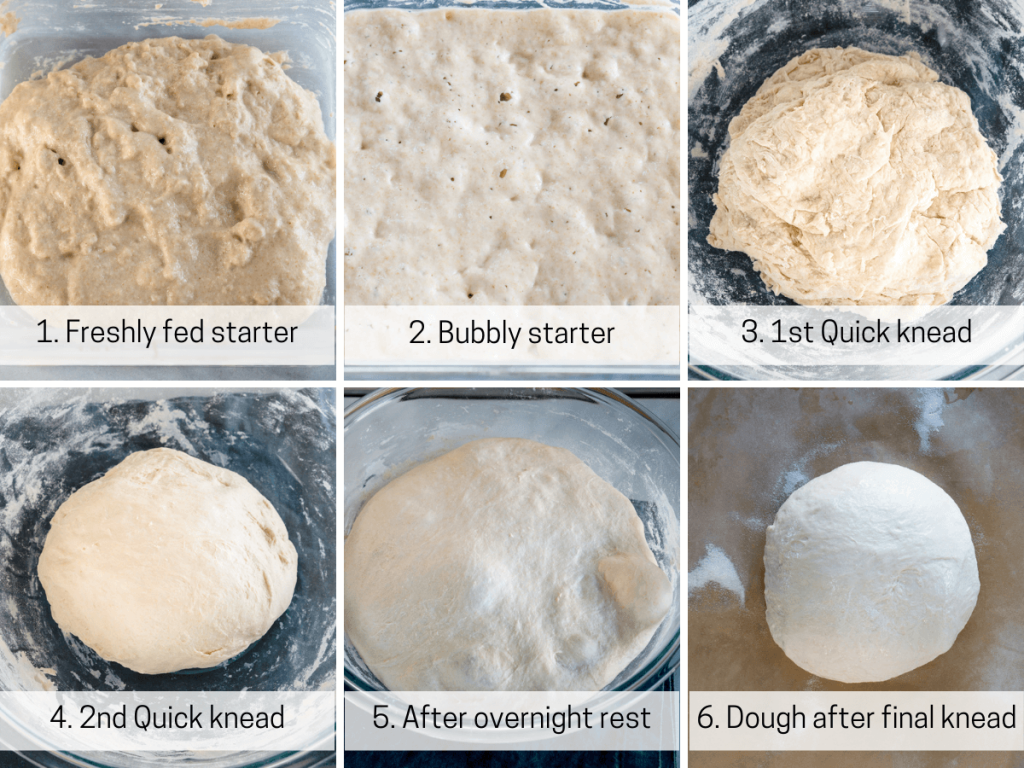
The above pictures from top left to bottom right.
- The freshly fed starter is thick.
- The Bubbly starter is ready. when bubbly and passes the float test.
- 1st quick knead just to combine ingredients (about 1 minute). The dough is thick and heavy.
- 2nd quick knead after a 30-minute rest. The dough is softer and smoother.
- Dough after 8 hours is full of air bubbles.
- Dough after final delicate knead is smooth and silky.
Absolutely! We love adding dried fruit such as apricots or cranberries, chopped nuts, cheese, olives, or herbs such as rosemary or thyme.
We recommend that you start by adding no more than 20%. So for this 500-gram loaf that would be
500 x 20% = 100 grams. You shouldn’t have to adjust your baking time.
Be careful that you don’t add a lot of moisture. Semi-hard cheeses such as cheddar shredded or diced into smaller pieces work well. Drain fresh fruit or olives of excess juice.
Sourdough Baking Guide is a comprehensive resource covering starters, fermentation, shaping, scoring, troubleshooting, and advanced baking methods.
Recipes using a bread starter
- Multi-Grain Wheat Bread Recipe
- Spelt Sourdough Bread
- Sourdough Sandwich Bread using Bread Starter
- Multi-Grain Wheat Bread
- 750gr All-Purpose Flour Sourdough.
Pro tips for Overnight Sourdough Bread
Resting times
Want to save this recipe?
I'd like to receive more tips and recipes from Hostess At Heart!
Don’t let bread rule your life! Here are some resting times that may help you to bake according to your schedule
- Counter rise – Written as is, this recipe has a counter rise of 3 to 8 hours. I’ve shaped it and let it rest in a banneton or you can carefully shape it just before baking it. The rise time is variable. If you have a warm kitchen, it may be ready sooner. Press your thumb into the dough, and if it bounces back slowly, it’s ready to bake. If it bounces back quickly, it needs a little more time to rise. If it stays dented, it’s probably over-proofed.
- Refrigerator proofing – If you don’t choose to bake your bread at the 3 to 8 hour counter proof, we recommend a 90 minute to 4 hour counter proof. Shape the dough and place it seam-side up into a banneton basket or a bowl lined with a kitchen towel that’s dusted with flour. We like dusting ours with a 50/50 mix of wheat flour and rice flour. We’ve actually left our bread in the refrigerator for up to 18 hours with no problems.
- When you’re ready to bake, remove the shaped dough from the refrigerator and let it sit on the counter while your oven preheats. Place it in the dutch oven, score it, and bake as usual.
If you do the full counter proof and then refrigerate the dough, it will be over-proofed. For that reason, try a much shorter counter rise and then refrigerate it.
More helpful tips
- Feed your starter earlier in the day. When it’s bubbly, do the test float. If it’s runny, it’s used up all its energy and needs to be fed again before you can use it. To see if your starter is ready, put a small amount in a bowl or cup of water. If it floats, it’s ready!
- Your bread can be cooked in a cold Dutch oven but I like the color and oven rise I get from preheating my lidded pot.
- To properly bake the bread we rely on an instant-read thermometer. The bread is finished baking when it reaches an internal temperature of 205ºF to 210ºF.
- This bread freezes beautifully. I wrap it in plastic wrap or a ziplock bag and then heavy-duty foil.
- Each time you bake, we keep a notebook and write down anything we do differently such as resting time, baking time, or adding additional ingredients. It’s so difficult to remember what worked the best unless we can look back and see what we were happy about or wanted to do differently the next time. This will also help you to determine what resting times work for you.
YOU MAY NEED
The following are affiliate links. Hostess At Heart is a participant in the Amazon Services LLC Associates Program, an affiliate advertising program designed to provide a means for us to earn fees by linking to Amazon.com and affiliated sites. You can read my full disclosure.
6 Quart Enameled Cast Iron Dutch Oven. – I love this Dutch oven. I have three that are triple the price of this one and it’s my favorite. It bakes my bread perfectly and makes a mean ragu recipe.
Zatoba 1003 Black Walnut Bread Lame Decorative Dough Slasher, 2x2x8 inches – I started out with a lesser quality lame and while this one isn’t expensive it’s definitely better quality and has made a prettier slash in my dough. You can also use a sharp knife.
Instant-read Thermometers aren’t just for meat! I use them to know when my bread is baked. I bake until I get an internal temperature of 205º F to 210º F or anywhere in between.
I have two books (out of several) that I’ve learned so much from. I recommend them exclusively to help in your bread experience. They are easy to read and will help you get that beautiful loaf on the table!
This is a 500gr loaf of bread which isn’t large. Baking bread is all about percentages. If you want a larger loaf, you can adjust the “Servings” in the recipe card and it will calculate your ingredients. (Thank you, Daniel, for this question!)
I hope you enjoyed this delicious recipe as much as we do. Drop me a comment below, and don’t forget to give it a star rating. ⭐⭐⭐⭐⭐. Your comments and ratings help others decide if this recipe is for them too.
Conversions are listed below the recipe card
Overnight Sourdough Bread Recipe
Ingredients
- 150 g bubbly starter
- 285 g *purified water or filtered water at room temperature
- 500 g bread flour organic
- 9 g sea salt fine
Instructions
- Squelch all of the ingredients together briefly (just for a minute is enough) with your hand. Cover the bowl with plastic wrap and let the dough rest for 30 minutes.
- Stretch and fold the dough into the bowl several times for about a minute. Cover and leave it out on the counter overnight, 6 to 8 hours. In the morning it will have doubled in volume at least.
- Pre-heat the oven to 475 °F (240/250C) (I preheat to 475°F and place your lidded pot inside to heat up. You can use an enamel Dutch oven or aluminum roaster. You can also put the dough into a cold pot.
- Dust your counter with flour. I use a rimmed baking sheet lined with parchment paper and then dusted with rice flour. It makes it easy to pick up the dough. Scrape the dough out onto the counter. Don’t punch it down. You want to keep as many of those bubbles as you can.
- Pull the outside thirds into the middle and shape as you wish. Try to pull the outside of the dough as tightly as possible so it will hold its shape well. I shaped mine into a ball also known as a boule.
- Cover with some oiled plastic wrap loosely. Allow the dough to rest for 30 minutes. Set the timer as this is the only proofing that should NOT be overdone.
- Remove the plastic wrap and slash with a sharp knife or lame.
- Carefully remove the pot from the oven and remove the lid. Carefully place the dough into the pot. I lift mine by the edges of the parchment paper and put the whole thing into the pot. Replace the lid and place in the oven.
- Reduce the heat to 425 °F 220C (425°F convection). Bake for 20 minutes. Remove the lid and bake for an additional 20 to 25 minutes or until the internal temperature reaches 205 °F ri 212 °F when tested with an instant-read thermometer.
- Immediately remove from the pot and cool on a cooling rack completely before slicing.
Video
Notes
- If you want to mix bread earlier in the day. After rising for 90 minutes or up to 4 hours at room temperature, shape and set the covered dough in the refrigerator to bake the next day. Remove the dough from the refrigerator to sit out while the oven preheats.
- Feed earlier in the day. When it’s bubbly do the test float. If it’s runny it’s used up all its energy and needs to be fed again before you can use it. To see if your starter is ready, put a small amount in a bowl or cup of water. If it floats it’s ready!
- Your bread can be cooked in a cold dutch oven but I like the color and rise I get from preheating my lidded pot.
- This bread freezes beautifully. I wrap it in plastic wrap or a ziplock bag and then heavy-duty foil.
Nutrition
Nutritional Disclaimer
This recipe was calculated using the exact brands and measurements I used to make this recipe. If you are following a strict diet please note changing anything will cause the nutritional info to change. My calculations are intended as a guide only.
Conversions for Overnight Sourdough Bread recipe
We realize that many of you aren’t comfortable using a scale. The closest conversions are the following.
- 4 cups flour
- 1 1/4 cup water
- 2/3 cup starter
- 1 1/2 tsp salt
A disclaimer is that I’ve never made this recipe without weighing the ingredients so I can’t guarantee or possibly troubleshoot any problems you may have with the recipe.
If you like this recipe you may enjoy these too
- Homemade Crusty Bread recipe
- 6 Ingredient Simple Classic Italian Bread Recipe
- Soft Buttermilk Sandwich Bread
- Simple Ciabatta Bread Recipe – Made 2 Ways!
- Spiced Apple Star Bread
This bread was made possible by the resources and recipes shared by Elaine, Selma, and Celia! Please visit all three of these blogs for amazing bread information!
Did you enjoy this recipe? Don’t forget to pin it for later and follow me on Pinterest for more delicious recipes like this one!


After leaving it overnight for 6hrs the dough was sticky and goopy. It basically just became a runny blob. It was unable to be kneaded or shaped. Do not recommend allowing your dough to proof for that long unless it’s in the fridge which is what other recipes recommend and I’ll be doing in the future.
I’d have to say your starter wasn’t ready, Hannah. Did you do the float test? This recipe works for so many.
@Julie Menghini, I had the exact same problem and my starter was definitely ready! Any tips? It was a gloppy mess for me ☹️ I had to add so much flour this morning to get it to not stick to everything and resemble a ball. It had risen beautifully overnight too
Hi, Rylee. I’ve got to think that it over-proofed. Let’s try letting it sit out for about 4 hours tops. Shaping it into a banneton or round bowl and then refrigerating it. Don’t do anything with it when you take it out of the refrigerator except baking it. PLEASE let me know how this works for you. Humidity, temperature and so many other factors can be at play with nothing to do with what you’re doing.
I found your recipe through the “Whisk” recipe app. I enjoy baking but I’m new to the sourdough concept, and found the recipe to be well explained as well as easy to make and delicious. Have made a few loaves already, with whole wheat flour and no issues. I am impressed that the bread keeps so well without needing to be frozen. In a 2 person family that doesn’t consume bread super fast,that is important to me.
Thank uou so much, Chris! The bread does keep well and that’s with no preservatives! Welcome to the sourdough world. You can find more sourdough recipes for bread and I also have some discard recipes that can be made with the starter that isn’t used.
This is the recipe. It does not fail!!!! Seriously, I am a new baker on loaf #5. 4/5 loaves have been perfect. My 4th one I tried a different recipe and it was soooo flat and sad. I am so grateful I came across this recipe!
Question- when putting into the Dutch oven, do I do seam side up or smooth side up??
Thank you, Meghan! I’m so glad it works for you. Flip the dough over to the smooth side and score it for baking.
I am working on a sour dough starter now and would like to make a sour dough bread using whole wheat flour. Can I swap out whole wheat flour for the bread flour?
Using all wheat flour requires more hydration because wheat flour absorbs the liquid and it will be denser and less likely to get an open texture. I’d suggest using 65% to 70% wheat and 30% either bread flour or all-purpose flour such as I did with this recipe: https://hostessatheart.com/multigrain-wheat-bread/. Wheat likes to ferment quickly so watch it or put it in the refrigerator for an overnight rest. Please let me know if you have more questions. ~Julie
@Julie Menghini, Thank you for your recommendation. I will give that a try!
Turns out perfect every time!
Thank you so much, Rachel!
Trying to do smaller loafs for gifting. If i split the recipe would you recommend splitting before final 30 min rest? Also wondering how long id cook?
Hi Laci! Great question. You can split the dough before or after the 30 minute rest. I’ll often double or even triple a recipe and then split it before shaping and the overnight rest.
Everything seems to go well until that final step. My dough is beautifully risen, I gently get it out onto the parchment, shape it and set it to rise and it flattens out. It won’t rise again, not even while baking. I’ve tried everything I can think of and it just never rises again, not even while baking. I’m using fantastic starter. I know it’s this phase that’s going wrong, because everything else I make, cinnamon rolls, brioche, dinner rolls, everything turns out beautifully. HELP!
I think it’s getting over-proofed. Are you leaving it out overnight on the counter and doing a gentle shape the next morning or are you doing a refrigerator proof. Also, after the shaping, you just let it rest for 30 minutes and then bake. It isn’t going to have any substantial rise at this point but you should get a nice oven spring. Ultimately what you could do is just shape it and put it in a proofing basket before raising instead of shaping it the next day. Let me know if this is helpful or doesn’t answer your questions.
Does it help to add wheat gluten to all-purpose flour and if so how much per cup of flour?
I’m not experienced using wheat gluten Shirley. Maybe we have a couple of readers that can help out here?
@Julie Menghini, I supplement my normal cheap supermarket flour with some gluten flour so that the overall protein level of the combined flours is about 14% (the same as a lot of strong flours). For the quantity I make, this works out to 29g of gluten flour out of a total flour quantity of 667g (i.e. 29g gluten flour and then rest is all-purpose flour or plain flour as we say in Australia).
Thank you, Stew! That’s very interesting and helpful for bakers that don’t have access to strong flour. For our U.S. readers, strong flour is bread flour.
When do I do the final stretch and fold, and 30 minute rest before baking if I’m doing the overnight proof in the refrigerator? Do I do that before I put it in the fridge? Or after I take it out of the fridge before baking?
Thank you.
Hi, Auleen! You can either stretch, fold and place in a banneton and then refrigerate it until you’re ready to bake it the next day. There is no need to let it rest the next morning. Or, if you’re going to bake it first thing the next day do the stretch and fold with the 30 minute rest the next morning while the oven is preheating. I hope this helps!
Since I’ve had an issue with parchment igniting in an oven at gjisectemis before? I thought I’d ask if you ever encountered that?
It’s important to read the temperature rating on the parchment paper! Many people don’t know that there is this rating. The one I use is rated to 450F and I haven’t had an issue with it. Great question, Wendy!
I love making bread but was new to sourdough. Thanks for all of your detailed tips, it worked beautifully!
I’m so glad that it worked for you! Thank you.
I made the Overnight Sourdough Bread recipe. The loaf of bread was so good that we are it all up with dinner. The recipe was very clearly written and easy to follow. After I baked it I read your helpful hints which are great.
Thank you so much, Cheryl! It’s a big post and I’m always looking for ways to make it more helpful so really appreciate your comments.
Nothing’s better than a fresh loaf of sourdough bread! Your loaf looks beautiful.
Thank you, Ann!
For the refrigerator proof, I just pull it out of the refrigerator and pop it into the hot Dutch oven and then straight into my 475° oven? Does it need to rest at room temperature before it goes in the oven?
I actually take my loaf out of the refrigerator while my oven preheats, Sara.
Absolutely love this! I have tried several other recipes and none have worked as beautifully as this one! I did the 4 hour proof then into the fridge overnight and it came out beautiful! I will be making this over and over! So easy to follow! Thank you!
I’m so glad that it worked for you, Jennifer, and thank you for sharing what you did!
Well, this didn’t exactly go as planned. Our AC broke overnight so my dough was way over proofed when I got up. I worked more flour in and did a few stretch and folds so it wasn’t quite as sticky. Then I let it sit for an hour and it rose a bit so I popped it in the preheated pan. Forgot to slash it so it made its own steam escape routes! It’s not pretty but it smells good and appears not to be a rock.
Oh Patty, what stress! I hope you’ll try it again with better conditions!
Absolutely love how my sourdough bread turned out with this recipe! This was my first one and it turned out beautifully! How would you recommend storing it?
I love that Malory! Having your bread turn out the first time is amazing and such a confidence builder. Sourdough bread can sit out on the counter without covering it until it’s cut for up to 2 days.
Sliced sourdough can be placed cut-side-down on a cutting board at room temperature. I’ve had wonderful results storing artisan bread in linen bags. I’ve also put it in reclosable plastic bags and left it on the counter. This does soften the crust a bit but it’s still excellent. Sourdough freezes really well. I’ll often bake 6 loaves at a time and freeze 5 of them. I’ll place a loaf in a freezer-safe bag and then wrap it in foil. It’s good for 3 months. Thank you for your comment, Malory! Happy Baking! Julie
Absolutely love this recipe! This was my very first sourdough and I was so very pleased with how it turned out! Left the dough on the counter overnight and baked in the morning. Definitely recommend waiting for it to cool completely before cutting as this lets it continue to cook a little (but it is hard to wait!!) I have made this twice already! Personally, I’m not a huge fan of the
“sour” flavor, so I tried to add a tablespoon of sugar to my second loaf. Everything turned out fine and it did cut the flavor a bit!
Megan, I’m so glad that this worked for you! Welcome to the sourdough community! I loved your tips for bringing down the sour flavor a bit. I get people looking for more and sure that people that want less will appreciate your tip. Be sure to check out our discard recipes too!
If I mix the dough and do the initial rise can I then just put it in the fridge until the next day?
Yes you can. You’ll just do your overnight rest in the refrigerator. Please see the section labeled “Refrigerator Proofing”. Let me know if you need any additional help.
Hello! I wanted to make one of these loaves with roasted garlic. Can I just add that to the dough without flopping the loaf?
And the same goes for a cinnamon raisin one?
Hi Alyssa! I would add it before the first or second knead. I wouldn’t add it after the long rest because it will flop your loaf.
Hello, in your backing directions am I to understand that you use convection oven temps ( that is what the recipe says) and not conventional oven temps
I always bake on convection and your oven should automatically adjust the basic temp when you use convection.
I love this bread! I am brand new to sourdough baking and began my first starter about 2 weeks ago. Your recipe is the first loaf I made when my starter was ready. It all worked out perfectly! Thanks for sharing such a great recipe
Welcome to the Sourdough community! I’m so glad that you had success! Be sure to check out all my sourdough recipes and discard recipes too. Thank you, Michele!
My bread just came out of the oven. It’s perfect!
That’s wonderful Susan! I can’t tell you how good I feel when I pull that beautiful loaf of bread from the oven. Thank you for commenting!
Just made sourdough today for the first time! So easy to follow and taste delicious! Thank you for this easy recipe and helpful video! I really liked how you showed the different kneads at the different stages in the video.
Thank you so much for your comment, Kelly! It can be difficult explaining these recipes so I really appreciate you letting me know that you found them helpful!
Easiest and best recipe! I have used it at least 8 times in the last month and just love it! Thank you!
Thank you so much, Stephanie! I truly love this recipe too and appreciate you taking the time to let me know.