Easy Valentine’s Day Fudge: A Quick and Delicious Way to Spread the Love
This post may contain affiliate links. Please read our Disclosure Policy.

Prep Time: 15 minutes | Chill Time: 1 hour | Total Time: 1 hour 15 minutes
Servings: 16 pieces

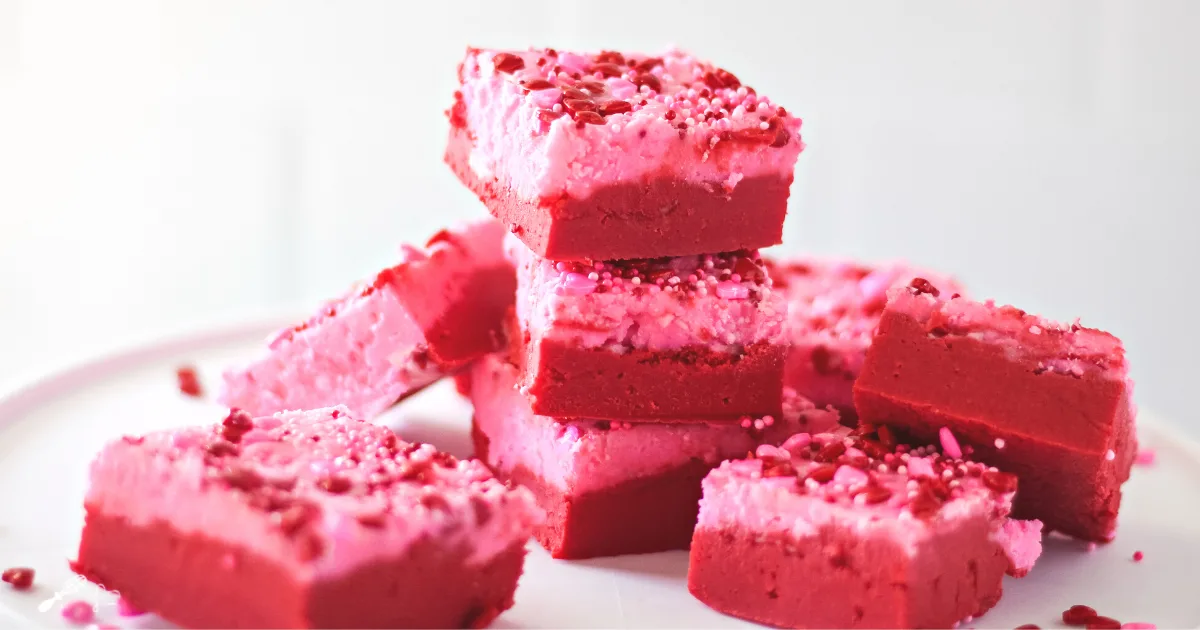
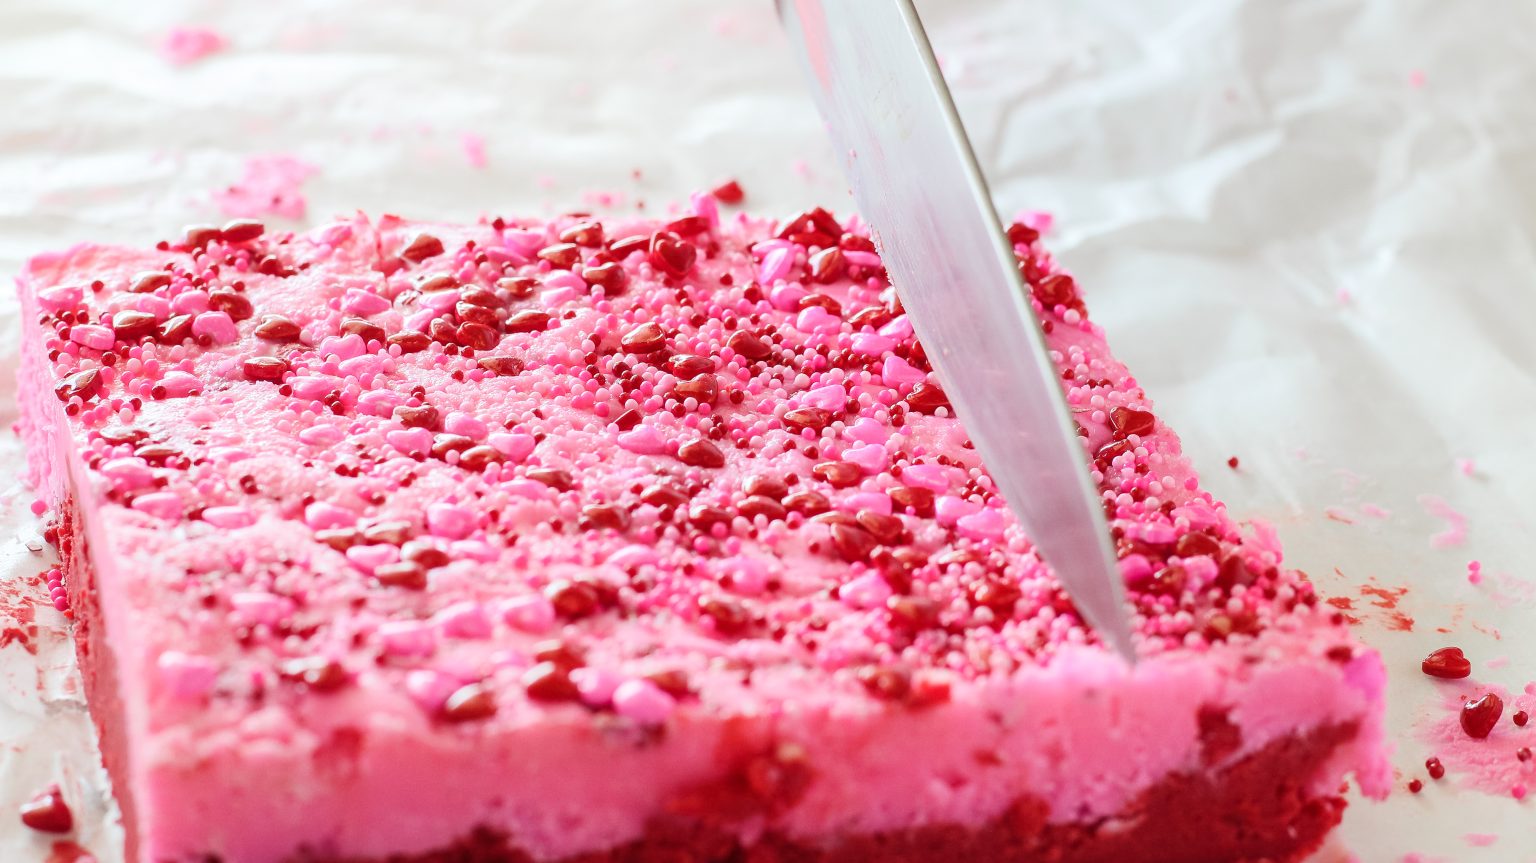
This recipe for Easy Valentine’s Day Fudge has become the most requested treat in our home every February. This colorful two-layer fudge combines creamy pink and red layers with festive sprinkles to create something truly special that’s perfect for Valentine’s Day gifts, classroom parties, or romantic dinners. The best part? It only takes about 15 minutes of actual work time and requires no candy thermometer or fancy equipment!
Why I Love This Recipe
I first started making this Valentine’s Day fudge when my kids were little and needed treats for their school parties. I wanted something that looked impressive but wouldn’t stress me out to make. My family immediately fell in love with it because it tastes like the expensive fudge from candy shops but costs a fraction of the price. Now it’s become our go-to treat for Valentine’s gifts to teachers, neighbors, and anyone who needs a little sweetness in their life.
What makes this recipe so special is that it uses simple ingredients you probably already have in your pantry, and it’s nearly foolproof. Even my most kitchen-challenged friends have succeeded with this recipe! The creamy texture comes from cream cheese, which gives it a softer bite than traditional fudge, making it perfect for kids and adults alike.
Key Ingredient Notes
While you’ll find the full ingredient list in the recipe card below, I wanted to highlight a few important ingredients:
- Red Candy Melts: These give the bottom layer its beautiful bright red color. You can find them at craft stores like Michaels or Hobby Lobby in the baking section. Don’t substitute with regular chocolate chips as they won’t melt or set the same way.
- White Chocolate Almond Bark: This is different from white chocolate chips and creates the perfect creamy base. Look for it near the baking chips at the grocery store. Brands like Baker’s or CandiQuik work great.
- Cream Cheese: Must be at room temperature and full-fat for the best texture. Low-fat or fat-free versions will make your fudge grainy and won’t set properly.
- Gel Food Coloring: This is crucial for getting that vibrant pink color without adding extra liquid that could make your fudge too soft. Wilton makes great gel colors that you can find at most grocery stores.
Pro Tips for Making Perfect Valentine’s Day Fudge
Before you head to the recipe card, here are some helpful tips I’ve learned from making this fudge dozens of times:
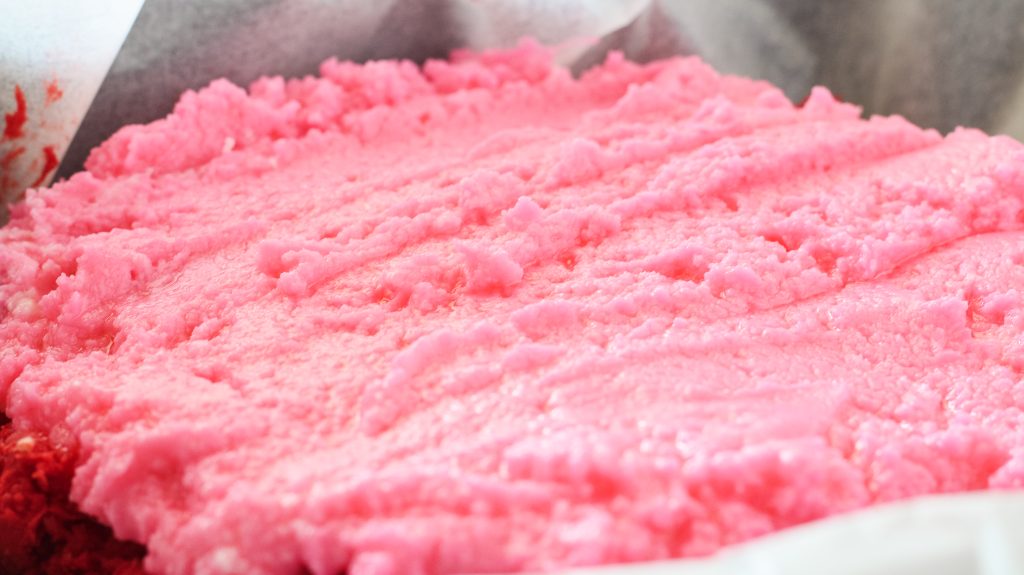 Pink fudge layer
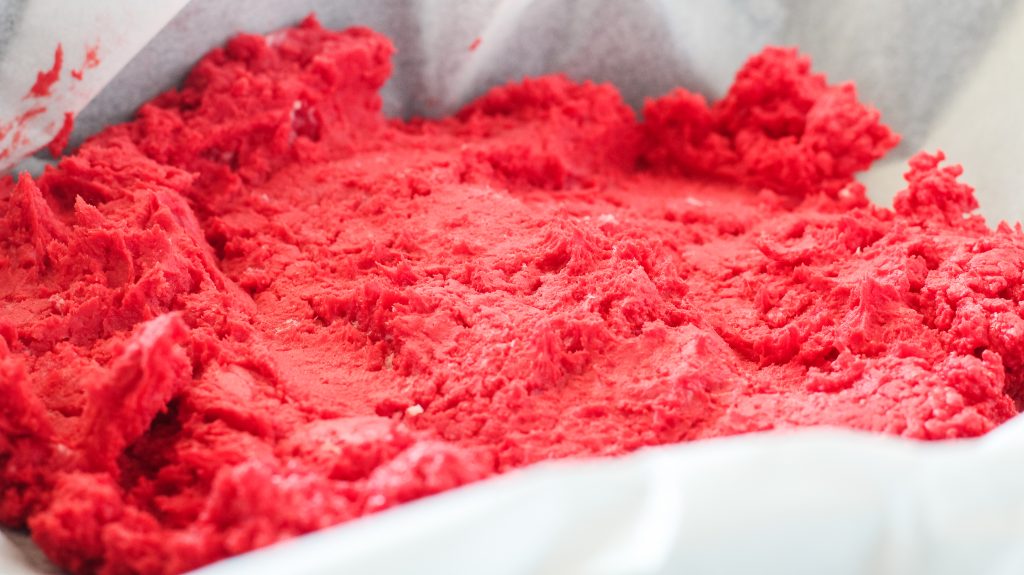 Red fudge layer
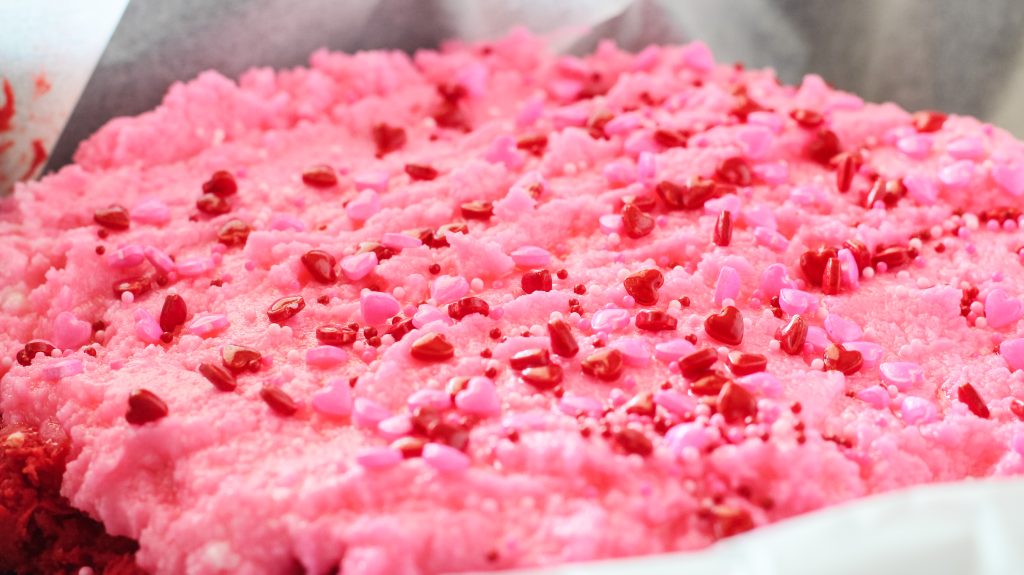 Valentine sprinkles


- Line your pan first: Always line your 9×13 pan with parchment paper before you start. This makes removing the fudge so much easier and prevents any sticking.
- Room temperature is key: Your cream cheese should be soft to the touch but not warm or melting. Take it out about 2 hours before you plan to cook.
- Microwave in short bursts: Melt your candy melts and almond bark in 30-second intervals, stirring between each one. This prevents burning and keeps everything smooth.
- Work quickly but carefully: Once you’ve mixed each layer, spread it immediately as it starts to set up fast. Don’t worry about making it perfect – rustic looks charming!
- Add sprinkles right away: Put your decorative sprinkles on while the top layer is still slightly warm so they stick properly.
Serving Suggestions
This Valentine’s Day fudge is perfect on its own, but it also pairs wonderfully with a cup of hot cocoa or coffee for a cozy afternoon treat. For parties, I like to cut it into small squares and arrange them on a pretty platter with some fresh strawberries and chocolate-covered pretzels.
To serve, simply cut into squares using a sharp knife. For the cleanest cuts, wipe your knife with a damp cloth between cuts. Each piece is rich and sweet, so smaller squares are perfect – I usually get about 16 pieces from one batch.
Storage and Leftovers
This fudge will keep beautifully in the fridge for up to 2 weeks stored in an airtight container. To store, I like to cut it into squares first, then layer them between sheets of parchment paper in a container.
Want to save this recipe?
I'd like to receive more tips and recipes from Hostess At Heart!
If you want to prep ahead for Valentine’s Day, you can make this fudge up to a week early and store it covered in the refrigerator. This recipe also freezes wonderfully for up to 2 months. Just wrap individual pieces in plastic wrap and store in a freezer bag. The amazing thing about frozen fudge is that it tastes great even when it’s not completely thawed!

Variations to Try
- Christmas Colors: Use green candy melts and red food coloring for a festive holiday treat
- Birthday Fun: Match the colors to your party theme – blue and yellow, purple and gold, or any combination you like
- Nutty Addition: Sprinkle chopped toasted pecans or walnuts on top instead of sprinkles for a grown-up version
- Cookie Crunch: Crush up Oreos, vanilla wafers, or graham crackers and press into the top layer
- Chocolate Lover’s: Use milk chocolate candy melts for the bottom layer and add mini chocolate chips to the top
Related Recipes You’ll Love
If you enjoy this Valentine’s Day fudge, I bet you’ll also love some of my other easy candy recipes! My Chocolate Almond Microwave Fudge uses many of the same simple techniques but comes together even faster. For a different Valentine’s treat, try my Red Velvet Brownies with Cream Cheese Frosting and White Chocolate Oreo Truffles which are always a hit at parties. And if you’re hosting a Valentine’s gathering, my Sweet Jarcuterie Ideas post will help you create a beautiful dessert spread that includes this fudge perfectly!

Make This Recipe Your Own
This Easy Valentine’s Day Fudge has become one of my most treasured recipes, and I hope it becomes a favorite in your home too! The combination of simplicity and stunning results makes it perfect for busy parents, new bakers, or anyone who wants to create something special without spending all day in the kitchen. The creamy texture and beautiful colors never fail to impress, whether you’re making it for your family or giving it as gifts.
Please let me know in the comments if you try it and what variations you come up with! I love hearing how my recipes turn out in your kitchens and seeing photos of your beautiful creations. If you love this recipe as much as my family does, please leave a 5-star review below – it really helps other readers find this recipe and means the world to me!

Easy Valentine’s Day Fudge: A Quick and Delicious
Equipment
- Electric Stand Mixer or hand mixer
Ingredients
- 1 lb red candy melts
- 1 lb white chocolate almond bark
- 8 oz cream cheese – full-fat variety at room temperature
- 2 tbsp butter – melted
- hot pink food coloring
- Decorative Sprinkles
Instructions
- Line a 9×13 inch pan with parchment paper and set aside.
Make the Red Layer
- Using an electric mixer, beat half of the cream cheese (4 oz) on high speed until smooth and creamy, about 2 minutes.
- Melt the red candy melts in a microwave-safe bowl in 30-second intervals, stirring between each interval, until completely smooth.
- Add the melted red candy melts and half of the melted butter to the cream cheese. Mix on high speed until well combined and smooth.
- Spread the red mixture evenly in your prepared pan. Cover and set aside while you make the pink layer.
Make the Pink Layer
- In a clean bowl, beat the remaining cream cheese until smooth and creamy.
- Melt the white chocolate almond bark in the microwave using 30-second intervals, stirring between each interval.
- Add the melted almond bark and remaining melted butter to the cream cheese. Mix until well combined.
- Add a few drops of hot pink gel food coloring and mix until you reach your desired color.
- Spread the pink mixture evenly over the red layer. Immediately sprinkle with Valentine's decorations.
- Cover with plastic wrap and refrigerate for at least 1 hour until firm.
- Remove from pan using the parchment paper and cut into squares with a sharp knife.
Video
Notes
Notes
- Store covered in refrigerator for up to 2 weeks
- Can be frozen for up to 2 months
- Makes approximately 16 pieces
- Use gel food coloring for best color results
- Cream cheese must be at room temperature for smooth mixing
Nutrition
Nutritional Disclaimer
This recipe was calculated using the exact brands and measurements I used to make this recipe. If you are following a strict diet please note changing anything will cause the nutritional info to change. My calculations are intended as a guide only.
- An Affair from the Heart – Valentine Oreo Bark
- Fresh April Flours – Red Velvet Bundt Cake
- Hostess At Heart – Easy Valentine’s Day Fudge Recipe
- Lemon Blossoms – Pink Champagne Cake
- Family Around the Table – Chocolate Peanut Butter Bundt Cake with Peanut Butter Glaze
- A Day in the Life on the Farm – Chocolate Cheesecake
- Daily Dish Recipes – Chocolate Covered Strawberry Cupcakes
- The Fresh Cooky – Red Velvet Donuts
- Devour Dinner – Dessert Charcuterie Board
- Jolene’s Recipe Journal – Copycat Flaky Puffs
- Art of Natural Living – Bailey’s Chocolate Martini
- Jen around the world – Strawberry Mojito Mocktail
- Kathryn’s Kitchen Blog – Sugar Cookie Bars
- Soulfully Made – Easy Red Velvet Brownies
- The Redhead Baker – Chocolate-Covered Strawberry Layer Cake
- Magical Ingredients – Soft White Chocolate Strawberry Fudge
- Take Two Tapas – Valentine’s Pretzel Hugs
- SueBee Homemaker – Chocolate Cake for Two
- Palatable Pastime – Strawberry White Hot Chocolate
- The Spiffy Cookie – Red Velvet Molten Lava Cakes
- Hezzi-D’s Books and Cooks – Pomegranate Moscow Mule
- Books n’ Cooks – French Martini
- Faith, Hope, Love, & Luck Survive Despite a Whiskered Accomplice – Nutty M&M Peanut Butter Cup Valentine Cookies
Did you enjoy this recipe? Don’t forget to pin it for later and follow me on Pinterest for more delicious recipes like this one!

Originally published: 2/1/22
Updated: 9/23/25


This was such a big hit! So easy and the kids love them
So glad that it worked for you!
Made this for little take home gifts for some girlfriends that I had for a Galentine’s day lunch! What a HIT!!
That’s my favorite way to share this fudge too! Thank you, Kathi!
The pink and red combo was so perfect for Valentine’s. It came out adorable with all of the sprinkles and tasted great too!!
Thank you, Trish! I just love those pretty colors to offset our winter days.
The color of this fudge is amazing, but the taste is even better! LOVE it so much!
Thank you, Sue!
This is so cute and perfect for Valentine’s Day! I love the two bright layers!
Thank you, Nikki!
This is so cute and perfect for Valentine’s Day! I need to start making fudge again!
Thank you, Inger. I need to make it more often too.
What a beautiful fudge! Such pretty color and so festive. It was quick and easy to make.
Thank you, Jen!
Love the pretty pink color and this is an amazing sweet to have! Love this fudge!
Thank you, Radha!
This is almost too pretty to eat! I haven’t made fudge in far too long, must change that!
Thank you, Jolene! I sure didn’t have any problems gobbling this up lol!
Love the sprinkles on top! Such a pretty fudge
Thank you, Hezzi!
I love how vibrant and festive this fudge is! I can’t wait to make this and it’s going to be perfect to gift to others. I love how this fudge is made with red hots- my favorite candy!
Thank you, Kathryn! Red hots would be delicious and so easy too.
This is both delicious and so pretty! The bright and vibrant color plus the cute sprinkles! Yes please!
Thank you, Kathy! That means a lot coming from you!!!
YUMMY YUM! Fudge is always a perfect treat and this recipe was fantastic
Thank you, Rebecca!
Easy and fudge…two very dangerous words!!! But they are extremely yummy words!!! This fudge looks sweet and festive!
I know, Colleen! Thank you.
Ok, this is adorable. Love making fudge super festive!
Thank you, Lynn!
So bright, vibrant and celebratory! Who wouldn’t smile receiving pieces of this beautiful fudge! Perfect for Valentine’s day Julie!
Thank you, Kathleen! It’s such a pretty fudge.
That brilliant pink and red color! Those heart-shaped sprinkles! Be still my Valentine Puffy Heart — this fudge recipe is PERFECTION!!
Thank you, Michaela!
Love this recipe and the fact that it can be adapted to any Holiday or Occasion. Thanks so much for sharing.
Thank you, Wendy!