How To Make Your Own Sourdough Bread Starter (and Maintain it)
This post may contain affiliate links. Please read our Disclosure Policy.
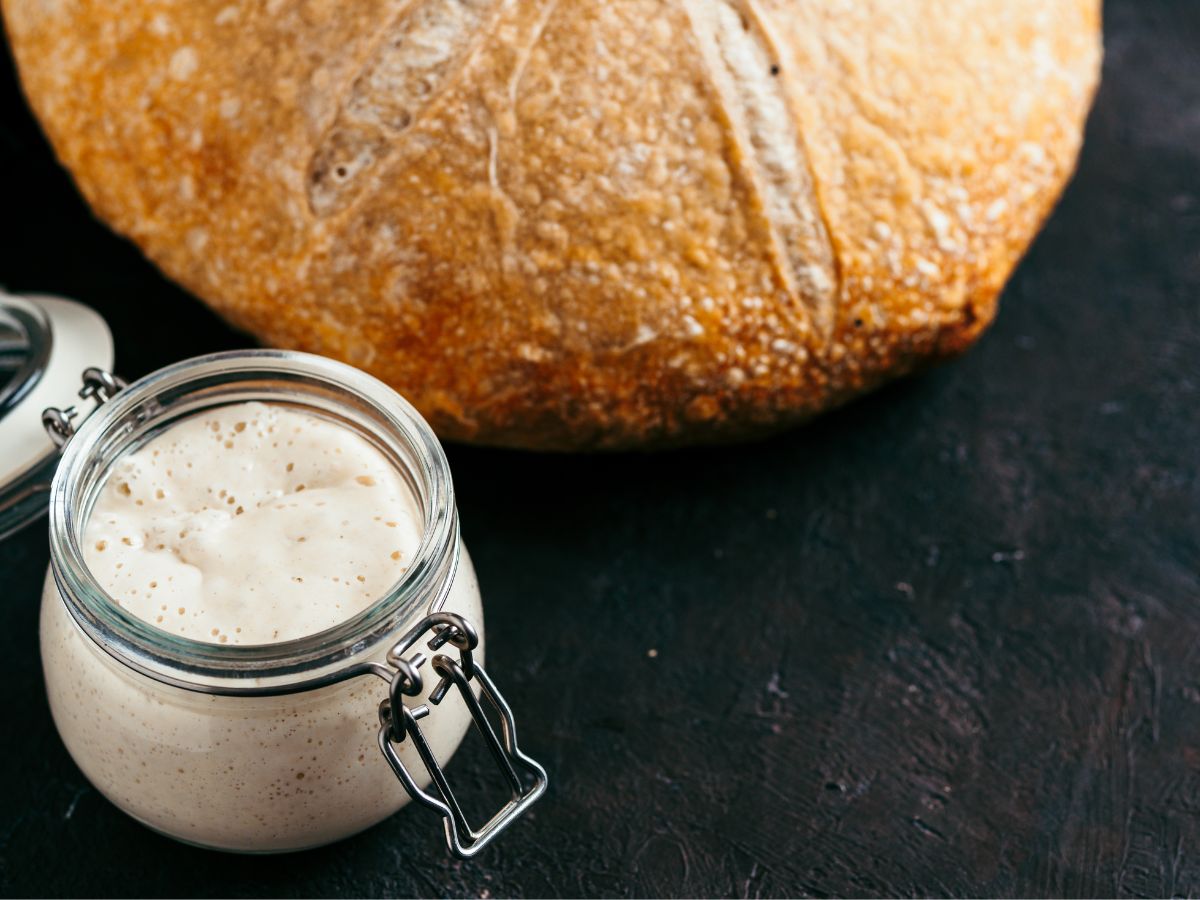
Bread starter is mystifying. How can flour and water become a culture that creates a beautiful loaf of bread with a soft crumb and the perfect crispy crust? This step-by-step tutorial will take the mystery out of yeast starters so pull out your apron and let’s get started!
What do you need to bake an Artisan style loaf of bread?
You need a vigorous starter, proofed dough, and proper baking. Even though the steps are few, you can’t make homemade bread by skipping any of them.
When I finally convinced myself that I wanted to bake sourdough, I poured over articles and videos. The more I read the more freaked out I got!
I actually purchased a bread baking series that was supposed to help me make my own starter and bake some amazing bread. Then I meticulously followed the instructions for making my own bread starter. I didn’t have any luck which really messed with my bread-baking psyche!
That recipe had you replacing a lot of the “seed” starter before it even got a chance to get going. It also used only all-purpose flour. This starter will give you a much better chance of success!
What is Bread Starter?
Bread starter is a combination of flour and water that mixes with wild yeasts and bacteria that are naturally found in the flour, air, and even your hands to form a culture.
This culture feeds on the natural sugars in the flour and must be fed regularly to prevent the depletion of the sugar supply. If you hear the term starving your starter, it means your starter has a lack of sugar to feed on.
This is especially important while you’re building your starter. Once you have a strong and vigorous starter if you skip a feeding don’t fret. Just get back on track.
Too many skipped feedings will throw off the microbial balance and lead to inconsistent results. See my tips on storing your starter below.
What’s the difference between a bread starter and a sourdough starter?
Many bakers call their starter a Levain or Starter. The characteristics and flavor of the bread is dependent on ingredients, method, time, temperature, shape, and technique.
The signature sour flavor of sourdough comes from how long the loaf ferments before baking, not the starter used. A long fermented loaf will usually have more of a sour flavor associated with sourdough than one with a shorter ferment time.
Bread Starter Ingredients:
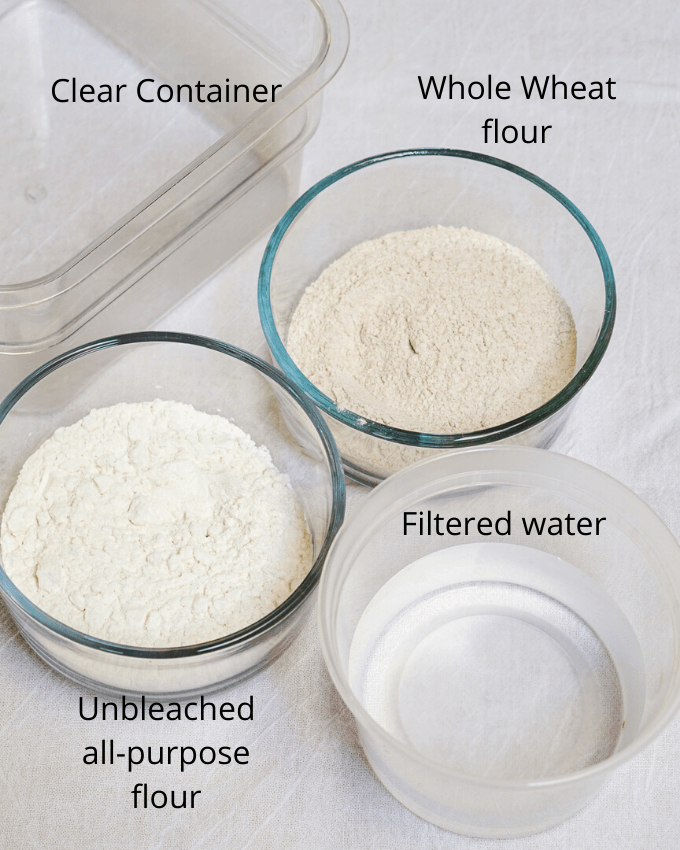
- Flour – You can use any flour. I use an equal mix of wheat flour and unbleached all-purpose flour.
- Unbleached flour, especially whole grain or organic varieties, retains more natural enzymes and minerals that help keep your starter active and bubbly.
- Whole grain flour such as wheat and rye have more nutrients and microorganisms than all-purpose flour. The yeasts and bacteria consume rye flour or whole wheat flour more quickly than others.
- Water – I use filtered water. It’s said that chlorinated water and water with a high mineral count (hard water) can inhibit yeast growth. Also, use slightly warm or room-temperature water. Using cold water will slow the growth down.
How to make a Bread Starter
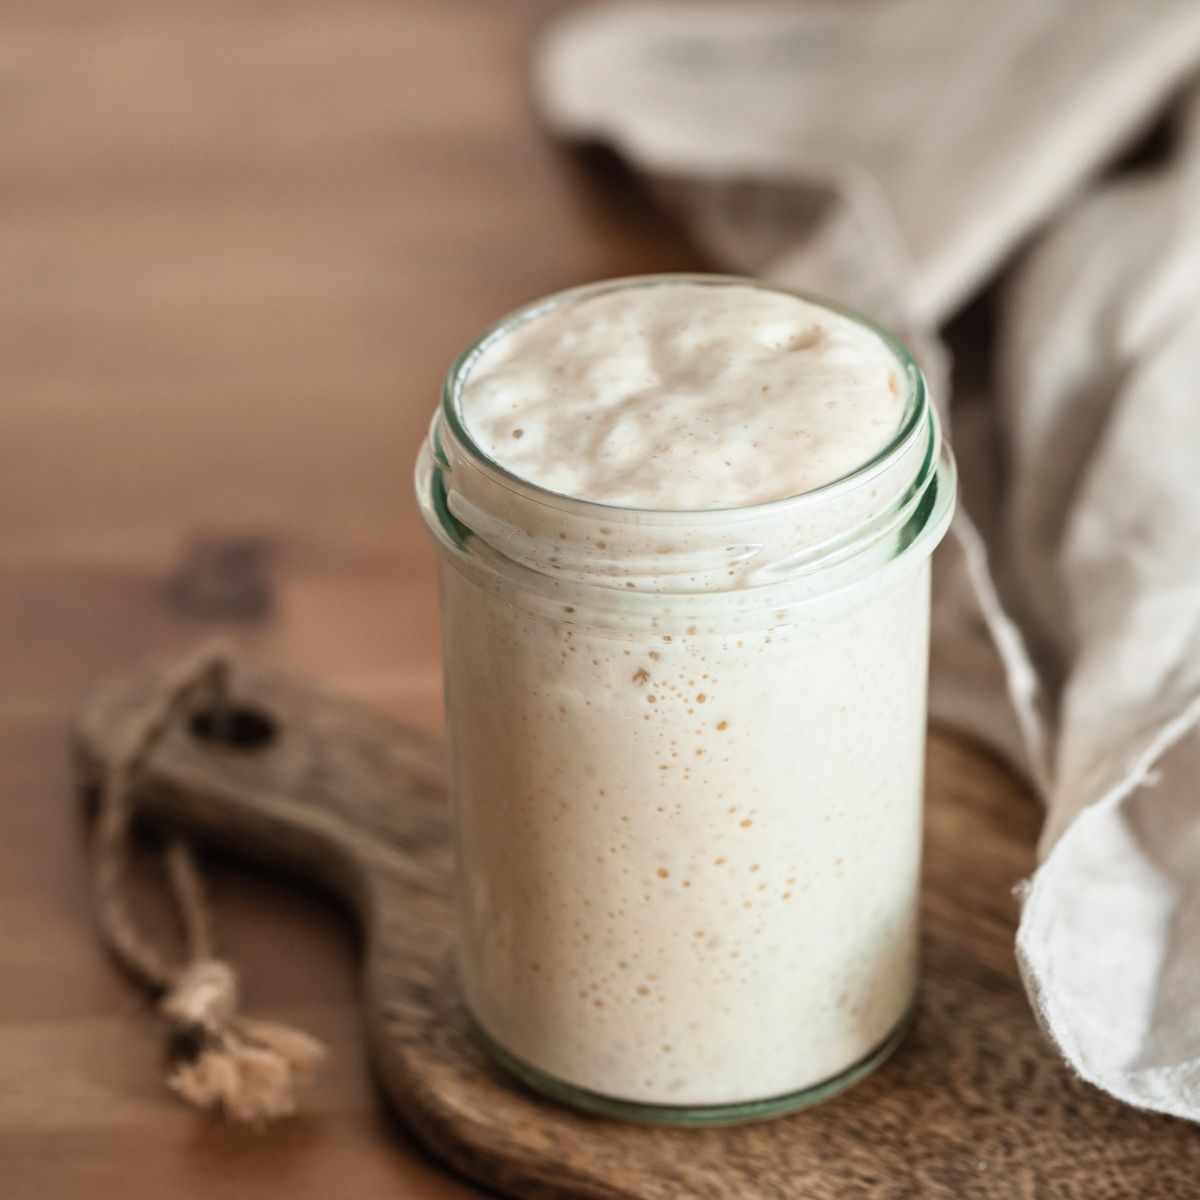
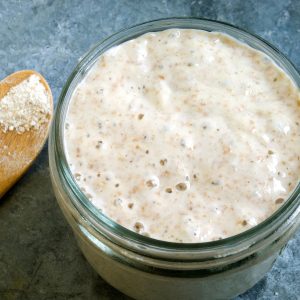
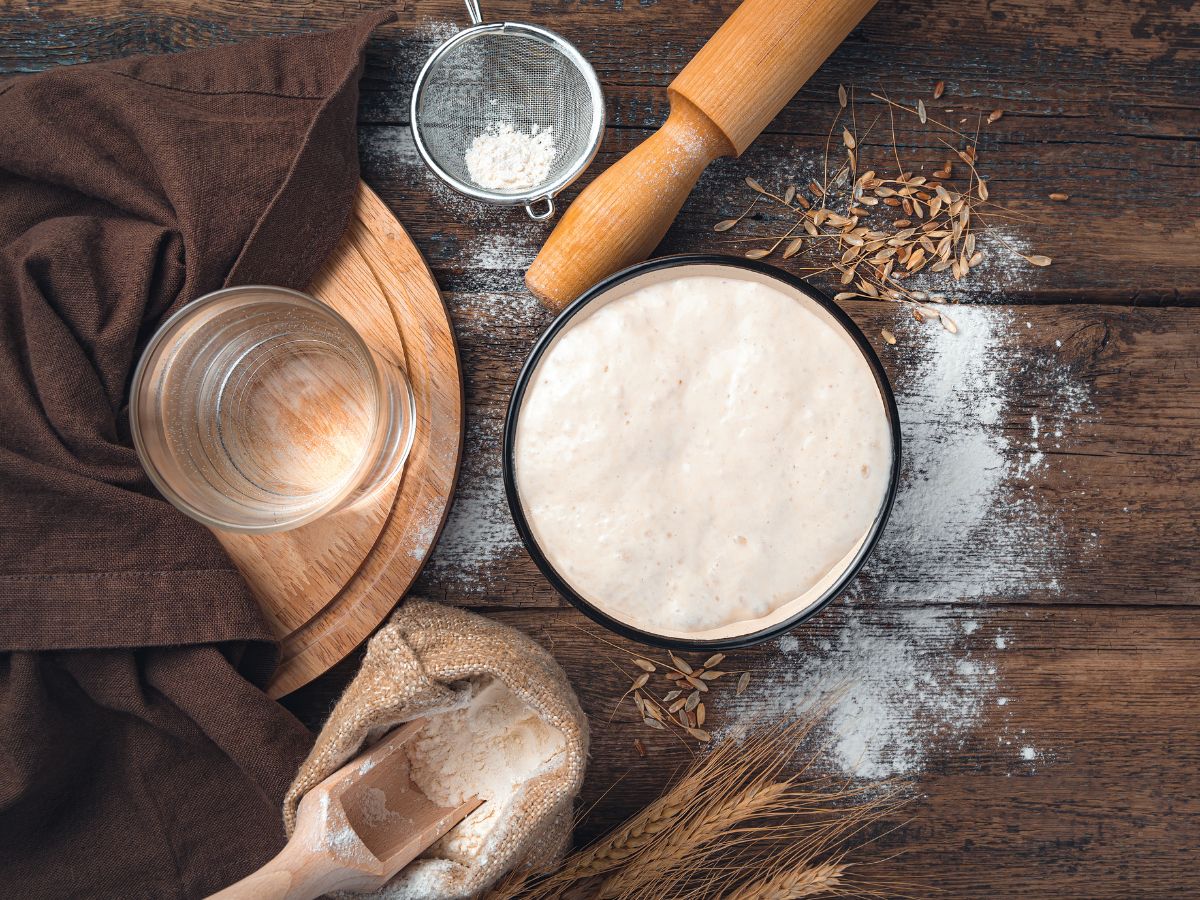
Use a non-reactive clear container such as glass or food-grade plastic. You want to be able to see through your container so you can monitor the progress. I recommend a container that is approximately 1 quart. Your starter needs room to rise.
You will also want to use a food scale that measures in grams. Why? Ingredients are added by weight not volume. You could measure out 1/4 cup of starter several times and never get the same weight because of the gasses it contains. Also, flour weight can differ according to how you fill a measuring cup or the measuring cup itself.
You can convert my measurements in the recipe below but if you have any difficulties making your yeast starter, the first thing I’ll ask is “did you weigh your ingredients”?
Ok, let’s get started!
One of the things that I struggled with was all of the “hydration” ratios that I read about when I first got started. The starter that we are making is called 100% hydration because the flour weight is a 1:1 ratio with the water weight.
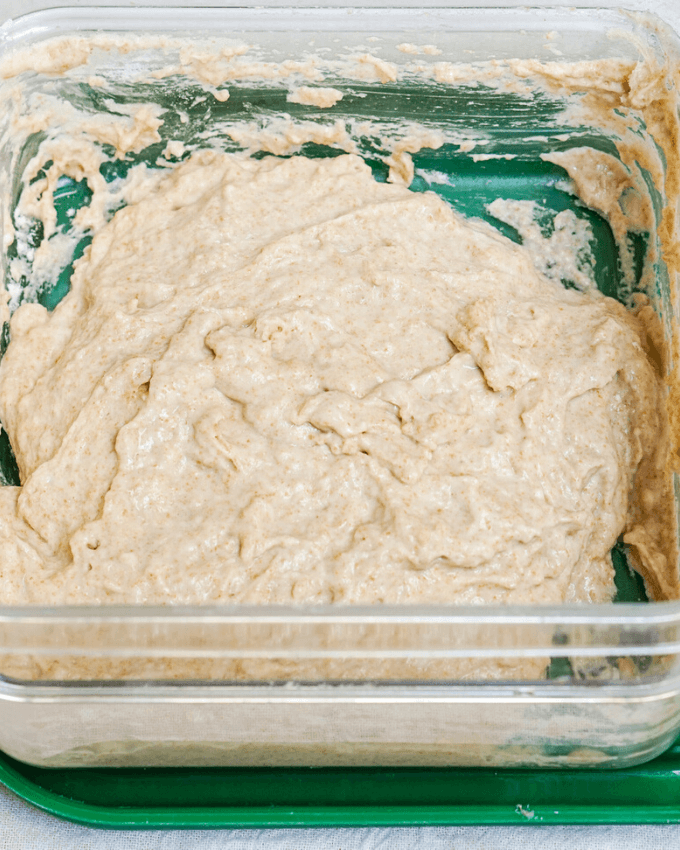
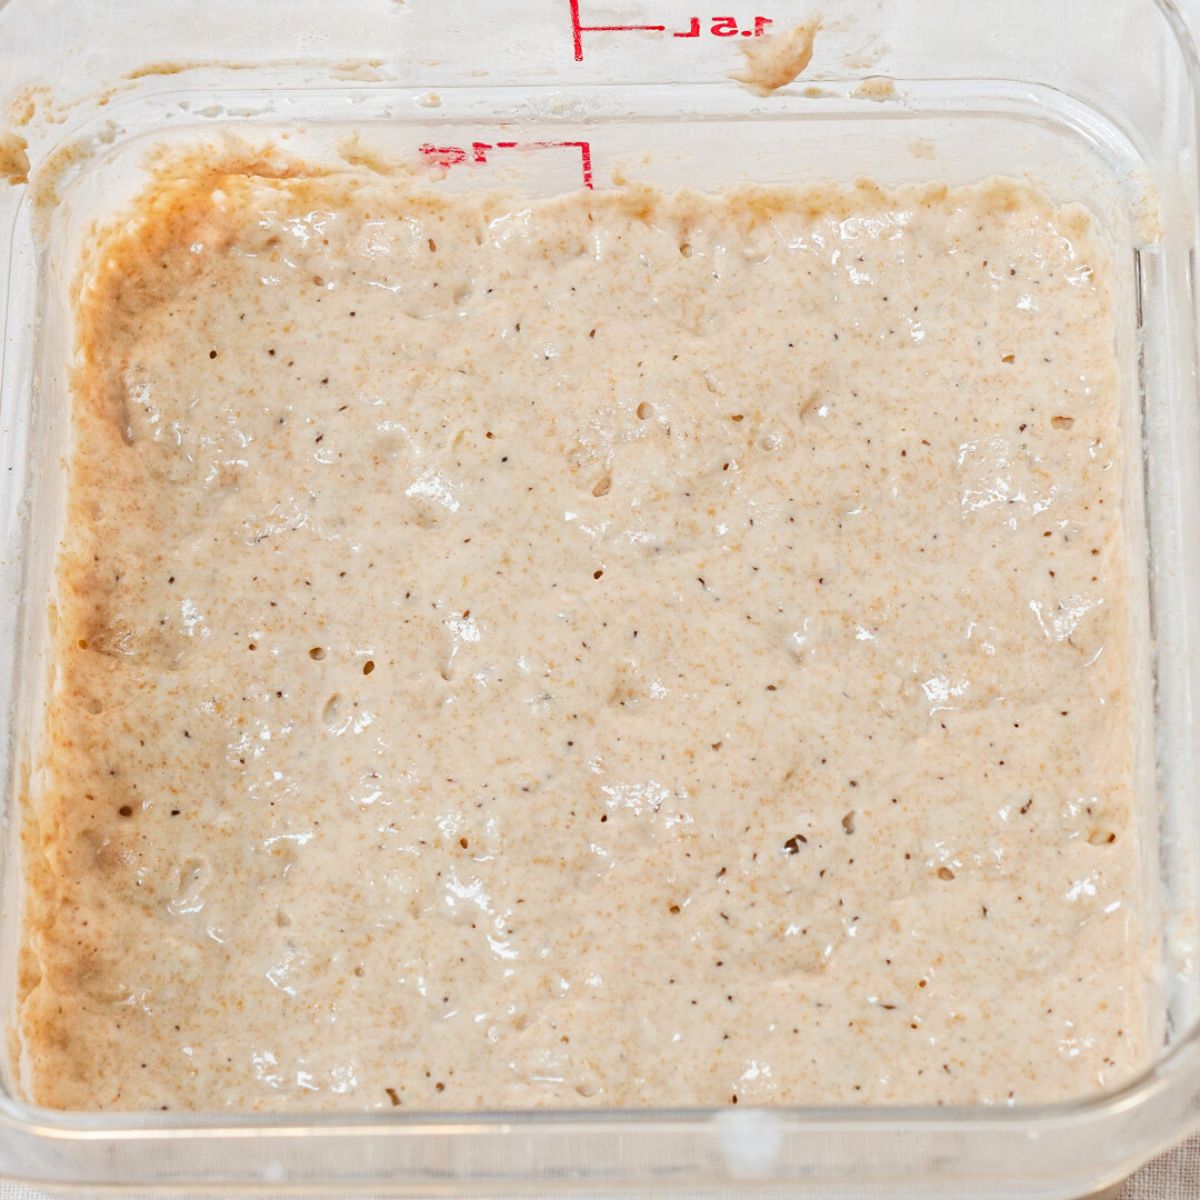
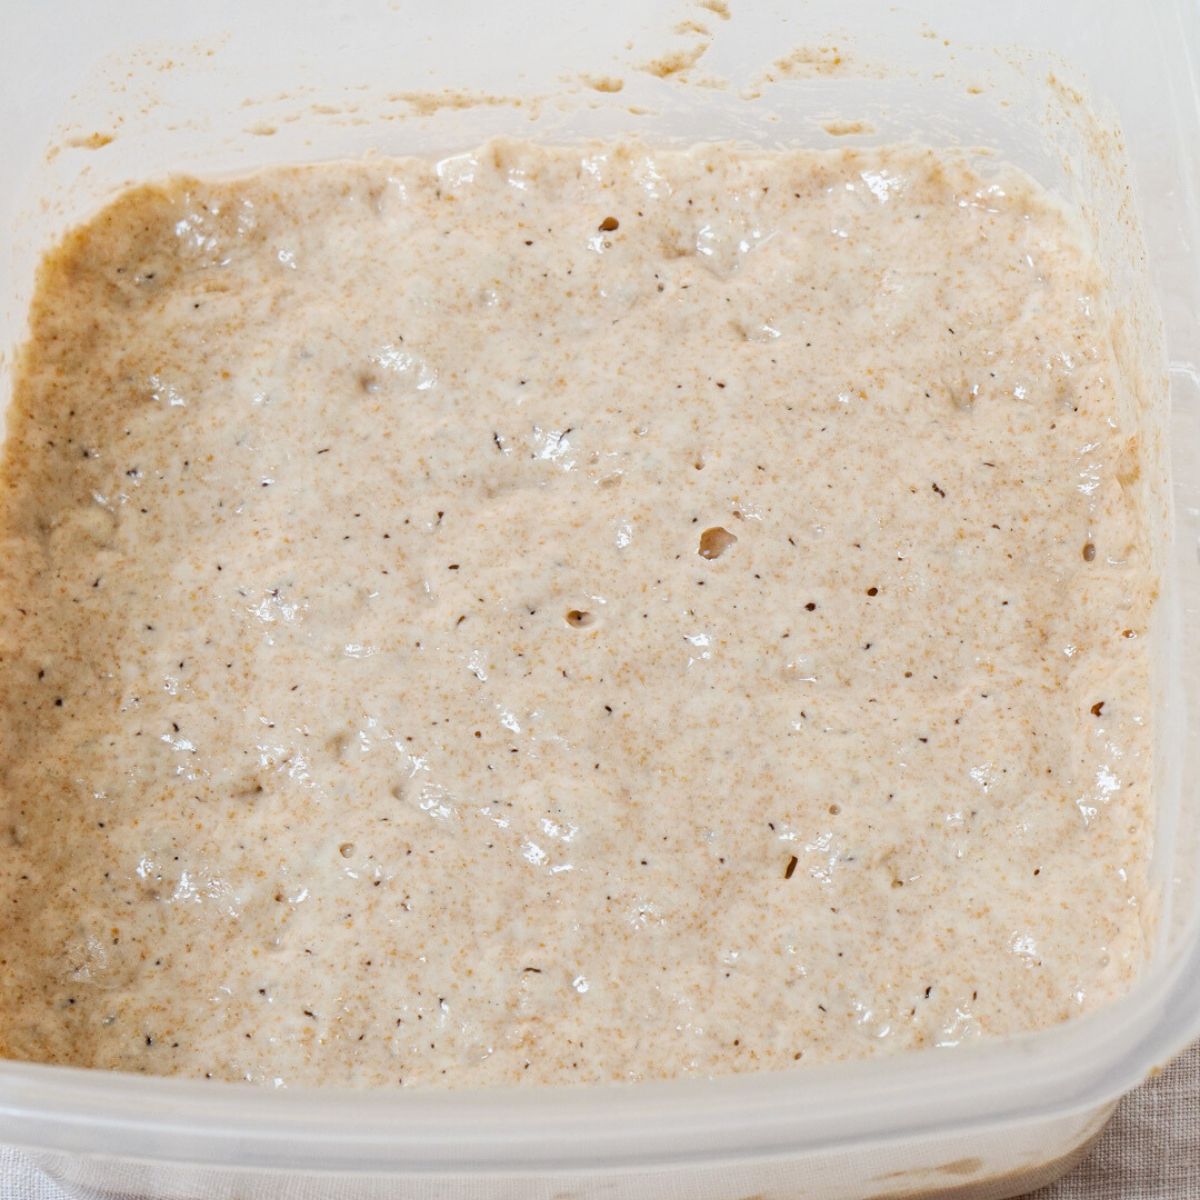
- Combine 180 grams of filtered water and 90 grams of Whole Wheat flour and 90 grams of Unbleached All-Purpose Flour. Mix it with your hand until no flour remains visible. Your mixture will be like a thick sticky batter. *Cover the container and let it sit at room temperature in a shaded spot for 2 days. Check for bubbles around the sides and on the top. If there are just a few let it sit for another day.
- Once bubbles appear, you will notice that your starter stinks and that’s normal.
- Discard about 80% of the starter and add 100 grams of filtered water and 50 grams of all-purpose flour and 50 grams of whole wheat flour. Mix again by hand. Cover and let it sit for 24 hours. *You don’t need to wash out the container between feedings.
- Maintenance feeding is actually training your starter into a lively and predictable starter and that’s what you’re now doing.
- Discard about 80% of the starter and add 100 grams of filtered water and 50 grams of all-purpose flour and 50 grams of whole wheat flour. Mix again by hand. Cover and let it sit for 24 hours. *You don’t need to wash out the container between feedings.
- Continue discarding all but about 20% of the starter. Add 100 grams of flour (50/50 mix) and 100 grams of filtered water every 24 hours at approximately the same time of day, preferably morning.
*Some people believe that you should loosely cover your starter with a dishtowel or light cloth so it can breathe. I’ve always covered mine with a lid and the only problem I’ve had is if the container was too small. My starter will actually blow the lid off!
While I was building my starter, I put a rubber band around the container to monitor its progress. You can also just make a line where your starter begins and follow it throughout the day.
Be Patient – Building a starter can take up to 14 days if not longer.
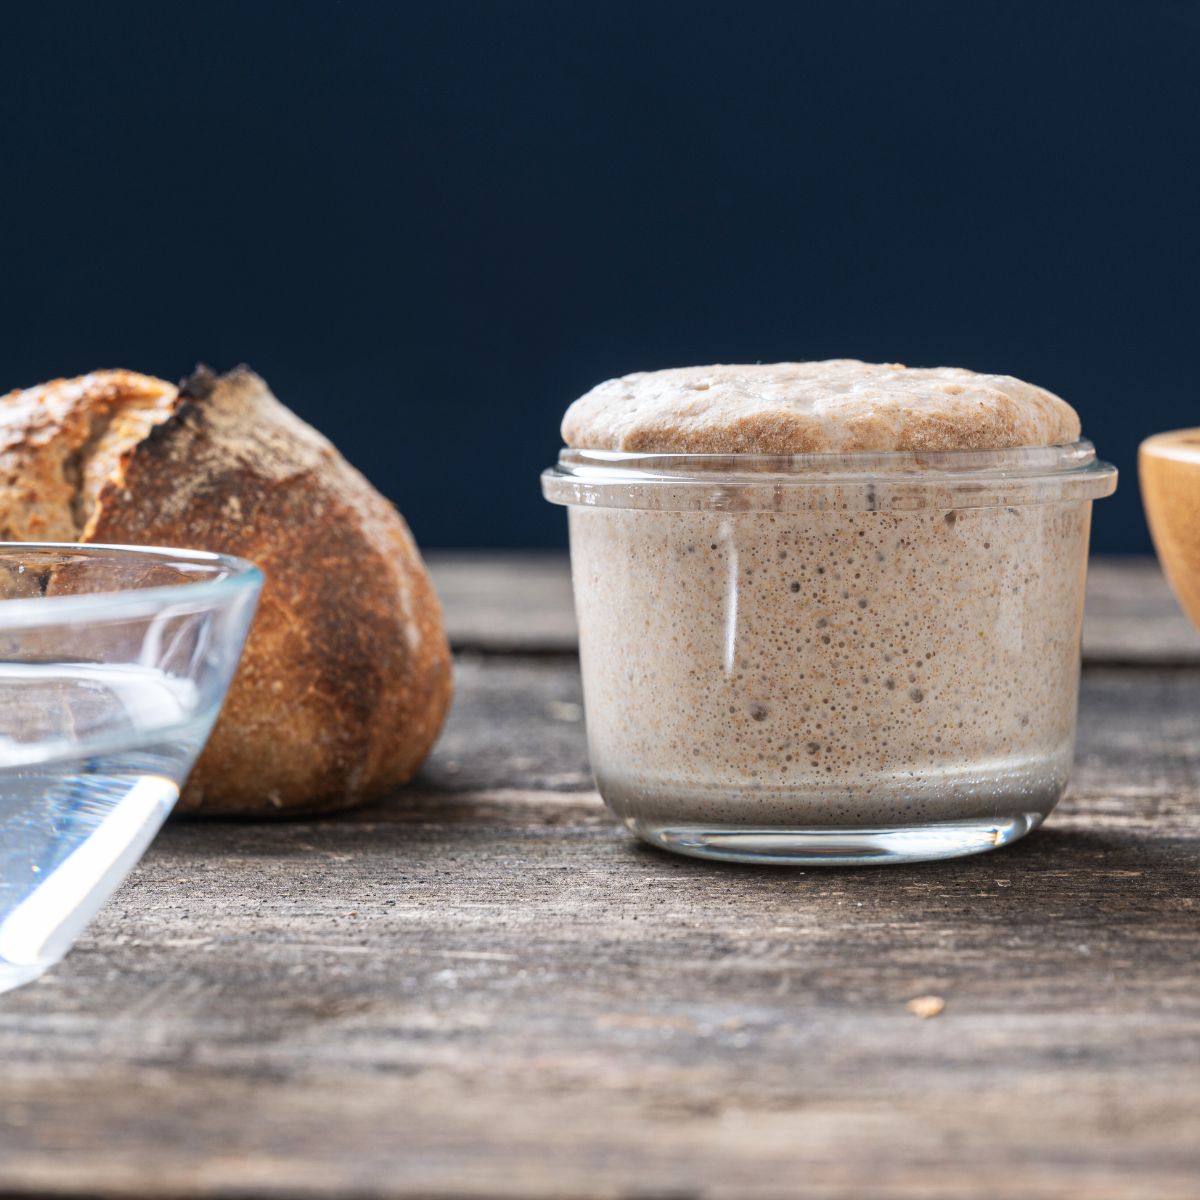
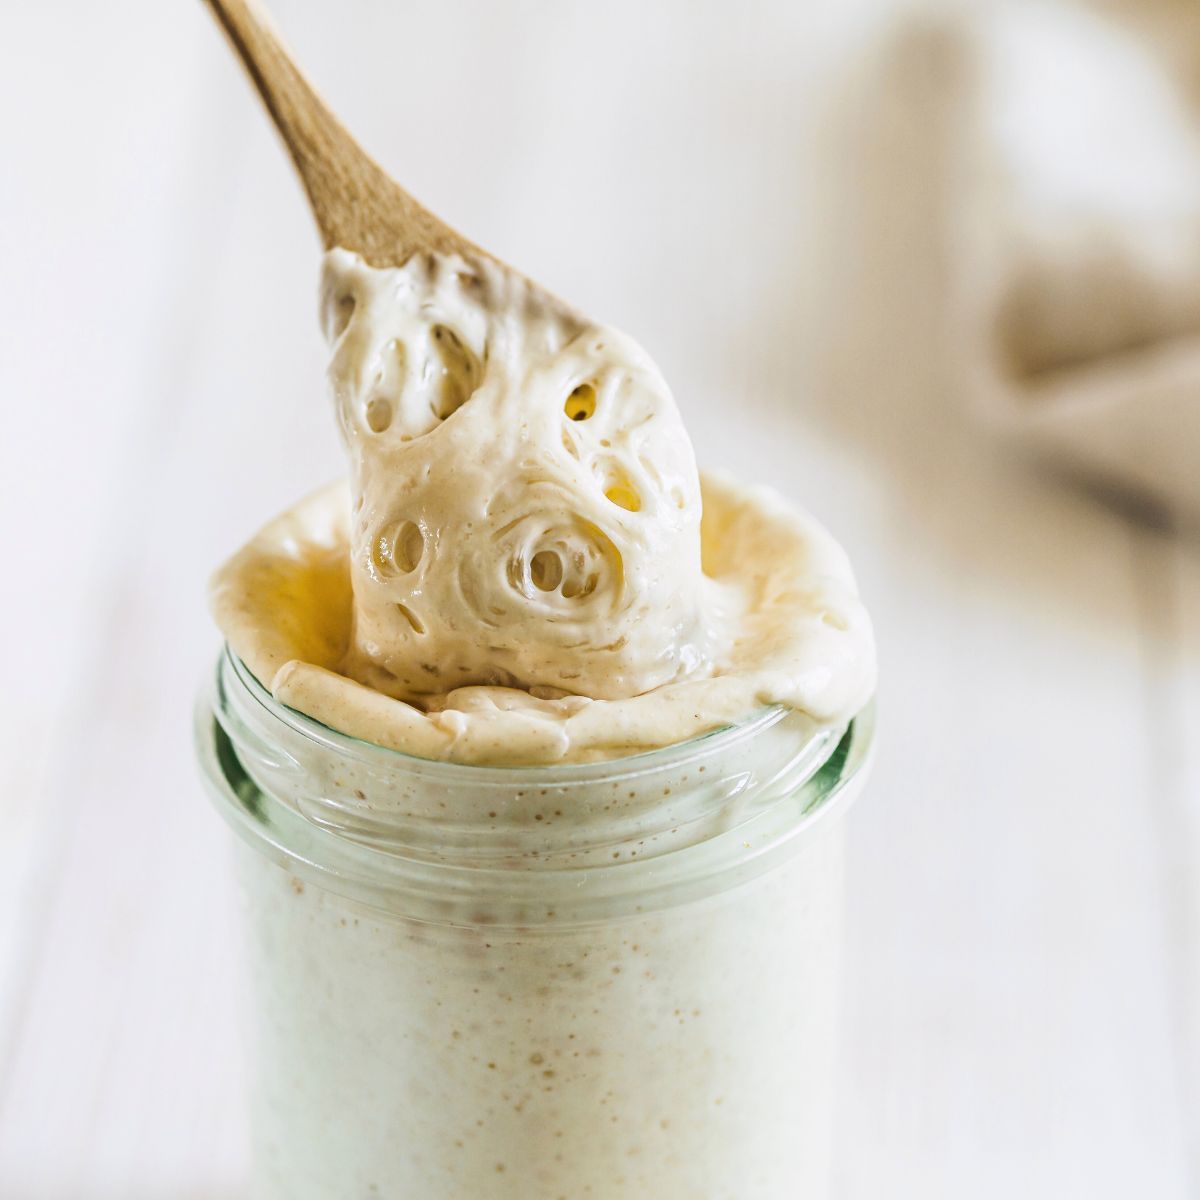
Once the yeast and bacteria are established, you will notice that the volume increases several hours after feeding and then collapses. The aroma also becomes milder and sweeter. At 8 hours my starter more than doubles.
It’s normal to take less time or more time depending on the temperature of your kitchen, the flour you use, and the culture itself.
Once the yeast starter starts rising and falling predictably, you’re ready to bake your first loaf of bread!
I used this starter 10 days after making it.
I was able to bake with my new starter after only 10 days. It was summer and so the conditions were perfect. It was rising predictably closer to 8 days. If you start in a cooler region it could take longer.
How to maintain and store your Bread Starter
If you plan to bake several times a week, leave the bread starter out at room temperature. Continue discarding and feeding every 24 hours.
There are variables that affect your yeast starter. Temperature is a big one. Cool temperatures will slow your starter down. Hot weather will speed up your starter and you may have to feed it more often.
Maintaining and Storing Active Starter
If you will not be baking regularly, after you feed your starter put it into the refrigerator. Feed it weekly. Continue using 100 grams of water and 100 grams of the flour mix.
When you plan on baking remove the starter from the refrigerator and let it return to room temperature. Discard and feed your starter recipe again. I will do this for 2 to 3 days to get it good and vigorous again. If it seems sluggish feed it twice a day (every 12 hours).
The high acidity of sourdough discard helps preserve it and prevents harmful bacteria from growing. You’ll know it’s still good if it has a pleasant sour smell and no visible mold. A thin layer of gray film or liquid (hooch) on top is normal and can be stirred back in.
I often bake on Monday or Tuesday so I will remove my yeast starter from the refrigerator on Friday and start feeding it regularly.
Storing Discard
Instead of throwing away the unfed starter (discard), bake with it. We’ve got all kinds of delicious recipes.
Sourdough discard can last about 7-14 days in the refrigerator when stored properly in an airtight container.
Bread starter is resilient. You can kill it from neglect but not very easily. Most often you can activate it with normal feedings. The exception is if it becomes moldy. Time to throw it out and make a new one. Hopefully, you have a little starter in the freezer?
Can I freeze Bread Starter?
For longer storage, you can freeze sourdough starter or discard for up to 3 months in an airtight container or freezer bag. Just thaw it in the refrigerator before using it.
We were going to be away for an extended time. I was short on time so just put the whole container of liquid starter in the freezer. When we returned, I thawed it out in the refrigerator and fed it. It came back good and bubbly right away.

Starter Insurance – I was so fearful that I would kill my first starter that I smeared it on waxed paper and let it dry. Once dried I peeled it off the waxed paper and then crushed it up in my mini-food processor. I froze it in tablespoon-sized packets. You can dry it or just put dollops of fed starter in small airtight containers in the freezer for up to 3 months.
I’ve made new starters using the crushed starter and it worked like a charm. Here is are printable instructions on using starter flakes to make a new starter.
Using your starter
Before you bake with your starter, you want to make sure it is vigorous. If it’s been in the refrigerator, remove it from the refrigerator and feed it within 4 to 6 hours before you want to mix the Levain. If it raises well, I’ll feed my starter before I go to bed.
A slow starter needs to be fed for one or two more days. You can also feed it twice in 12-hour intervals on the day you take it out of the refrigerator. On the second day feed it in the morning and mix your Levain the night before you want to mix your dough.
I usually mix my starter around 9 o’clock in the evening. I make sure to use it by 9 o’clock the next morning, even though I have a bit more time.
You should use your Starter within 2 hours of when it’s ready. This way, it won’t be starving when you start mixing your dough.
A new starter will get stronger as it matures. I noticed that even though I fed my new starter the same way as my old one, it was a bit thinner. I guess we all get better with age right?
Want to save this recipe?
I'd like to receive more tips and recipes from Hostess At Heart!
It had a slightly more acidic smell. However, when I baked with it, I couldn’t tell the difference in the bread.
Do I need a different Yeast Starter Recipe for different types of bread?
No, you do not. This Starter recipe can be used for any bread recipe that calls for a natural or wild yeast starter.
Some recipes state that you need to feed your starter or make your starter from the flour in the bread such as Rye or Pumpernickel. That’s not necessary. Just use the ratios of flour (50/50 mix) to water as they suggest.
If you want San Francisco Sourdough bread why not just buy their starter?
You can find a lot of San Francisco starters for sale. However, if you don’t keep feeding it with the same water and flour, it won’t stay a San Francisco starter for long. It will take on the characteristics of the water and flour you use.
What is Levain, or Leaven?
Levain and Leaven and activated starter are the same thing. For the purpose of simplicity, we’ll call it an active starter.
Building a starter is the same as feeding a yeast starter in order to activate it for baking.
Your bread dough usually needs more starter than you keep when you’re feeding your bread starter in order for the dough to rise. We build it by adding more flour and water.
When you are maintaining a starter, you don’t have to keep as much as is called for in most bread recipes that use a natural yeast starter. Keeping a lot more than you need is a waste of flour.
For that reason, we build on our vigorous starter so we have enough for the bread recipe. Any leftover starter becomes our new starter so we want to make sure that we have enough leftover (1 tablespoon).
How do I know how much active Starter to make?
The recipe will usually tell you how much you need. They may say starter but it’s the same remember?
If your recipe calls for 150 grams of Starter, the night before I will mix up 1 tablespoon of my mature starter, 150 grams of filtered water, and 150 grams of my flour mix.
After I measure out the amount of starter that I need to mix my dough, I will take a tablespoon of my Starter for my maintenance starter and feed it with the filtered water and flour mix.
Let it sit out at room temperature for about 30 minutes and then refrigerate it if you’re not going to be baking with it right away.
How do I know if my starter is ready to use?
Once you mix up your starter, let it sit for about 4 to 6 hours. Most of the time I’ll mix up my starter before I go to bed and then the next morning mix my dough.
Put a small amount of water in a bowl and do a float test. Drop some Levain into the water. If it floats it’s ready. The activated starter is aerated by wild yeast activity that produces carbon dioxide making it float. When the temperature is cooler I’ve had to test mine again after 30 minutes. Just place it in a warm area and let it build a little longer.
If it doesn’t float cover it and place it in a warm place 73°-75°F for another 30 minutes and test it again. Ultimately, if it doesn’t work discard half the Starter, add 100 grams warm water and 100 grams flour mix. Cover it and set it in a warm area for 2 hours and then retest it again.
If your starter is thin, it could be because you waited too long and it’s used up the sugar needed to make it bubbly. You will have to feed it again before you can use it.
Tip: To create a warm environment I will often briefly heat up a cup of water in the microwave and then put the container containing the starter in the microwave where it’s warm and moist. You don’t want it too hot, however. Place it on top of the refrigerator (heat rises). You can also just turn the light on in your oven and set it in there.
Many bakers will use a “proof box” which maintains a constant temperature for your starter and dough. I use my microwave like a proof box.
Troubleshooting and FAQ’s
Question – “I followed the recipe to a T, but when I woke up, the dough was completely liquified… I’m not sure what I did wrong, but it was more like melted ice cream than dough.”
Answer – Most likely your starter is starving and not strong enough to bake with. If you’ve neglected it or it’s been stored in the refrigerator for an extended time, feed it every 12 hours. It should be doubling in volume and collapsing predictably with plenty of strong bubbles before you use it.
To get it going again refortify it with several feedings of 20% starter, 100 grams of the flour mix, and 100 grams of filtered water. You want all of your ingredients to be at room temperature.
Question – My starter used to be vigorous but now it’s having trouble gaining strength.
Answer – Don’t worry, it happens.
Try feeding it twice a day for a couple of days before you want to use it.
You can also use some whole-grain rye flour to feed your starter. Rye contains certain yeasts that are prolific in fermenting. Remove about 1 tablespoon of all-purpose flour and add back an equal amount of rye.
Whole grain flours can accelerate fermentation and will have your starter ready to go in a couple of days. When it’s strong again you can resume feeding it with the flour mix.
What you may need to make this Bread Starter Recipe:
Hostess At Heart participates in affiliate programs. As an Amazon Associate, I earn a commission from qualifying purchases. Please refer to my disclosure page for more information.
Kitchen Scale – You absolutely must have a scale. This one holds up to 22 lbs and will weigh grams and ounces. Make sure you tare the scale with the container sitting on top of it then add the ingredients.
Clear container – you can use any food-safe clear container. I recommend at least 1 quart. I used this container to build my starter and use it to mix my Levain. You see a lot of starters are made in jars. If you use a jar make sure the opening is large enough to mix your ingredients and that it’s big enough for the starter to rise.
I have two books (out of several) that I’ve learned so much from. I recommend them exclusively to help in your bread experience. They are easy to read and will help you get that beautiful loaf on the table!
Are you ready?
Are you ready to jump into making your own starter? Is a delicious loaf of sourdough or an Artisan Wheat bread in your future? Once you’ve dabbled in this dough, the sky’s the limit of what you can do!
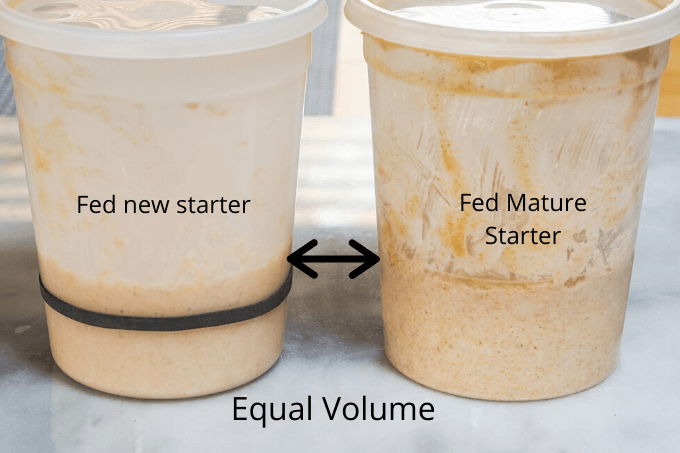
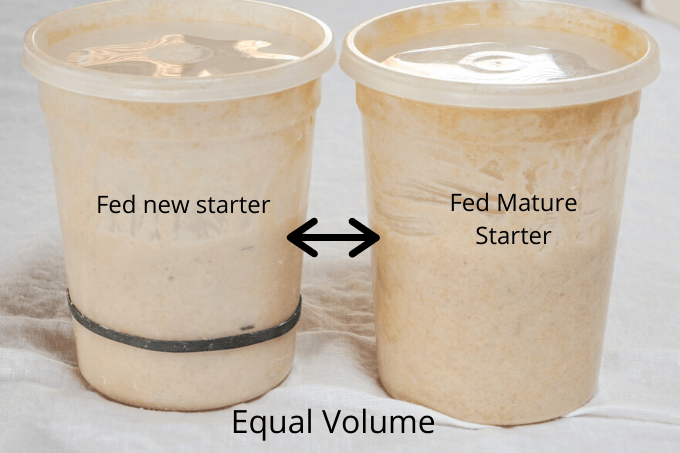
As you can see in the above pictures, there aren’t many visible differences in my mature bread starter versus the one that I started. The new starter may have been a touch thinner but it kept up with the old girl quite well.

Just take a look at the way they baked up! They were both delicious. I wouldn’t have been able to tell the difference if I hadn’t been diligent in keeping them separated!
I hope you enjoyed this delicious recipe as much as we do. Drop me a comment below, and don’t forget to give it a star rating. ⭐⭐⭐⭐⭐. Your comments and ratings help others decide if this recipe is for them too.
Sourdough Bread Starter Guide (100% hydration)
Ingredients
- 100 grams water filtered
- 50 grams Unbleached All-Purpose flour
- 50 white whole wheat flour
Instructions
- To make a new starter, combine the ingredients in a 1 quart container. Each day remove all but one tablespoon of the mixture and add 100 grams of water and 100 grams of the flour (50/50/mix).
Notes
- Feed the starter each day until predictably active. Depending on the temperature conditions it can take anywhere from 8 to 14 days to get an active starter.
Nutritional Disclaimer
This recipe was calculated using the exact brands and measurements I used to make this recipe. If you are following a strict diet please note changing anything will cause the nutritional info to change. My calculations are intended as a guide only.
Here are recipes that use Bread Starter:
- Overnight Sourdough Bread Recipe – Perfect for Beginners and this is the recipe I used with both starters.
- Multi-Grain Wheat Bread
- Spelt Sourdough Bread
- Sourdough Sandwich Bread
- Homemade Sourdough Bread with All-Purpose Flour
Recipes to make using your leftover Starter (also called discard)
You can use your starter instead of commercial yeast. A packet of yeast equals 1 cup of your liquid starter. This article has some instructions and considerations that are helpful.
If you hate throwing away sourdough starter discard, you’re going to love these Sourdough Starter Discard recipes!
How long is Starter Discard good for?
Lots of bread bakers will stockpile their discard (depleted starter) to use in all kinds of recipes. Generally, these people are active sourdough bread bakers. I’m a on and off sourdough bread baker so I usually have to get my starter active before I bake by feeding it two or three times.
It’s o.k. to store your discard for 2 to 3 weeks in the refrigerator. Make sure that there are no signs of mold or a pink or orange discoloration before you use it. After you’ve been using a starter for a while, you’ll know what a good starter smells like. It’s a yeast or floral smell that’s not off-putting or an acidic smell.
What’s in a name?
Finally, you have to give your starter a name and tell me what it is in the comments below.
My first starter was built from some dried starter a dear friend gave me. I named her Phoenix because she was literally built from dust. My new starter is Nomad. He’s aptly named because he went on vacation with us while I was building him. He must have had a great time because he’s still very happy!
This document is constantly changing. Your questions and comments benefit all of us!
As always, I answer my own comments and emails so let me know how I can help you.


Just found your recipe and going to give it a try. My question is what is your exact starter ratio for this recipe?
It’s 1:1 flour to water. I use a blend of 50% unbleached flour and 50%
Hi enjoyed your article I’m a recently retired auto technician. I am used to oil & grease on cars but have found that I enjoy baking and have found that I like the challenge of making bread. I never knew you could make your own starter for your bread. I have been using store bought yeast. But now I think I’m going to try making my own starter. My wife thinks I’m nuts but she loves the bread that I make and when my kids come back to visit they ask for some bread to take home. Thanks for the great tips
I love working with my hands as you must and find it very therapeutic. Please ask questions. I’d love to help you develop your breadmaking skills. I just made my 3rd starter. It’s so much fun watching it develop (bread nerd alert). I’d suggest https://hostessatheart.com/sourdough-bread-recipe/ for your first sourdough. Many people have had a lot of luck with it. My husband and friends love homemade bread and I know your family will too!
Amaising very well presented all informations u may need Best of all I read before Thank you Julie
Thank you, Daniela.
Hi Julie, thank you for the detailed instructions. Now that I am retired, I am hoping I can tackle a sourdough starter and keep it alive (although I don’t have the best track record with plants). I messed up and bought a huge bag of AP flour at the big box store without realizing it was bleached. Is it possible to use it for a starter?
Yes, you can, Tina. Any flour will work. Will you be using any whole wheat with the apf? Congratulations on your retirement!
@Julie Menghini, Thanks for the quick response! I have a bag of sprouted whole wheat so I mixed that in 50/50. I’ll let you know how it turns out
@Julie Menghini, I should have looked at my new starter before I sent my first reply. It doubled in size overnight and has quite a few bubbles. Do I really need to wait two days or should I go ahead and start the daily feedings?
As soon as your starter is active, you can use it! Have fun, Tina!
Hi can you convert to cups please . I always get discouraged when I have to look it up . I want to start making sourdough bread but nervous about the starter .
Hi Doree! This is an easy one for you. Your flour and your water will be equal measurements(1:1). So, for 1 cup of water use 1/2 cup of wheat flour and 1/2 cup of AP flour. Or 1 cup of water to 1 cup of flour. Please let me know if you have any questions! ~Julie
Hi…I love making discard recipes. Can you tell me how long discard is useable when left in the fridge?
Lots of people actually store it and I wouldn’t be afraid to use it for up to 1 month old. Make sure it smells ripe with no signs of mold or a pink discolor. I generally use mine when I’m getting ready to bake because I’ll feed it a couple of times (having discard) so it’s good and strong for baking. Hope this helps! Thank you for the question.
Do you have a calendar or table to follow? I keep having to go back to reread and would love a chart or calendar of some sort. Thanks!
That’s a great request, Renee! When developing this recipe I just used a small notebook and listed my results by day. I fed it pretty much at the same time and jotted down how it acted by rising and falling in volume. Does this help?
OK, I have just made my first starter! Haven’t named it yet (will if it lives!). It didn’t seem as thick as I thought it would be. I used the scale to measure everything, so it should be ok. My whole wheat flour did say whole wheat “Pastry” flour. Would that make a difference? And another question: Can I save some of the discard to start a second batch or should I wait a few times of feeding and discarding to start my second batch of starter?
I’ve never used pastry flour Linda so don’t know how it will work. You can also use just all-purpose flour. I would wait until your starter grows and consistently doubles before using it to start another one. Why not experiment and start another one from scratch using APF? See if it grows a little quicker. Good job measuring! You are keeping it at room temperature right?
It is finally rising. It has doubled! Still no name! I am amazed flour & water will raise.
That’s awesome Linda! You’re on your way now! If you’re still using pastry flour, I wouldn’t recommend it for the bread recipes. I’ve got my starter getting ready to go to work baking tomorrow.
I’m really interested to know whether you continued using the whole wheat pastry flour, and whether your starter was ultimately successful for baking bread. I have a lot of whole wheat pastry flour that I don’t use much, and I wonder if it would work to feed a sourdough starter. I would use APF for the bread itself, I just want to know if I can use whole wheat pastry flour to feed the starter. Thanks!
I use a 50/50 blend of APF and whole wheat flour. Your whole wheat pastry flour will work to feed your starter too.
Thanks, Julie. I’ve read conflicting things about this, so I wanted to make certain.
You’re welcome Margaret. There are as many opinions as there are questions. Baking bread is finding what works for you. I’ve baked a lot of bread and continue experimenting. I have my favorites and some that I know aren’t for me. Feel free to let me know if I can help.
Hi,
What is the reason to discard every feeding time some of the starter ?
The discard is used up energy. If you didn’t discard any, it would take a lot of flour and water to revive the starter to where it’s ready for baking. Does that help?
I can’t seem to find where you mention the
size of the duch oven.
Thanks
I use a 6qt Lodge Dutch oven Suzan for the Overnight Sourdough Bread Recipe https://hostessatheart.com/sourdough-bread-recipe/.
Hii Julie, so glad I found your site & all the helpful tips. I’m a bit confused though. I have a jar of starter from my daughter which I have been feeding as recommended. After I make my levain in a new container do I discard the remainder of the original starter and start to make a new starter with what’s left over of the levain once I’ve added the required amount to my dough? Hope that makes sense!
PS Glad to see you enjoy our Aussie lamb…our farmers will be grateful!
Hi Christine! Levain is actually the same thing as starter. It is usually the process of increasing the amount of starter if the bread calls for more than the starter you have on hand. It’s also fed and ready to go. I hardly ever use a new container. I just pour out all but about a tablespoon and then feed it with 100gr of water and 100gr of my 50/50 mix of flour Does that help? We love working with Aussie!
Now I get it! Thanks so much for all your helpful advice. My bread turned out beautifully using your recipe!
That’s great, Christine! Thank you for letting me know!
I just made my first loaf using my new starter and it came out great….but then I read this article and learned a lot more, so thank you! I named my starter “Seymore” after the plant in Little Shop of Horrors…I couldn’t resist saying “feed me Seymore” every time I fed my starter!
I love that Francesca! I wish I’d thought of it. Thank you for sharing!
My starter, Gemini, was doing super and I was enjoying the foods I was able to produce. Suddenly today it started to smell terrible. No discoloration noted except for a tiny speck of a yellowish pinkish ting on edge of jar I didn’t wipe off. I fed as usual and I’ve been leaving it on counter and now thinking I should be putting it in refrigerator since I had 3-4 days between use. Is it possible it has gone bad (mold) maybe starting. I do have some dried starter but hope I won’t have to use it.
Hi Gerie, that tinge indicates that it’s gone bad so PLEASE throw it out NOW. If you aren’t baking daily, and want to keep your starter at room temperature, you’ve got to feed it daily. Otherwise, store it in the refrigerator and feed it once a week. I get lazy and don’t always feed my refrigerated starter weekly but always look and smell it before feeding it. Any mold, pink or orange tint and it’s gone.
Thank you for the quick response. It has been discarded.
I have dried starter but not sure how to activate it so please advise as I’d like to start over.
Still learning!
Gerie, send me your email address and I’ll send you the instructions. hostessatheart@gmail.com.
My sister, in NY,( I am in MD) are about to (virtually) tackle the starter process on May 1, together. We baked a loaf of Italian Bread together(virtually with much laughter) two weeks ago. It went very well. She is not necessarily a baker, nor am I, but it is something to do with all the SPARE TIME we have. But yeast is just way too hard for her to come by, so the starter is my solution. My question: DO we have to do half all-purpose half whole wheat flour?
I’ll keep you posted on our progress. Thank you for such an informative site!
No, you don’t, Nicole! You can use All-purpose flour at 100gr and 100gr of water. That sounds like so much fun! Make sure you share what you’ve named your starters. I’ve heard they do better when you name them LOL!
I just made my first two starters, one with wholewheat brown flour and one with white bread flour. They matured really fast and are seriously gassy, so I named them Tuz & Fus, two Lebanese words for Fart…. Tuz is loud and Scentless and Fus is silent but deadly! The white flour is the Tuz… hungry and fast (loud) without tooo bready a taste, and Fus is my Wholewheat one… Silent (takes longer to activate) but so full of scent!
Hope my weird sense of humour hasn’t offended anybody!
I love your sense of humor Muna! Not those two are ready for some serious bread making! Thank you for sharing!
What is the purpose of discarding 80% of the starter each feeding? That seems like a lot of flour to throw out over time. Thank you in advance.
Hi Scott, thank you for stopping by. The starter needs a certain amount of food to stay alive and active. Once spent, it isn’t much use to the starter. That’s why I only keep a minimal amount (100g).
You can fry the discarded starter just like a pancake, no need to add anything but I season it with salt and peper and sprinkle seaseme seeds on it! sSoooo tasty!
That would be amazing Sabrina! Thank you for sharing!
I have named my starter Karl after the fog in San Francisco! Looking forward to enjoying our first loaf on Thanksgiving!!
I love it! I can’t wait to see the bread Karl makes!
I have never do a recipe for bread so this will be my oportunity thank u for sharing with us ❤follow me in IG: xoxo.4191
Good luck! I hope you’ll let me know how it goes!
I love a good bread loaf with a crispy crust! Thanks for the tips and I can’t wait to get started on baking my own bread instead of buying it!
Thank you, Jennifer! Homemade is so yummy!
This is so helpful. I’ve never had luck making my own starter but I can see just by reading what Id done wrong in all of the other attempts. I’m so looking forward to trying your way!
Thank you, Michele! Glad it was helpful for you especially since my first attempt was a fail too!
I’ve been wanting to try making my own starter and this is such a great guide! I love making homemade bread!
Thank you, Madi! It’s fun to watch it grow too!
This is so helpful! I don’t know if I would have tried anything like this without such thorough directions!
Thank you, Michelle!
So much great information, you might just have given me the courage to try my own! Delicious!
Thank you, Kathleen! Just jump in!
I am TOTALLY inspired! I am making mine this week — I will be sure to report back!
Thank you, Michaela!
This is absolutely fascinating. I need to get a kitchen scale and then I will be set. I can’t wait to get started. I will report back with a name! 🙂
I can’t wait to see how it goes! Thanks Deb!
Hi,
This is most nicest and detailed , all I wanted to know , explanation ever regarding anything with cooking.
Thank you so much for sharing , ill start mine today , and name will be Julie
Best regards , Oliver
You’re so sweet, Oliver! Let me know if you have any questions.