Basic Baking Techniques, Tools, and Ingredients
This post may contain affiliate links. Please read our Disclosure Policy.
Use these basic baking techniques and tools to get started making bread, pastries, and desserts. Baking brings joy to your family and makes your home smell amazing, but if you have limited experience baking it can be a daunting task.
This post was updated from 2021 to bring you more information based on your questions.

Table of contents
Basic Baking Techniques
Baking is a science, but we don’t want you to feel like you need a culinary degree to make our recipes. Just knowing Basic Baking verbiage can help you gain the confidence to try new things.
For that reason, we vet our recipes several times to make sure they work. We’re human, however, so If you see something that doesn’t make sense or have any questions, just let us know.
Safety First!
How can I ensure my baking station remains organized and hazard-free, especially with frequent foot traffic in the kitchen?
“Safety in the kitchen is paramount to an organized and hazard-free working space. Consider the following when you begin your next activity.
1. Keep your workspace organized. Gather any equipment you will need and the necessary ingredients ahead of time. This will keep you from having to make unnecessary trips across your workspace and prevent accidents when using wet or soiled hands to grab equipment or ingredients that aren’t at your workspace. Removing used bowls and utensils after they’re used will keep you on-task and efficient. Either set them in a sink or off to one side.
2. Keep equipment pushed back on your workspace which will keep items from falling on the floor and out of reach for little hands.
3. Try to follow the instructions on your recipe card, which are generally organized into tasks.
Prep that’s required to make your recipe includes chopping, measuring, and mixing required and any cooking or pre-baking. As you can see, these tasks start with a workspace and end with a focus on a hot stove or oven. Two separate tasks that require your attention.
Just a little thought before you begin your project can keep you and others safe and accident-free.”
Handling ingredients properly and maintaining a hygienic workspace ensures that each batch of baked goods is safe and high-quality. For detailed information, we recommend these tips published by “Porch” in which we were featured.
Measuring Techniques
Different ingredients call for different measuring techniques for the best results. Follow the instructions in your recipe to see if it specifies which method to use.
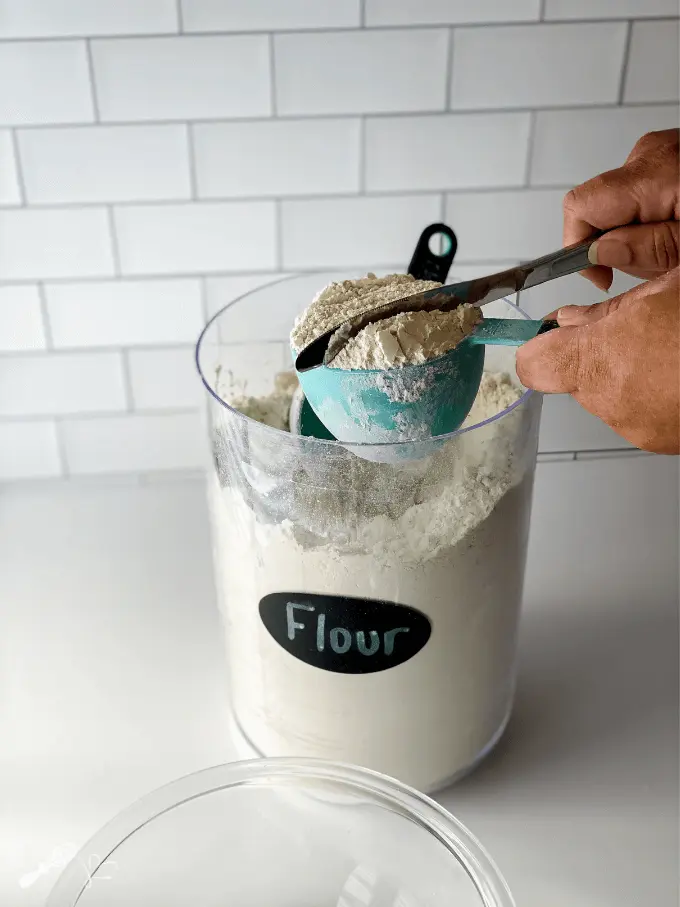
Scoop and Level Method
If your recipe doesn’t say which measuring method to use, we recommend using the scoop and level method. It’s not the most accurate but it is used the most.
For this method, scoop the measuring cup directly into the flour and level it off with the back of a knife. A lot of our recipes use this method unless the recipe says differently. Sugar, flour, baking soda, baking powder, and salt can all be measured with this method.
Note: If the flour is packed into your flour canister, stir it up with the cup before scooping.
That being said, it’s actually an unreliable method because the weights can vary. If the recipe calls for another method of measuring, don’t be surprised if your recipe doesn’t turn out because you used this method.
Spoon and Level Method
If a recipe calls for the spoon and level method of measuring and you ignore this direction, you could end up with 50% more flour or other ingredients than you need. This method can be used with flour, cocoa, or confectioner’s sugar.
How to measure with the spoon and level method
- Scoop the flour out of the flour bin with a spoon and dump it into the measuring cup. Don’t pack the flour in.

- Lightly tap the side or over the top of the measuring cup with a butter knife to fill in any air pockets (4 to 5 light taps).
- Once you’ve filled the cup and tapped out the air bubbles, gently level with the flat edge of a butter knife.


Scoop and Pack Method
Brown sugar is measured by scooping with a measuring cup and then packing it down. Unless a recipe states otherwise, you can use light brown sugar and dark brown sugar interchangeably.
Weigh Method
Use a food scale to measure ingredients if the recipe requires one. Using a scale is the most reliable method of measurement and it’s used for dry and liquid ingredients.
First, place an empty bowl on the scale and use the Zero function (tare) so it doesn’t include the weight of the bowl in your weight. Then fill your bowl with the ingredient of choice. Scoop in more or remove the ingredient until you get the correct weight.
You can tare (clear the weight) between ingredients so all of your ingredients are added to one bowl but I usually weigh them separately.
Tips and Tricks for Measuring
- Baking soda, cornstarch, and baking powder can settle or clump, so before measuring these ingredients, shake the container a little bit or fluff it up with a fork.
- If your recipe requires sifting read it to see if you measure the ingredients and then sift or sift and then measure.
- We always sift powdered (confectioners’) sugar and cocoa because they tend to clump or contain lumps.
- Standard yeast packets hold 2 and 1/4 teaspoons if a recipe calls for more or less than 1 standard packet of yeast (or if measuring out of a jar or container), measure the yeast using the same method as you are measuring the baking powder or baking soda.
Mixing Techniques
Quick Bread Mixing or the Easiest Mixing Method
Many quick-bread recipes and the occasional cookie recipe don’t need any special method of mixing. You just throw all the ingredients in at once and mix it all together thoroughly before putting it straight into the oven.
This is by far the easiest baking technique but is not standard for most cookies, cakes, or bread. The most common baking recipes require the creaming method.
How to Fold ingredients together
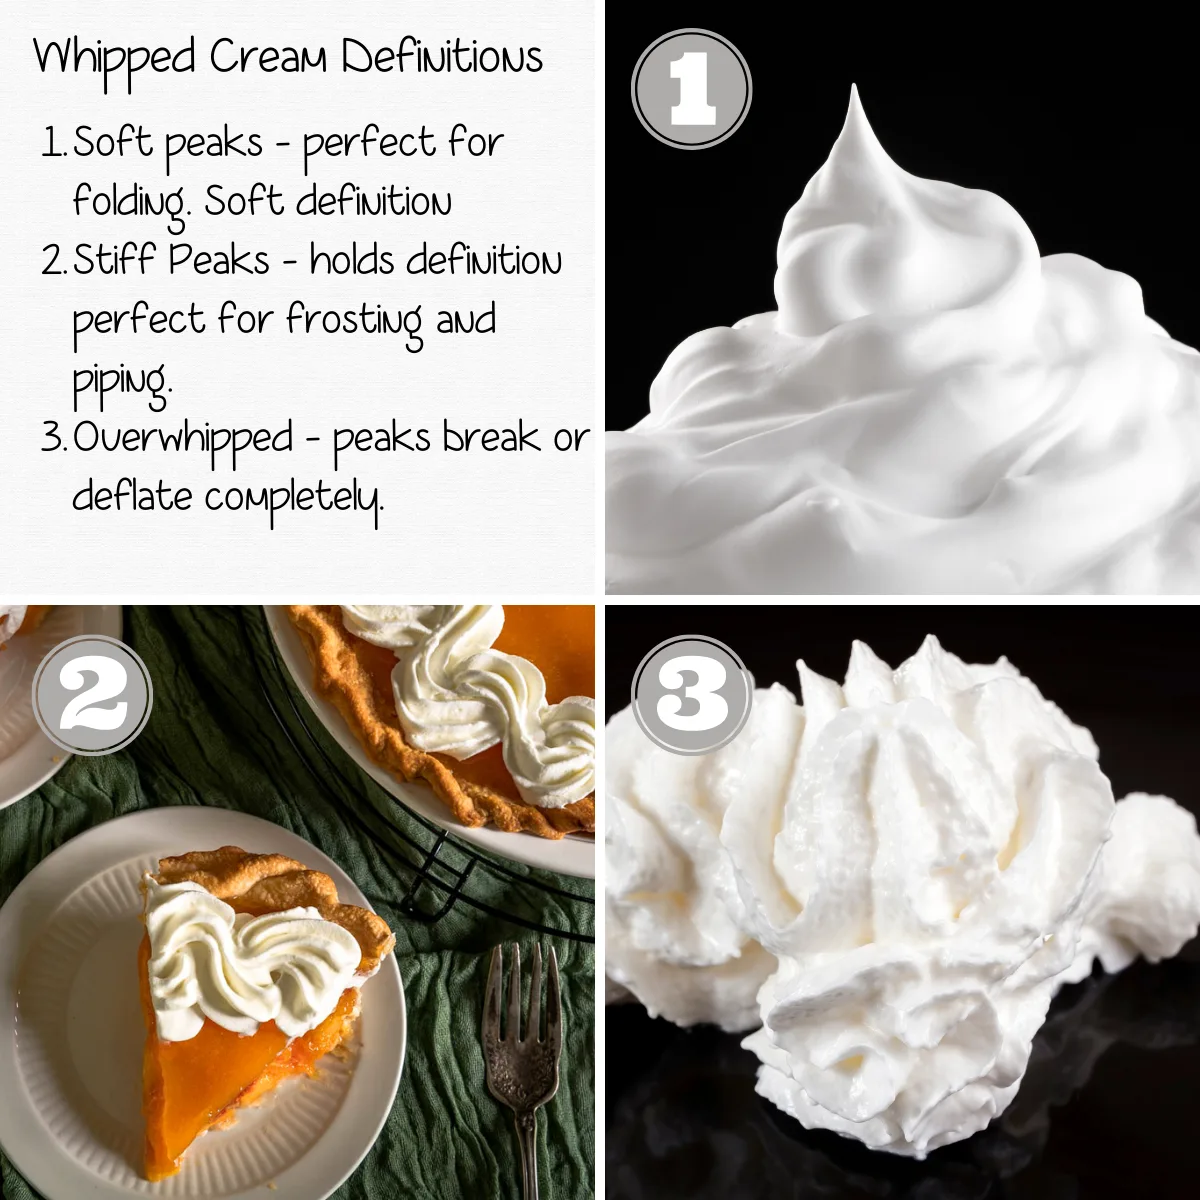
Folding is a technique that is unlike stirring or mixing. The purpose of folding is to mix ingredients together without deflating or overmixing the ingredients.
Folding is often used when mixing whipped topping into a recipe where you want to maintain a fluffy texture. It’s also used when you add a delicate ingredient such as berries into a batter where you don’t want them to break up.
I show you how to fold in our Strawberry Cheesecake Salad video. This is a fluffy salad and if I just mixed or stirred it the result would have been a liquid consistency instead of a fluffy consistency.
You can fix overbeaten cream by simply adding 1 to 2 tablespoons of cold milk to the cream and rewhip it to the proper texture.
The Creaming Method
Many recipes begin by having you cream the fat with the sugar first. This is called the creaming method. The most typical order of steps is to use a mixer to thoroughly blend the sugar with the butter or shortening, and then add the remaining liquid ingredients such as eggs and vanilla, or other extracts.
Properly creamed ingredients will be light and fluffy as well as lighter in color after they’re properly mixed. We use the paddle attachment of an electric stand mixer for this.
When creaming butter, you want your butter at room temperature or at the consistency of peanut butter or shortening. If your butter is too soft it will not cream properly and result in flatter baked goods.

Cream the butter until it’s light and fluffy, 3 to 5 minutes with your mixer on medium-high. This will help create a tender bakery. If the butter becomes gritty or greasy it’s become “broken” you’ve overdone it and need to start over.
In the creaming method, dry ingredients are normally mixed in a separate bowl and then added to the main bowl once all of the liquid ingredients have been incorporated.
Rub In The Flour Method
If you make a lot of pastries or bread you will almost surely come across a recipe that says “rub the flour into the butter”. When I see this, wash my hands really well and use my fingers. Mixing the flour with the butter first by pressing the butter into the flour over and over will result in the perfect texture for your baked goods.
You need to keep rubbing and rubbing until your mixture looks like crumbs. Every piece of flour will be coated in butter and as the butter melts during the baking process it will create an even moist crumb. You can use a pastry blender for this step if you do not want to use your hands.
Hot Milk Method for Baking
I make a Texas Sheet cake that uses this method. To make many from-scratch cakes, cupcakes, and hot milk puddings, you need to boil the butter and milk or other liquid together before you add the flour and other ingredients. This gives the cake a beautiful texture and intensifies the flavor if using cocoa.
Scalded Milk
Older recipes called for scalded milk to kill bacteria and enzymes that prevented the dough from rising. However, today, most milk is pasteurized which eliminates these bacteria and enzymes so it’s no longer necessary.
We still do it in some of our recipes because the warmer temperature helps activate the yeast and blends well with softened butter. It’s also said to make bread light and cakes spongy.
HOW DO YOU SCALD MILK?
- Add the milk to a small saucepan.
- Using an instant-read thermometer, heat the milk to 180°F. The milk will just start to form a skin over the top and is just under the boiling point. You’ll see little bubbles just on the edge.
- Remove the pan from the stove and place it in the refrigerator for 12 to 15 minutes or until the temperature of the milk lowers to at least 110°F.
Blind Baking Method
Blind Baking is a term that just means pre-baking. This method is used to pre-cook pastry dough before adding the filling. It helps prevent an undercooked crust in certain pie recipes. Using a pre-baked crust also keeps some pies from getting soggy as they bake if the filling is liquid.
Normally when you blind bake a pie crust, you add a sheet of parchment paper or foil over the crust and then fill it with dry beans, rice, or pie weights to help the crust hold its shape as it cooks without the filling in it to keep your pie crust or pastry crust from bubbling up and losing its shape.
Note – you can reuse the beans and rice for blind baking but don’t eat them after they’ve been used for blind baking.
Also, it’s important to note that if you use clay you need to put a layer of foil between the clay weights and the crust because the clay weights will absorb the fats in the crust and become rancid.
This was a personal experience so am hopeful it helps you as well. I baked a crust using the rancid weights and had to throw the whole thing out.
You’ll pre-bake the crust for ten or fifteen minutes, then add the filling. Depending on the filling you may or may not have to let your crust cool before adding the filling. The recipe should include these instructions.
Baking Essentials
Basic Baking Tools
- Mixing Bowls
- Electric Hand Mixer
- Measuring Spoons
- Dry Measuring Cups
- Liquid Measuring Cups
- Pastry Blender
- Whisk
- Electric Stand Mixer
- Rubber Spatula
- Cookie Scoop
- Cooling Rack
- Parchment Paper*
- Pie Plate
- Loaf Pan
- Pastry Brush
- Sheet Pans
- Cake Pan
- Cupcake/Muffin Pan
- Pie Weights*
*Parchment Paper – We always line our baking sheets. Sure it makes clean-up a breeze, but it also eliminates the effect of using a dark or light baking sheet during baking.
You can use bleached or unbleached parchment paper. If it has a glossy side, that should face up on your baking sheet or dish.
It’s important to know that there is an oven temperature rating on parchment paper. If you exceed it your parchment paper can catch fire in your oven. The one we recommend is rated to 450°F, high enough for our bread recipes too.
Don’t reuse parchment paper once it’s become brittle. We don’t reuse our parchment paper under any circumstances.
*Pie Weights – Pie weights are often ceramic or made of clay. If this is what you use, make sure you line the crust with parchment paper or foil before adding the weights. Your pie weights can become rancid if placed right on the crust. We know this from personal experience. We had to dispose of an entire beautiful pie. (very sad face inserted here)
Converting batter for cakes, cupcakes, and quick bread recipes can be difficult. We get that! Our free printable Baking Pan Conversion Cheat Sheet should help you utilize the pans that you already have
Want to save this recipe?
I'd like to receive more tips and recipes from Hostess At Heart!
Essential Baking Ingredients
Baking Soda & Baking Powder
Baking Soda and Baking Powder are leaveners that improve the texture and appearance of baked goods. They create a chemical reaction that produces air bubbles helping batter and dough rise.
- Make sure your baking soda and baking powder are fresh! They can absorb odors and lose their potency over time, so replace them often.
- To test baking powder to see if it’s still good, put 1/4 cup of boiling water into a bowl and add about 1/2 teaspoon of baking powder. If it bubbles, it’s still good.
- To test baking soda to see if it’s still good, add a spoonful of baking soda to a bowl and add an acid like vinegar or lemon juice. If it fizzes it’s still good.
Butter
Use the real stuff! Real butter tastes so much better than margarine or butter substitutes.
European butter has higher fat content (82% to 86%) and a lower water content compared to U.S. butter which must have at least 80% fat content. Look for Plugrá or Kerry Gold European butter or Land O’Lakes in the U.S.
We bake with unsalted butter because we want to control the salt in our recipes. If you use salted butter, eliminate some or all of the remaining salt.
Tip: How do you tell if butter is at room temperature? Press a clean finger onto the surface; it should leave an indentation on the surface. If it’s too cold it will not make an indentation and needs to be warmed a little longer. If your finger goes all of the way through or the butter is glossy, it’s too warm and you will want to refrigerate it briefly.
If your recipe states to use room temperature butter, you can soften the butter by placing sliced butter in a bowl next to two cups of boiling water in the microwave for about 10 minutes.
We’ve also put our butter on a plate and microwaved it for 5 seconds per side. Watch it carefully. Softened butter doesn’t mean melted butter. If it’s too soft it will not work well for creaming butter and sugar together.
As previously noted, your butter should be the consistency of peanut butter or shortening. If it’s too soft, it will not cream properly resulting in flatter baked goods.
Cornstarch
Corn Starch helps create a crumbly and tender texture in baking. It’s also a great thickener in sauces, soups, puddings, and pie fillings.
Eggs
We use Grade A Large eggs for consistency.
When a recipe suggests using room temperature ingredients, you can put your eggs in a bowl of room temperature water for 5 minutes to take them to room temperature.
Flour
It’s important to use the flour recommended in your recipe unless it indicates you can substitute. The reason is flour variety and brands contain different percentages of protein, grains, or even other ingredients.
All-Purpose flour (APF)
We use all-purpose flour unless we indicate it differently. Bleached and unbleached all-purpose flour is interchangeable and will not change the outcome of your recipe.
The difference is unbleached flour is less processed so is preferable to some bakers. It’s also said to be more flavorful. We use it a lot in our bread recipes.
If you’re wanting your bakery to have a whiter appearance use bleached.
Self-Rising Flour – Don’t substitute self-rising flour for another flour. Self-rising flour already has a raising agent and sometimes salt in it. Using it could add or duplicate ingredients not called for in your recipe.
Cake Flour
Cake flour is said to make baked goods soft and tender. It is not all-purpose flour. Cake flour is a finely milled soft winter wheat flour with a lower protein content than all-purpose flour. I show you how to make your own in the “Emergency Substitutions” section below.
Whole Grain Flour
What is whole grain flour? Whole grain flour uses grains that are fully intact meaning that they haven’t undergone processes that remove their bran and germ, not to mention nutritional benefits.
Wheat flour isn’t always whole grain. Wheat flour generally uses whole grain. You need to look for the word “whole”. Like so many ingredients, the wording can be misleading.
We love using whole grain flour. However, you can’t always swap whole grain flour 1:1 with all-purpose flour and expect to have the same outcome. Your bakery can be tough, dense, and dry because they absorb liquids differently. In our recipes, we try and explain the substitutions that you can make. We’ve used this article as a resource.
Bread Flour has a higher amount of protein and gluten which works great in bread that needs to rise. It creates a stronger dough that can be shaped. Bread flour also creates an airy chewy texture.
You can substitute all-purpose flour for bread flour 1:1. The texture may not be as chewy but it will still be good.
Salt
Kosher salt has larger grains that are actually hollow. You can usually use less kosher salt with the same impact as other varieties.
We often use fine salt in our bakery. We find that it blends with our ingredients instead of falling to the bottom of the bowl because it’s lighter in weight.
Tip: Mix your salt with the wet ingredients instead of whisking it with the dry ingredients for greater distribution. Ever take a bite and taste salt? it’s the distribution that can be the culprit.
Sugar
We use white granulated sugar.
Sugar in the raw
Sugar in the raw is also known as (turbinado sugar) and can be substituted 1:1 or sprinkled on top of your bakery for a delightful crunch.
Use the manufacturer’s recommendations when substituting with Sugar-free varieties.
Brown Sugar
Dark brown sugar and light brown sugar can be used interchangeably.
The difference is that dark brown sugar contains about twice the amount of molasses as light brown sugar giving it a deeper almost caramel flavor.
Vanilla
We use Pure Vanilla Extract most of the time, especially in puddings and whipped topping. Imitation vanilla extract can be substituted. An equal amount of vanilla extract can be substituted for vanilla bean paste.
Yeast
Instant Yeast, is also known as rapid rise or quick yeast. This yeast can be added right into your ingredients without activating it first.
Dry Yeast or Active Dry Yeast must be rehydrated and activated. It’s not listed as instant, quick, or rapid rise. Dry Yeasts are activated by combining them with warm water and often some sugar and letting them sit for about 5 minutes. Once it begins to bubble or foam, you’ve proved it’s active and good to use. If it doesn’t activate, start over with fresh yeast.
We prove that our yeast is active before adding it to all of the other ingredients. If you bake with “dead” yeast your dough will not rise and you’ve wasted a lot of time and ingredients.
Instant or rapid rise yeast can lose its potency. You can test it by adding some warm water and if it bubbles it’s ok to use.
Yeast can be stored in the refrigerator or freezer.
Sourdough Starter – this is a live yeast that you can make and maintain. The starter is used in bread and the starter discard can be used in lots of baking recipes.
Emergency Substitutions
Cake Flour – Make your own cake flour, measure out 1 cup of all-purpose flour and remove 2 tablespoons. Replace the 2 tablespoons of flour with cornstarch and sift them together.
If your recipe calls for less than a cup, I recommend that you make this substitution by the cup and then measure out what you need. For example, if you need 1-3/4 cups of cake flour make 2 cups of cake flour and then measure out the 1-3/4 that you need for your recipe and store the rest for your next cake.
Baking Powder – To replace 1 teaspoon of baking powder, combine 1/4 tsp baking soda and 1/2 tsp of cream of tartar.
Baking Soda – 4 teaspoons of baking powder can replace 1 teaspoon of baking soda.
- Sugar – Brown sugar can be used interchangeably with white sugar or
- 1-1/4 cup powdered (confectioners) sugar, or
- ¾ cup liquid sugar (honey, corn syrup, date syrup, maple syrup, agave).
- Brown Sugar – You can make your own brown sugar by adding 1 tablespoon of molasses to one cup of white sugar. Blend it in a food processor until it reaches a uniform color.
- Light Brown Sugar – Substitute with dark brown sugar or make one cup use 1/2 cup of dark brown sugar and 1/2 cup of white granulated sugar.
- Powdered Sugar (confectioners’ sugar)- You can make your own powdered sugar by adding white sugar to a blender or other powerful food processor or Nutri-bullet and mix on high for 4 to 5 minutes, stirring occasionally to make sure it’s all getting mixed. Be careful to make sure it stays dry.
- If the mixture feels gritty, continue blending. If it doesn’t blend to powder, your blender may not be powerful enough.
- Since powdered sugar stores well, I keep plenty on hand and store it in an air-tight container.
Butter – For creamed butter, substitutions include margarine, solid coconut oil, or shortening. For melted butter, substitutions include any neutral oil. You can also use an equal amount of unsweetened applesauce or pureed black beans for a non-fat substitution.
Buttermilk – Add 1 tablespoon of white vinegar or real lemon juice to 1 cup of milk. You can also substitute with yogurt 1:1.
Note: There is powdered buttermilk available in the baker’s aisle that can be stored in the refrigerator after opening.
Cocoa Powder – Use 1 ounce of unsweetened baking chocolate chopped fine (we use a blender or food processor).
Eggs – One egg can be replaced with 1/4 cup of mashed banana, applesauce, or vegetable oil.
Lemon Juice – Use Lime juice, white vinegar, or dry white wine.
Yogurt and Sour Cream can be used interchangeably. Buttermilk can also be used if you don’t need the consistency.
Pans
Converting batter for cakes, cupcakes, and quick bread recipes can be difficult.
The most essential thing people need to consider about baking pan conversion is volume and not surface. How many cups of batter is your recipe?
For instance, if you have a recipe that calls for an 8” square pan, the volume is pretty close to 8 cups. Equivalent sized pans would be two 8” round pans or one 9” loaf pan. A standard muffin pan holds 6 cups so for the same recipe would make 12 to 16 muffins (or cupcakes).
Our baking pan conversion cheat sheet will come in handy and save you money and room in your kitchen when you don’t have to buy one more pan!
An additional article that puts this information and more can be found in the “Ask The Pros” that featured Hostess And Heart and other talented bakers. It’s a great summation for baking at home.
Troubleshooting
There are certain rules that apply to most baking recipes.
- Don’t overmix. Overmixing can create a dry or dense result. That’s the biggest reason that recipes call for combining the wet ingredients together separately from the dry ingredients and then combining them.
- Don’t overbake. A recipe should tell you how to tell when your recipe is done. If you are consistently over or under-baking, it could be your oven.
- The best way is to check using a cheap oven thermometer from the hardware store. When your oven says it’s 350°F, what does the thermometer say? Some ovens can be celebrated. If not, you will manually have to adjust the temperature.
- Use fresh ingredients, especially baking soda, baking powder, and yeast.
Why did my cake sink in the middle?
Cakes can sink in the middle for several reasons.
- Is it underbaked? If you take the cake out and then it sinks slightly, you can put the cake back in the oven and finish baking it.
- Did you open the oven door? If you do, to turn the cake pan or to check doneness, carefully close the door. If the door is slammed, it will cause your cake to deflate or sink in the middle.
- Measure the leaveners (baking soda and/or baking powder) correctly. Also, make sure that they’re fresh. It’s best to replace them every 6 months and to store them correctly.
- Did you change pan sizes? A recipe that calls for a 9×13 pan doesn’t always work in a bundt pan or another sized pan and it can have an effect on the baking time.


This is wonderful! I teach in a school of skills for kids with learning disabilities. Is there any way one can buy the pdf of this or would you share. This is touches on every single thing they are doing
Hi Wilma! I’ll contact you by email.
This post is filled with so much helpful info and tips! I consider myself an experienced baker, but even I learned a thing or two that I didn’t know from this post!
Thank you, Amy!
What a great baking tip resource! Thanks so much!
Thank you! I’m glad you find it useful!
Thank you so much for this helpful baking guide! Love all your tips!
Thank you! If you ever have any questions, just let me know so I can keep our information up to date.
What a great post, I needed a substitute for cake flour and your substitution idea worked perfectly!
Thank you, Kathleen! I get lots of questions, and it occurred to me that putting them all in one document could be helpful.
I love all these tips and tricks. I used to be a scooper when it came to flour but I have totally changed my ways after so many failed recipes!
I’m with you! Thanks, Jennifer! Baking is definitely a learned skill.
I loved reading this and it was so helpful! Saving this for my daughter.
Thank you, Beth! I know my kids have asked all of these questions so hopefully it will help your kiddos too.
Such a wonderful post! I love how you have broken down all the basic techniques to help get beginners started on the right track with baking. The scooping photos for measuring are especially helpful.
Thank you, Tara! Just let me know if you have any questions.
This is such a great article with so many tips I needed! I’m definitely sending this to a few of my friends who need this (don’t tell them I said that), and I will be pinning it to save for reference. Thank you!
That’s great! Thank you Emily!
There are so many great tips here for becoming the best baker!
Thank you, Dannii!
So much great information about baking! I especially like how you explain different ways of measuring ingredients.
Thank you, Biana